Counter-Pressure Bottling Techniques
Back when I was a graduate student in Boston, I threw a lot of homebrew parties at my apartment on Common-wealth Avenue. I remember explaining over and over to my party guests that they had to pour the beer into a glass because of the sediment in the bottles. I must have given that speech 50 times every party night. If only so I could have relaxed and enjoyed my parties, I wish I could have served my homebrew from sediment-free bottles back then.
Later on, I got a kegging system that allowed me to serve sediment-free homebrew, but my bottled beer still had the yeast sediment from bottle conditioning. Finally, I learned of a procedure that allows homebrewers to produce sediment-free bottles — counter-pressure bottling.
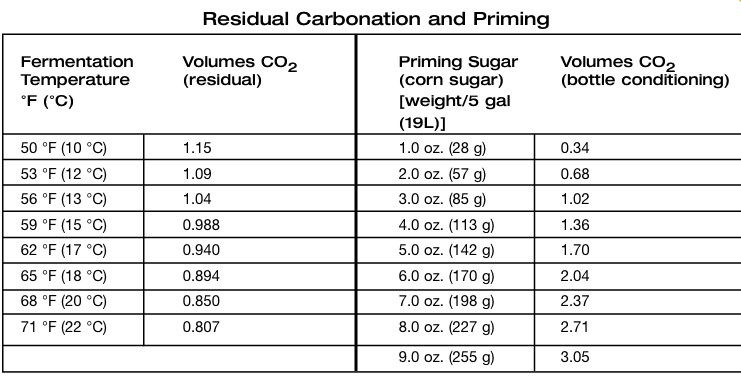
In counter-pressure bottling, finished beer is moved from a keg to a bottle. No sugar is added at bottling and the beer doesn’t need to bottle- condition to carbonate. If the kegged beer is sufficiently conditioned, you will have clear, carbonated beer in the bottle . . . and no yeast sediment.
The main challenges of counter-pressure bottling are to retain the beer’s carbonation and minimize its exposure to oxygen during the transfer. When performed correctly, almost all of a beer’s carbonation is retained when it is counter-pressure bottled. Likewise, with a little practice, the beer can be transferred with minimal exposure to oxygen. Oxygen speeds staling reactions in beer. So, the less oxygen your beer encounters, the longer it will taste fresh.
Advantages
There are several benefits to counter-pressure bottling beyond saving explanation time at parties. The yeast in homebrew bottles is a minor inconvenience for homebrew served at home, but it can become a major problem when you try to transport or ship homebrew. Yeast gets disturbed and it takes time, sometimes a couple of days, to settle back down. And even then, the beer may take on some off-flavors from the roused yeast. Many homebrewers buy a counter-pressure filler just for shipping beer to contests. With counter-pressure bottling, you can also bottle the last few beers from a keg (the “keg dregs”) to make room in the fridge for fresh kegs.
Disadvantages
One drawback to counter-pressure bottling is the initial cost. Counter-pressure fillers cost around fifty dollars, and you need to have a kegging system. In addition, counter-pressure fillers have interior spaces that can’t be seen by the homebrewer. Unless you clean the filler thoroughly after each use, deposits can build up inside the unit. Like the crud that forms in tap lines, you don’t want this stuff touching your beer. Soaking the filler in TSP or PBW immediately after use, then rinsing thoroughly with hot water, should keep everything clean.
Bottling beer with a counter-pressure filler takes a little more effort, especially with regard to set-up, than standard homebrew bottling. However, few homebrewers with counter-pressure fillers bottle the entire keg, as this would be time-consuming. Instead, only a few bottles — usually for bringing to a party or shipping to a contest — are filled. The rest of the beer is dispensed from the keg.
Connecting the system
To set up your counter-pressure system, you’ll need your counter-pressure filler, a keg of beer, a CO2 tank and the required connecting tubing. (Your filler should have all the necessary tubing supplied when you buy it.) To begin set-up, take the filler and close all the valves. Likewise, turn the gas off on your CO2 tank. Unless you like the sight of beer spraying or the sound of CO2 hissing, don’t connect the filler to anything until you’re sure all the valves are closed. Connect the CO2 tank to both the keg and the filler. This is usually done by splitting the gas-out line with a “T” connector. One line goes from the CO2 tank to the “in” connector on your keg (as usual); the other connects to the filler. Finally, connect the beer-out line from the keg to the filler. (Some counter-pressure fillers require the beer to flow downhill into the bottles. If this is the case with your filler, elevate the keg above your bottling station.)
The keg of beer should be cold, carbonated and conditioned. The colder the beer is, the better. Carbon dioxide (CO2) dissolves more readily in cold beer, so you will have fewer problems with foaming (from CO2 breakout) in cold beer. Ideally, your keg should be around 32° F (O° C). (The freezing point of normal-strength beers is slightly lower than this. Stronger and sweeter beers have a freezing point significantly below this.) Since some carbonation is inevitably lost during the process, your beer should be fully carbonated. You may, in fact, want to slightly overcarbonate your beer prior to counter-pressure bottling to compensate for this loss. To do this, simply increase the CO2 pressure by two to three psi overnight. Don’t go nuts with the carbonation, however, unless wrestling with wildly foaming beer bottles is your idea of a good time.
It’s always good to have a couple hand towels or a roll of paper towels on hand, as it’s relatively easy to spill a little beer while counter-pressure bottling. You’ll also need your bottle capper, caps and — of course — clean and sanitized bottles.
Bottling the beer
Once the filler is connected, check again that all the filler valves are off and open the valve on the gas cylinder. Opinions differ on how much pressure should be applied for counter-pressure bottling. I’ve seen pressures from 3–15 psi recommended. Lower pressures allow you to fill the bottles slowly, but CO2 can break out of solution fairly easily when beer enters the bottle and is exposed to a lower pressure than the level at which it had been conditioned. Higher pressures move the beer faster, but the filler is more likely to pop off the bottle while filling. And the beer can suddenly start foaming when the filler is pulled off and the beer experiences a large pressure drop. I usually just leave the pressure at the level at which the keg was conditioned, usually somewhere between 8–12 psi, depending on the beer style.
Purging the bottle
The first step in counter-pressure bottling is to fill the bottle with CO2, displacing the air that was formerly there. Filling the bottle with CO2 first will minimize the amount of oxygen the beer encounters during the transfer.
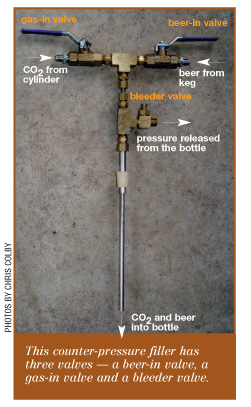
To fill the bottle with CO2, place the filler on the bottle and make sure the stopper is securely positioned in the opening of the bottle. Next, open the gas-in valve and then crack open the “bleeder” valve. Once the bleeder valve is open, you’ll hear the gas hissing and the bottle will begin filling with CO2. Gas from the cylinder is flowing through the filler tube to the bottom of the bottle. Since CO2 is heavier than air, it will form a “blanket” on the bottom of the bottle. As this “blanket” rises, it displaces the bottle’s existing air (approximately 20 pecent of which is oxygen) and forces it out of the bleeder valve.
After 10 or 12 seconds, the bottle should be full (depending on how far open you cracked the bleeder valve). You can’t see CO2, so you’ll just have to estimate how much CO2 is enough. I try to think of how much gas escaping the bleeder valve it would take to fill a balloon the size of the bottle I’m filling. Once the bottle is “gassed,” close the bleeder valve first, then close the gas valve on the filler. (The valve on the gas cylinder remains on throughout filling.)
Transferring the beer
The second step in counter-pressure bottling is to fill the bottle with beer. The filler’s tube extends almost to the bottom of the bottle. So during the transfer, the bottle is filled from the bottom, under a blanket of CO2. This minimizes foaming and aeration, because there’s always bound to be some stray oxygen in the bottle, even after it’s purged with CO2.
To fill the bottle, open the beer-in valve. Beer will not start flowing yet because the pressure in the bottle is equal to the pressure pushing the beer. Counter-pressure bottling is named for the opposing pressures at this stage. To get the beer to flow, crack the bleeder valve. Once the bleeder valve is opened, the pressure in the bottle will decrease and the beer will start to flow. The farther you open the bleeder valve, the faster the beer will flow. You should aim to fill the bottle slowly enough that foaming is controlled. A little foam on top of the beer is OK, good even, but the bottle shouldn’t quickly fill with foam. Once the bottle is filled, close the bleeder valve first, then close the beer valve on the filler.
If you are using a gravity-flow counter-pressure system, the beer will start flowing (downhill) immediately after opening the beer-in valve.
The pressure difference between the keg and the counter-pressure relief valve should ideally be about 3 psi. With this pressure differential, you can fill a bottle in 5–10 seconds. Of course, in the absence of modifying your bottler with a gauge, you’ll just have to estimate this differential from your fill rate. Try opening the beer-in valve until the beer just foams, then close the valve a bit and aim to fill the bottle within 5–10 seconds. You can fill the bottles to the level of commercial beers, or you can go a little higher. Either way gives good results.
Capping
The final step in counter-pressure bottling is capping. Capping should be done as quickly as is feasible. Cap each bottle right after filling it rather than filling several bottles, then capping them all. While the bottle is uncapped, carbonation is being lost and the beer is being exposed to oxygen. The loss of carbonation is relatively slow, of course. Think about opening a bottle of beer. The carbonation dissipates over time, but your beer doesn’t instantly go flat. So move quickly during this step, but don’t worry overly much about it.
To begin capping, check that all the valves on the filler are closed. If any of the valves are opened, you will lose beer or CO2 when you take the filler off the bottle. I also take the time at this point to ensure that I have a bottle cap and my capper ready. Remove the filler from the bottle and it set aside. Now quickly place a cap on the bottle and crimp it closed with your capper.
Ideally, you should try to cap over foam. When foam rises in the bottle, it displaces the gas above it. In doing so it displaces any oxygen in that gas. While filling, adjust the flow rate so a bit of foam forms on top of the beer. Once you remove the filler, the beer will likely start foaming some more. Place the cap on top of the bottle and wait for the foam to rise to the top, then cap. You may need to lightly hold the cap on with your finger to stop it from being knocked off while the foam is rising.
If the beer is not foaming, you can either just cap the beer or try to induce foaming. To induce foaming, take another beer bottle and lightly tap the top of the just-filled bottle. Be careful, though — if you hit the bottle too hard it will foam uncontrollably. (If you’re like me, you’ve probably seen this performed as a prank, turning the victim’s beer into a geyser.) This takes a bit of practice. Don’t try it unless you are willing to risk losing some beer and having a mess to clean up.
Conditioning
Counter-pressure bottled beer can be served immediately. You will notice, however, that newly-bottled beers won’t make the “phsst” sound of escaping gas when opened. Initially, the gas pressure in the bottle’s headspace is equal to the atmospheric pressure at the time the beer was bottled. Over time, CO2 from the beer will diffuse out of solution and pressurize the headspace. This is why some homebrewers feel that it is best to minimize the amount of headspace in the bottles. The smaller the headspace, the less carbonation is lost from the beer to pressurize the headspace.
At first, counter-pressure bottling can seem complicated. There’s tubing running all over the place and four valves (counting the main valve on the CO2 tank) to keep track of while filling. Just keep in mind that, any time you’re unsure of how to proceed, you can turn all the valves off and figure it out or look it up. Also keep in mind that all the valves should be closed whenever you hook up the system and whenever you take the filler off a bottle. Although counter-pressure bottling initially seems complicated, it will seem like second nature once you’ve done it a couple times.