Better Beer with Extract Kits
 So you’re a kit brewer, or perhaps you want to start brewing with kits. Maybe it’s your first brew or you’ve brewed several and are still getting things down before venturing into grain brewing, or you’ve decided that you like kit beer and are happy to stick with them. If any of these descriptions fits, here are a few helpful hints that will make your kit brewing experience more rewarding.
The first thing to consider about your beer is that (cue spooky music)—it’s alive! Making beer means taking this nutrient-rich stuff, wort, introducing yeast, and then letting the yeast grow. The growing yeast—not to get too literal about this—coughs and burps alcohol, carbon dioxide, and yeast-derived flavors into the beer.
If everything is going right, these flavors will be enjoyable. However, the wrong type of yeast—or worse, bacteria—will give the yeast indigestion and produce beer with off flavors. The goal is to successfully introduce brewing yeast into the wort while keeping unwanted life forms out. This means that all the equipment must be sanitized, and air-borne contaminants must be kept out of the brew.
An important fact about yeast is that they produce different flavors depending upon their concentration in solution (called pitching rate), the temperature of fermentation, the amount of oxygen in the solution, and most important, the yeast strain itself. This means that yeast selection is critical.
Ingredient kits come with yeast under the lid, but dry yeast only lasts for a specific period of time if it’s not refrigerated. To make sure you’re not going home with a packet of yeast that won’t do the job, check the freshness date on the package. If it’s past the freshness date or doesn’t have a date, buy some fresh yeast. After all, it is fairly cheap.
You also need to use the right amount of yeast. A good rule is to use 10 to 15 grams of yeast for five gallons of wort. Don’t be surprised if you have to buy extra yeast, as most kits don’t enclose this quantity. If you want to get out of dried yeast, there are many liquid varieties out there. However, dried yeast can work fine. Ask the homebrew store owner for suggestions.
The No-Sugar Diet
Many kits recommend adding table sugar to boost the wort’s original gravity. Throw this suggestion out. Even the big breweries that use adjuncts such as rice and corn would never use refined sugar in large quantities. White sugar in large doses gives beer a distinct and unpleasant cider flavor.
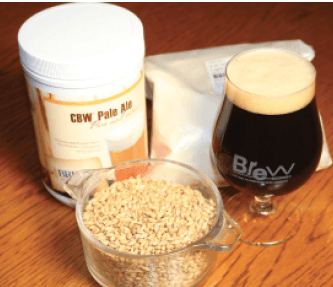
The preferred substitute for sugar is dry malt extract (DME). DME is unhopped wort that has been spray dried into a powder. Substitute DME pound for pound for white sugar. This will give you an all-malt beer if the kit is all-malt.You can also use unhopped malt syrup. However, this ingredient should replace white sugar in a 1.25 to 1 ratio. In other words use 1.25 pounds of malt syrup for every pound of sugar called for in the recipe.
At this point the brewery is clean, we’ve got healthy yeast in hand, and the wort is all-malt. Good brew is in sight!
Water, Water…
The number one ingredient in beer isn’t malt or hops, it’s water. Beer is 95 percent water, and the quality of the water you use matters. Chlorine-free water is recommended for all brewing because chlorine can create off flavors. All-grain brewers also have to worry about salts in the water, because they have a major effect on the pH of the mash. Since you’re not mashing, good tasting, chlorine-free water is all that is needed. Charcoal-filtered tap water or bottled water will do the trick.
Double Bubble…
Wort boiling has many purposes in brewing, not the least of which is sanitation. Fortunately the wort in kits has been boiled during manufacture, and all of the positive goals of boiling have been achieved. However, when the wort is poured out of the can and mixed with water, which may carry spoilage organisms, it is no longer “sterile.” Therefore, it’s a good idea to boil the mixture for at least 10 minutes to re-sterilize it, but this advice is not given by many kit manufacturers. Perhaps they don’t want the hop aroma of the kit to be driven off by boiling. If you need the hop aroma, boil your mix and add 1/4 ounce to one ounce of aroma hops at the end of the boil. This gives your beer a good hop nose and satisfies the desire to have everything as clean as possible.
Brew Day
The step-by-step instructions that follow can be used for almost all hopped beer kits.
- Start the day by getting all of the necessary equipment laid out. You’ll need a brew kettle (2-3 gallon pot), a metal mixing spoon, a large metal funnel, a fermenting vessel, an airlock, and a strainer if using aroma hops. All of the equipment should be sanitized by placing it in a sink with a cool sanitizer solution such as scent-free chlorine bleach or an idophor solution (don’t use too much chemical). Leave the equipment here until you need it. Since the fermenter probably won’t fit in your sink, you can put the sanitizer in your clean fermenter to coat all surfaces. Utensils should not be rinsed before using; just let the solution drip free from the surface.
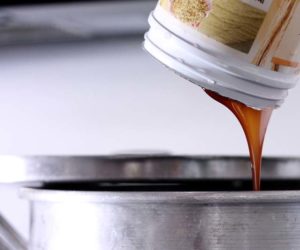
- Remove paper labels from the kit can and soak the can in hot water to soften up the extract. This will make it much easier to get out of the can.
- Determine how much water needs to be added to the kit. There will probably be two amounts listed. One will be for initially diluting the syrup, and the other will be for topping the fermenter off once you’ve finished boiling. Boil the latter quantity for five minutes, cool it a bit by putting the pot into a sink of ice water, and then transfer it to your fermenter using the funnel. Place the fermenter in a cool place, preferably a refrigerator or cooler, for later use. The purpose of this is to sterilize and cool your water. Later you’ll use it to cool the wort.
- Remove the syrup from the hot water bath, open the can, and pour it into the brew kettle. Make sure to get all of the syrup out of the can. The kit will call for some water, one to two gallons, to be added to the syrup at this point. Use some of this water to clean out the can of all syrup.
- This is the point where some can directions may wander. If the directions call for sugar, add your DME or malt syrup. Give this mixture a 15 minute boil. If you want a nice hop aroma, add the 1/4 to one ounce of aroma hops at the end of the short boil. Cover the pot and place it in an ice water bath to cool it down—the temperature should be close to your yeast-pitch temperature (see number 5)—before moving the wort to the fermenter, which should contain the water you cooled earlier. During the transfer to the fermenter, it is all right to let the wort splash into the fermenter. This helps aerate the wort and will give the yeast the oxygen they need to begin growing.
Mix the wort with the water in the fermenter by gently swirling the vessel. If you’re using a glass carboy, fit aluminum foil over the mouth. This further aerates the wort, since oxygen from the atmosphere can still enter. Once it’s mixed you need to get an idea of the temperature. If you’re using an ale yeast, it should be added to 70°F wort; 55°F for lager yeast. Most kits come with ale yeast. - It’s now time to pitch the yeast. It is best to rehydrate the dried yeast before pitching into the wort. To rehydrate, simply take about one cup of boiled and cooled water, about 80° to 90°F, and sprinkle in the yeast (10 to 15 grams for a five-gallon batch). It is rehydrated after 10 to 15 minutes. Pour this yeast slurry into your fermenter. Be careful when pouring it to practice sanitary techniques. Once the yeast is safely in the fermenter, fix the airlock or blow-off tube in place.
- Place your fermenter in a cool, dark place for fermentation. If you’re working with ale yeast, the fermentation temperature should be between 65° and 75°F. For true lager yeast it should be no warmer than 58°F.
The reason that temperature is so important lies in its effects on yeast performance. During fermentation yeasts take in sugars from the wort and produce alcohol, carbon dioxide, and many flavor compounds, some good and some down-right nasty. If the fermentation temperature is too warm, your beer will have an elevated flavor profile, and many of the nasty flavors will become quite obvious. In fact some of these compounds, known as higher alcohols, are infamous for producing killer headaches. The other fermentation flavor group is esters, which contribute negative fruity and solventy characters to beer (ethyl acetate, or finger nail polish remover, is the most prevalent beer ester).
Fermentation should last between three and 10 days depending on what you are fermenting. It is important to identify when fermentation is complete. The first indication is appearance. If you’re using a glass carboy, you can see when the beer begins to clarify from the top. This is an indication that fermentation is complete. To confirm your observation take a hydro-meter reading at this point and check it again in 24 hours. If there is no difference in the gravity, fermentation is over (unless there is a hung fermentation). Don’t take too many samples; you risk contaminating the brew with each one. Plus, you lose a certain amount of precious beer with these checks. It is important to check, however, since bottling beer that’s not done fermenting will result in over-carbonation or even homebrew grenades. - Once fermentation has ended, allow the beer to naturally clarify before transferring it to your bottling bucket. The best way to achieve natural clarity is to move the fermenter into a refrigerator. This will cause the yeast to rapidly drop from solution and will also cause chill haze to form and precipitate. If you clarify in a refrigerator, take note: As the head space of the fermenter cools, a vacuum is created and the liquid contents of your airlock will be sucked into your beer. To prevent this from happening, remove the airlock and cover the carboy with several layers of aluminum foil, then wrap masking tape around the neck. This will allow enough air into the carboy to equalize the pressure. Once the beer is at refrigerator temperature, you can replace the airlock. Let it clarify for about a week.
- It is now about two weeks since brew day, and you’ve got five gallons of flat, clarified beer that has called the fermenter its home since conception. You now must gently pry the brew from its fermenter and relocate it to a bottling bucket. This procedure, best accomplished with a racking hose, must be done without disturbing the stuff that settled to the bottom of the carboy and without aerating during transfer. Aerating at this point causes oxidation and damages the beer flavor; stirring up the yeast and trub (the leftover residue) at the bottom defeats the purpose of clarification and will also adversely affect the beer’s flavor.
- You’re home free now. All that’s left to do is to add between 3/4 and 1 cup of corn sugar to a small sample of the beer in a saucepan, bringing it into solution by gently stirring while applying heat. Take this solution and carefully add it to the bottling bucket, give it some very gentle splash-free stirs, and it’s time to bottle. Once the beer’s in the bottle, store it at room temperature for one week and then transfer it to the cellar for 1 or 2 weeks of aging. It’s now 4 to 5 weeks after brew day, and you deserve a cold one!