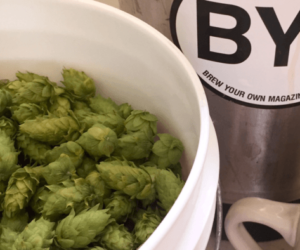
The Key to Better Lager: Cornelius Kegs!
 Porter, stout, pale, stout, weiss, pale, stout, porter. Is that what you see when you peruse the pages of your brewlog? Wouldn’t you like to also see pilsner, bock, Märzen, doppelbock, and other bottom-fermenting beers in that log as well?
Making lagers can be a challenge for any homebrewer. If yours taste fine but lack that refreshing quality and the smoothness generally associated with a lager, you are not alone.
One of the real challenges for the homebrewer is temperature control. Ales can be fermented at a great range of temperatures while maintaining a desirable balance of flavors. Lager yeast is much more temperature reliant, and controlling the fermentation temperature is the most common problem in producing lagers and some colder-fermenting ales.
Pale ale, for instance, often suffers from too much diacetyl (a buttery flavor). This is generally a result of fermenting at a temperature not appropriate for the particular yeast strain.
A common conclusion for those who live in an area that gets hot and/or humid during the summer (in other words, almost everyone who lives in the US) is that lagers and some ales can only be made in the wintertime. Summer stalwarts, meanwhile, search their homes with thermometer in hand, looking for the most suitable resting spot for their carboy filled with lager, then pray that the temperature will hold steady. The irony of all of this is that these spots are generally in front of a drafty door or window that really should be fixed but not at the loss of a good lager.
The sensible choice is to have a controlled fermentation room that holds a few fermenting vessels and can be monitored, the temperature adjusted if necessary. This is both possible and practical thanks to that wonderful invention, the refrigerator.
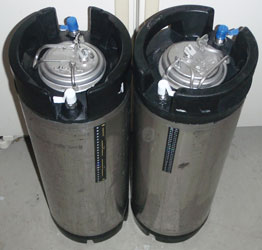
A typical fridge, though, does have its drawbacks. For one, it is not always easy to fit a couple of carboys in a refrigerator. That’s why on the eighth day (brew day), God created the cornelius keg.
Fermenting in Keg
What better vessel could you find for fermentation than the cornelius keg? Just think about it: What do breweries ferment in? Stainless steel, right? Corny kegs are made of stainless! How do breweries move beer? They pump it. (Wait, don’t they have huge racking canes with some guy sitting at the end sucking on a tube to start the siphon?…Nah.)
At home you can do much the same things. By pressurizing the keg, you can “pump” the beer from one vessel to another. The only real downside to using the cornelius keg as a fermenter is its size. But if you are making five-gallon batches, there is no problem.
These kegs are very common and often inexpensive. The hardest part can be finding a source for them, but once you find one you will most likely end up with more kegs than you could ever use.
Very little modification (if any) is needed to ferment in a cornelius keg. First you must decide if you are going to rack the beer from the primary into the secondary under pressure or use a racking cane. If you choose to rack under pressure, you will want to shorten the dip tube in the keg. The dip tube goes to a small bowl-like indentation at the bottom of the keg, thus allowing you to serve every last drop of beer.
Leaving the tube at its full length will cause you to rack every last drop of yeast and trub from one keg to the next, rendering the rack useless. The dip tube should be cut so that its length is about 1/2 inch from the bottom of the keg (see Figure 1).
Kegs and Oxygen
Using kegs as fermenters works basically the same as using carboys except for one advantage. Kegs make it much easier to avoid oxidation. Before you fill any keg, attach it to your carbon-dioxide tank and with the top of the keg off, inject the keg with CO2 for about 45 seconds. CO2 is heavier than oxygen and will fill the keg from the bottom up regardless of which tappet you hook to. Always do this before you rack.
For proper oxygenation of wort prior to fermentation (and after cooling), fill the keg with O2 or air and allow the wort to splash into the keg when racking. After filling the keg with wort, open the check valve at the center of the cover and shake the keg a few times. Close the valve and attach the airlock.
Airloc
When fermenting in the fridge you need a special airlock. It is pretty simple to make. Some of the parts were described in the article “Keg Cleaning Made Easy” (BYO, February ’96). The idea behind the airlock is to vent the CO2 produced during fermentation to the outside air rather than just into the refrigerator.
The biggest reason for this is to prevent the build-up of dangerous CO2 in your fridge. If too much CO2 accumulates, it can cause unpleasantness and even injury when you open the door. An outside airlock also keeps your refrigerator from smelling like a closet where someone came to hide after eating too many burritos.
Airlock parts
- 2 1/4-inch flare nuts.
- 1 Length of 1/4-inch plastic tubing.
- 1 1/4-inch male flare to 1/2-inch
female pipe thread. - 1 1/2-inch female pipe thread to
3/4-inch compression fitting. - 1 Length of 3/4-inch inner diameter
(I.D.) plastic tubing. - 1 Length of 3/4-inch copper tubing.
- 1 Airlock.
- 1 Piece of hose gasket material.
The first step is to make flare fittings (described in more detail in the February ’96 article). Take the 1/4-inch tubing and cut it into two lengths of two inches each. Using a flaring tool, flare one end of the tubing. Slide on the flare nut. This is your flare connector. You can also buy the flares already made from hardware stores and some homebrew supply stores for $1.99 to $3.99 each.
Assembly
- Bend the 3/4-inch coppertubing to form a 90-degree angle and then cut each side to about four inches in length.
- Insert airlock into 3/4-inch plastic tubing.
- From the outside of the refrigerator, drill a 1/2-inch hole through the side of your refrigerator about two to four inches above the height of your kegs.
- From the inside of the fridge, drill a one-inch hole at the same location through only the interior plastic.
- Insert the 1/2-inch male pipe thread into the hole with the 3/4-inch compression fitting on the outside of the refrigerator.
- Cut a piece of hose gasket material about one inch by one inch with a 1/2-inch hole in the center. Slide this around the 1/2-inch fitting from the inside of the refrigerator (you will have to remove some of the insulation material).
- Screw the 1/2-inch pipe thread and 1/4-inch flare fitting onto the 1/2-inch pipe thread on the inside of the refrigerator. You may have to use a few layers of gasket material to achieve a snug fit.
- Insert the 3/4-inch copper tubing (previously bent) into the compression fitting.
- Affix plastic tubing and airlock onto the copper tubing.
- Make a small hose with 1/4-inch flare fitting on both ends to attach between the airlock fitting and the keg quick disconnect. The shorter the better. This will be attached to the keg’s CO2-in poppet (not the beverage-out dip tube side).
That’s it for the air lock. Of course if you choose to use the airlock within the refrigerator, assemble the airlock to fit your needs.
Temperature Control
This is where the refrigerator or chest freezer comes in (yes, you can also do this in a chest freezer). It makes good sense to have a separate refrigerator for fermentation, but space can be a problem. Money should not be a concern when it comes to refrigerators for draft systems or
fermenting. Used refrigerators can be had for next to nothing and often free.
If you have a draft system, you can also use that refrigerator for fermentation as long as you don’t mind drinking your draft beer at temperatures between 50° and 65° F. If you make traditional-styled ales, 50° to 60° F is a very nice serving temperature to experience the aromas and flavors of your current masterpiece. Still, most Americans drink their beer rather colder. So do what you must.
Building your own thermostat is very simple and inexpensive. You need a regular household thermostat, the kind with a thermometer reading on the bottom and a temperature setting on the top (or vice-versa). If you have upgraded your old home thermostat to a computerized setback type and kept that old one, you’re in luck. If you still use the old type, this is really good excuse to upgrade; what’s good for your beer is good for your house.
The thermostat is the key to the whole system. It works by shutting down your refrigerator or freezer at a specific temperature. (If you don’t want to go to the effort of building one, a refrigerator thermostat can be purchased for $40 to $60 at good hardware stores and some homebrew supply stores.)
Thermostat Parts
- 1 Thermostat control (household type)
- 1 120-volt-to-12-volt transformer.
- 1 Relay switch
- 1 Outlet
- 1 Length of two-core bell wire
- 1 Length of electrical zip cord wire.
- 2 Male plugs.
Assembly
- Attach bell wire leads to thermostat.
- Attach one wire to the transformer and the other to the relay.
- Run a wire from the open lead on the transformer to the open lead on the relay.
- Attach the relay out to the outlet with the zip cord.
- Attach the transformer to another length of zip cord and attach a male plug.
- Attach a length of zip cord to the relay and attach a male plug.
The thermostat goes inside your refrigerator (or freezer). Both thermostat plugs and fridge plug should be plugged into an outlet. Turn your refrigerator (or freezer) to its maximum setting and set your new controller to the desired temperature.
Always be careful when dealing with 120-volt circuitry and follow local and state building codes. If you have questions, an electrician or someone at your local electronics store should be able to help.
You should now be able to perfect your beers with a constant and exact fermentation temperature.