Build a Keg Lid Carbonator: Projects
Kegs, those old soda containers made by Cornelius, Firestone, and Spartanburg, appear in many brew houses around the time the brewer thinks “I really hate bottling,” “I’m serious about this hobby,” or “my brother’s birthday party is around the corner.”
Kegs are convenient, both for beer and homemade sodas for the kids. Kegs are available new and used from many local homebrew shops, some internet shops, or may be found in the basements of old restaurants and bars. Kegs discovered in salvage yards are often there for a good reason — don’t buy damaged kegs unless they are for other projects! Once cleaned and checked for leaks (a whole ‘nother story or three), see February 1996, September 1997 or May 2003 BYOs) the question is, “how do I get the bubbles into my brew?”
About carbonation in kegs: methods
Carbonation is a natural phenomenon. Every homebrewer has used fermentable sugars, whether pure corn sugar, molasses or malt extract, to create carbonation in the bottle.
Kegs can be easily carbonated in exactly the same way, but usually with about 15–20% less fermentables added; this is primarily due to the fact that there is less headspace in a keg than there is in a couple cases of bottles. Also, Kegged beer is hard to pour when carbonation is above approximately 2.5–2.6 volumes. Bottled beer on the other hand, is much easier to pour, even when the carbonation is 3.0 or slightly higher. German weizens and Belgian ales have different CO2 levels in the bottle versus the keg exactly for this reason.
The alternative carbonation method is “forced carbonation.” Carbon dioxide, under pressure, is added to the keg. After a suitable time — it varies with temperature and pressure — CO2 has dissolved into solution.
While most homebrewers simply pressurize their keg and wait a few days for the correct volume(s) of CO2 to dissolve (see volumes chart in the 2000 BYO Reference Guide), others have discovered the value of bubbling their gas through the beer using a 2–5 micron sintered stainless steel carbonation stone. This is the same kind of stone many of us use when oxygenating sweet wort prior to pitching a healthy quantity of viable yeast.
Microbrewers and craft brewers also use stones to aerate wort with oxygen and to speed up the process of carbonation. Advocates of stones claim two benefits when carbonating; reduction of time to carbonation, and the better creation of those dancing bubbles we all prize so highly.
Why do carbonation stones save time? If the CO2 is simply filling the empty headspace of a container, it has a surface contact equal to pi times radius squared (πr2). But if CO2 is bubbled up from the bottom of the tank, it has the external surface area of each bubble. That provides thousands of times more contact area. Thus the CO2 is more easily and quickly absorbed.
Carbonation stones are available from a number of homebrew supply shops. By far, the easiest way to employ a carbonation stone is to purchase a stone joined to a stainless steel tube. You’ll need one for every keg you own. Connect the stainless tube to the gas-in dip tube with a 2-inch (50 mm) length of beer tube. Wait a minute! I have six kegs, so that would cost thrifty me $150 to equip my kegs!
Surely there is a way to avoid this expense — can we assemble a device that can carbonate multiple kegs? You bet; we propose modifying one keg lid and using it for the kegging stage of all of your beers, then racking the well carbonated brew into your various kegs for dispensing. For $125 in savings, I’ll do just that.
Using barbed fittings will require you to make a thick, approximately 1/4-inch or 7 mm, washer. This is because the threads, male and female iron pipe threads, do not join flat-to-flat.

I realized that substituting a gas-in ball-lock (or pin-lock) fitting (new or used) to connect to the keg’s CO2 source would be much more effective. Either method requires a lid, female barbed hose fitting, a bit of ordinary beer hose, a carbonation stone and some hand tools.
Parts List
MIP barbed adapter 1/4″ x 1/4″ $1.50
#10 O-ring $0.47
Teflon tape or NSF teflon pipe dope $1.00
Gas ball-lock connector $4.50
Gas-in keg connector (used) $6.00
Requires Poppet $2.50
O-ring $0.50
Tool list:
Drill bits: 1/8″, 1/4″, 1/2″
Drill motor
Round files (or rotary grinder)
Adjustable wrench or deep sockets
Step-by-step
Begin with a spare keg lid that is in good condition, particularly at the edges where the O-ring seals. If there is any damage, file it smooth or straighten it. Then, before you begin modifications, remove any pressure relief valve to prevent damage from heat or accident.
If you own a TIG or MIG welder, you may prefer to weld in a stainless steel male gas-in assembly cut from a discarded keg. For this project I’ll keep the arcs and sparks out of the picture and apply a more universal solution; a brass 1/4″ MIP barbed fitting and #10 (11/16 x 1/2 x 3/32) O-ring, plus a used ball-lock (pin-lock) connector.
After dissembling the lid, drill a 1/8″ (3 mm) pilot hole approximately 1″ (25 mm) from the edge and centered. You must avoid the bail (closure) entirely. Opinions vary about the proper procedure for drilling stainless steel. I’ve found that medium pressure, low speed and titanium drill bits (as opposed to ordinary high speed steel) work best.
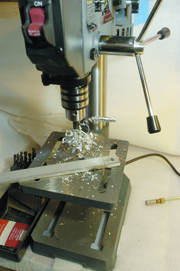
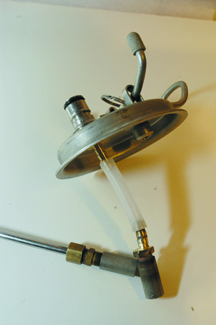
Enlarge the pilot hole to 1/2″ to fit the Male Iron Pipe (MIP) threaded barbed adapter in two or three steps. This 1/2″ (approximately 13 mm) hole will not permit the fitting to slip through. You’ll have to enlarge it with a file or rotary grinder. Once the hole is large enough, sanitize all the parts with liquid sanitizer. Don’t use heat as there are tiny O-rings inside the ball-lock (or pin-lock) connector. Slip the O-ring over the MIP adapter and screw it into the ball-lock fitting. To seal the keg lid — it has to be gas tight — use an NSF approved thread sealant like teflon tape or teflon pipe dope. That, with the O-ring, will ensure a gas-tight connection.
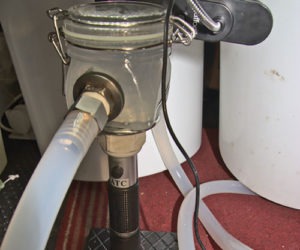
Once the lid is completed you must make a decision. Carbonation stones are available attached to a stainless steel tube, or joined to a MIP barbed adapter. If you purchase a tube or stone, join it to the MIP fitting with 2–3″ (50-75 mm) of beer tube. This flexibility allows you to get the tube into the keg; the lid and tube have to bend almost 90° and slide perpendicularly into the cylinder.

Alternatively you could purchase the stone and barbed fitting (both are shown) and use stiff polyethylene tubing to make any required length. You need the stiffer tube to prevent the stone from floating up in the keg — the stone belongs close to the bottom for maximum performance. The only consideration is your ability to sanitize the stone and tube.
Preventing contamination with sanitation
The only times I’ve had beer go bad, sanitation was involved . . . poor sanitation, that is. A stainless steel carbonation stone is like a stainless steel sponge: A hiding place for all kinds of nasty organisms.
To sanitize, first you will need to disassemble your lid, removing the stone, the stainless cane and its barbed fitting from the flexible tube. Simply pushing a sanitizing solution through the stone and tube, regardless of duration or direction is not enough.
The stone and the stainless steel should be boiled for at least 20 minutes and then soaked in sanitizing solution (StarSan solution will suffice). To be even more thorough, you can pump the sanitizer and rinse water through the stone and metal tube. Of course, the plastic tube, flexible or not, can be sanitized in a liquid sanitizer, or just replaced.