Make Your Own Spindle Tap Handles: Projects
Make Your Own Tap Handles from railing spindles
Every few issues we get a request for something easy enough to build on a Saturday afternoon. Tap handles are just such a project and I built one in less time than it took for the University of Michigan football team to defeat my hometown Michigan State Spartans.
Why would you make your own tap handle when there are so many available? Because tap handles actually belong to the brewery (unless legitimately purchased) and because having your own tap handle, unique in every way, is totally cool.
Tap handles can be incredibly complex or blindingly simple. I researched tap handles at my local homebrew store, where a collection of 100 tap handles greets patrons of The Red Salamander. All had several things in common, whether made of wood, cast in acrylic, or some odd combination of the two. All were more than 6 inches (15 cm) long; all had a tapered ferule and all had the ferule attached via a “hanger” bolt.
At its most basic, a tap handle is a wooden stick with two pieces of hardware. Sticks I know about. But where to get the hardware? MoreBeer.com offers both hanger bolts (easy to find and cheap at under $1) and more difficult to find ferules. Ferules are $3.25, exclusive of shipping.
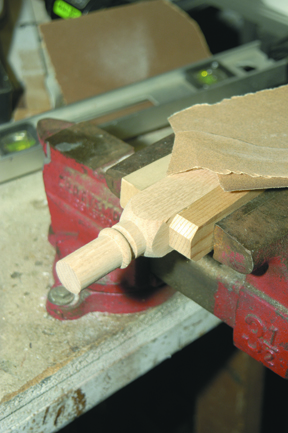
Now for the stick. The long stick is simply a wooden spindle meant for constructing new stairs. It suits our purposes precisely. While making logs into sticks is a very fun task involving saws, lathes, chisels and everything in the wood-working toy chest, it is best left to woodworking hobbyists. Most home stores stock rails and spindles, so why do the work? You are trying to get in and out of this project in an afternoon aren’t you?
I bought a single oak spindle for a few bucks (USD). It was roughly 2 inches square (50 mm) and had a long spindle and multiple turnings near each end. So for about $12 I had enough materials for two tap handles!
What to buy
The following is a list of supplies that you will need to purchase for this project: one spindle, one or two ferules, one or two hanger bolts. You’ll also need a drill, sand paper, a decorative object or two and some paint or varnish to finish the wood.
Step by Step
Step One:
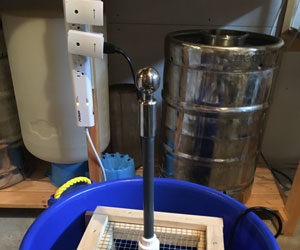
Decide on the length of your tap handle, choosing a separating point near one of the turnings. Cut there, and remove some of the square length (assuming you have extra) to create your ideal length. For this project, I wanted a decorative finial to adorn the top of my tap handle. You may prefer a wooden plaque holding your own custom label like Redhook places atop their distinctive yellow handles.
Step Two:
 Sand the wood lightly. Oak, the wood I chose, is open grained and should be sealed. Any imperfections should be sanded out or filled and sanded. If you will be painting your tap handle, multiple coats are required to recreate shining, glossy tap handles. Sand lightly between coats. If you appreciate wood like I do, choose a stain and a clear finish and follow the manufacturers’ directions. Other options for decoration include wood burning, application of custom labels under clear finish (decoupage) or applying metallic objects. I chose a mushroom-shaped drawer pull.
Step Three:
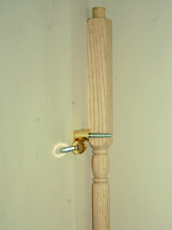
Insert the hanger bolt. Hanger bolts have a wood screw on one end and a typical bolt on the other. Find the absolute center of your tap handle’s end and mark it, then use a sharp prick punch to start a pilot hole. Drill a pilot hole, 1/8 of an inch in my case, then enlarge it to fit the hanger bolt. In the U.S. hanger bolts suited to tap handles are 5/16-inch by two inches. I do not know what the metric world has to offer — sorry. Your final hole should be 1/4-inch, or you will, as I did, split the wood. Drilling a 1/4-inch pilot hole for a 5/16-inch screw leaves just the threads cutting into the wood. Another tactic for preventing splitting is to wrap the end with several turns of wire while inserting the wood screw.
As there is no slot for your screwdriver, use a technique called double nutting to turn the screw. Run one 5/16-inch nut onto the shaft of the screw, then another, and tighten the two together, then use the nuts to drive in the screw. Remove the nuts and screw on the ferule.
Step Four:
Adding a finial to enhance the handle is equally as easy. The procedure is similar. The drawer pull I chose, and most drawer pulls, have a shaft on them. If there wasn’t you couldn’t get your fingers underneath.
Drawer pulls come with their own hardware. This will enable you to discover the size of the mounting bolt. Mine was 8-32. Hanger bolts are available in 8-32 size and many lengths. A one inch (25 mm) length might be a bit short.
Step Five:
 I wanted the mushroom end to mate flat to the top of the tap handle. This required sinking the shaft of the pull below the top. Again, predrill a 1/8-inch pilot hole, perfectly centered, into the top. For this size hanger bolt you’ll need a 5/32-inch final hole. Drill a larger hole to conceal the shaft of your drawer pull; mine was 5/8-inch in diameter and 1/2-inch deep. When inserting the hanger bolt into the finial (drawer pull), I’d suggest using some kind of liquid thread locker like Loctite to keep the hanger bolt secure — you might want to remove the drawer pull later. A liberal application of nail polish can also do the trick.
Step Six:
With all the mechanical preparation complete, it’s time to complete the finish. Be sure your surfaces are sanded smooth and apply your sealant. Sand again and reapply sealant or stain (according to directions) and then the final finish. Please, send us photos of your completed tap handles and if we compile enough, we will run a special showing in a future issue!