Corking Belgian-Style Homebrews
One recent Christmas, I decided to brew a special batch of beer for my friends and family. Since I had recently read “Farmhouse Ales,” by Phil Markowski (Brewers Publications), I decided to brew a Bière de Noel. To complete the package, I wanted to use bottles that matched the style. After a fruitless Internet search for the procedure to cork a Belgian beer, and with little luck talking to my local homebrew shop (LHBS), I decided to figure it out myself. The technique I came up with is straightforward and the equipment and supplies are easy to obtain. Since the right presentation can significantly affect the enjoyment of a beer, I am happy to share the details with the homebrew community.
Tools and Supplies
The total outlay to get into corking Belgian-style ales is quite modest. You need the following in order to bottle a 5-gallon (19-L) batch:
• Colonna Capper/Corker (~$60)
I got mine from my local homebrew shop, but have seen these available online as well.
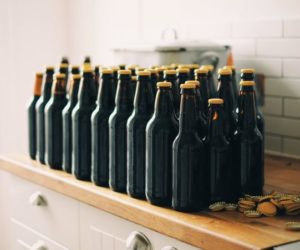
• Belgian Style Beer Bottles (two cases of 12 for ~$30 each)
Alternatively, you can use recycled bottles from your favorite Belgian brews or put the word out to your friends, family, and brew club that you would like people to save these for you.
• Belgian Corks (~$6 for 25)
These are corks designed especially for bottling Belgian-style ales. In other words, ordinary wine or Champagne corks will not work. These corks are straight-sided when inserted in to the bottle. With time, the length of cork in the neck of the bottle compresses, making the mushroom shape you are familiar with.
• Belgian Bottle Wire Hoods (~$4 for 25)
The single biggest expense is the bench corker/capper, but you can use this to cap regular beer bottles as well. I had heard on at least one website that you could use a floor corker, but when I tried this down at my LHBS I found the process to be awkward, and I was not really interested in dedicating the storage space or money towards a single-use tool.
It is possible that other models of corkers will work with this procedure, but I have not experimented with them. The key feature of any corker you want to use is that it needs to be able to handle the Belgian corks — which have a larger diameter than wine corks — and it needs to be able to leave some of the cork sticking out of the bottle.
The Process
The process of corking beer in Belgian bottles is very similar to the bottling procedure you already know. The biggest difference with corking Belgians is that, instead of using a standard bottle with crown caps, you are using a Belgian bottle with corks and wire hoods.
Before starting, be sure to clean and sanitize your bottles. Prepare your beer by either priming or carbonating in a keg to whatever level is appropriate for the beer style.

Step 1: Adjusting Your Corker

Start by setting the base height so that the top of a Belgian bottle is just below the cork holder. Next, experiment with both different base heights and handle rotation distances to get the right amount of cork sticking out of the bottle — roughly 5⁄8 of an inch (1.6 cm). It is not critical that you get this perfect right now because you can adjust these factors at a later step after trying out some test bottles. I highly recommend performing a dry run with an empty bottle so you can practice your technique and get the settings right. Assuming that all of your bottles are the same size, you only need to do this adjustment step once. Mark the base height with a pen for quick setup in the future.
Step 2: Fill Your Bottle
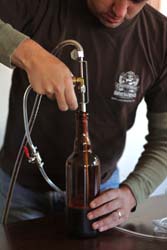
If you are planning to bottle condition your beer, you have probably mixed the beer with the priming sugar in a bottling bucket and have a bottle filler hooked up with some tubing. If you carbonated in a keg, then you likely have either a BeerGun or counter pressure filler for filling bottles.
In either case, fill the bottle to about two and a half inches (6.4 cm) below the top of the bottle. This may seem like a lot of head space, but I surveyed a significant number of commercial Belgian beers and this is consistent with their fill levels.
If you are filling your bottles from a keg, cork each bottle immediately after filling. Do not fill several bottles, then proceed to the corking stage. Given that you will lose a small amount of carbonation during capping, you may want to slightly overcarbonate your kegged beer prior to bottling.
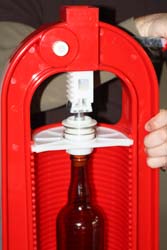
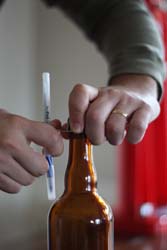
Step 3: Inserting the Cork
Prepare a bowl of Star San and have it at hand for sanitizing the corks. Star San is ideal for this application as any liquid that squeezes out of the cork will not affect the flavor of the beer (unlike bleach) and will not discolor or destroy the corks (unlike iodophor and boiling water, respectively). Dunk the cork in the bowl to get it thoroughly wet. You can put a new cork into the bowl as you pull out one to put into the corker as part of your overall bottling rhythm, which provides plenty of sanitizing time.
Drop a sanitized cork into the cork holder and then turn the handle about 180 degrees to push the cork into the bottle with about 5⁄8 of an inch (1.6 cm) still sticking out. You should not have to use an unnatural amount of pressure to get the cork in there. It should be well within the working capacity of the corker.
If you do choose a floor corker for corking your Belgian-style ales, some sources report that making a spacer — often from a drilled stopper — to fit over the corker’s shaft can help you get consistent spacing. A correctly-sized spacer would block the downward motion of the plunger once the cork was inserted to the correct depth.
Commercial breweries, of course, do not sanitize their corks. However, for homebrewers there is the added benefit to doing so — Star San is a slippery solution — a brief soak in it makes the cork easier to insert.
Step 4: Removing the Cork from the Corker

Okay, here is where it gets interesting. The cork holder on the corker is like a funnel so that it compresses the cork before pushing it into the bottle. When you only press the cork in part of the way, you are left with the cork still in the funnel. How do you get the cork out without pushing it into the bottle? Simple; remove the base from under the bottle so the corking mechanism no longer has leverage to push the cork into the bottle. Hold the bottle to prevent it from falling and then turn the lever to its full extent, turning the handle to push the cork through the cork holder without pushing it any further into the bottle. If you hold the bottle at the neck, you can also use your hand to support the cork holder to prevent it from flexing excessively.
Step 5: Admire the Result
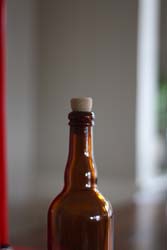
Take a look at the bottle you just corked. If you are adjusting the corking settings for the first time, now is when you measure how much cork is sticking out the bottle and either change the base height or amount that you are turning the handle. Remember, you are looking for about 5⁄8 of an inch (1.6 cm) of cork sticking out of the bottle.
Step 6: Cage the Cork
Before the pressure has built up in the headspace, the cork will stay in the bottle on its own. Beer is much like sparkling wine, though, in that the cork will fly out at some point if not secured with a cage.
Slip a wire cage over the cork. If you inserted the cork to the correct depth, the bottom wire on the cage should fall just below the ridges on the neck of the bottle.
Tighten the cage with a pencil, ballpoint pen or something of similar diameter — a short section of keg dip tube works well. There is even a fancy Champagne wire tightener available from many wine supply stores if you are going to be doing a lot of bottles on a regular basis.
One good trick when tightening the cages is to pull away from the bottle while twisting the wire. This tension ensures that you get a nice, even twist on the wire. If you want to be totally authentic, you should use 6 half turns, as the commercial examples do. Using more turns or a twisting tool of a smaller diameter will make it less comfortable to open the bottle later. In any case, make sure that the wire is securely seated under the ridges on the bottle neck.
At this point, you are done and can put the bottle away for cellaring.
The Finished Product
Once you have everything dialed in it should take about two minutes to fill, cork, and cage each 750 mL bottle. That is not much longer than you would spend filling and capping a 22-ounce (651-mL) standard bottle. People will assume, though, that you spent a lot of time and care on each bottle. That, of course, makes corked Belgians an ideal present.
I still have bottles from the first batch I corked and they are holding up very well. I have made some minor adjustments such as the amount the cork sticks out and how I tighten the cages, but overall my process is largely unchanged.
Storing Your Bottled Beer
As with corked wine bottles, you will want to store Belgian bottles on their sides so the corks remain hydrated. I have not seen a Belgian with a problematic cork, but I am not one to tempt fate. Unlike wine, you are going to get yeast settling out (especially if you bottle condition.) Many people will store bottles upright for several days before serving so that the yeast settles on the bottom rather than the side. In any case make sure whoever is pouring the bottle knows to be careful to not stir the yeast up.
I also recommend experimenting with various strains of yeast. As noted in Stan Hieronymous’s “Brew Like a Monk,” (2005, Brewers Publications) some Belgian brewers centrifuge out their fermentation yeast strain and inoculate with a suitable bottling strain. For yeast such as White Labs German Ale/Kölsch (WLP029,) which generates significant fluffy sediment when bottle conditioning, I prefer to carbonate in a keg rather than priming. My absolute favorite yeast strain, White Labs Abbey IV Ale (WLP540)/Wyeast Abbey II (1762,) is an excellent choice for bottle conditioning as it drops out quickly to form a tight yeast cake at the bottom of the bottle.
Cork Questions
Since coming up with this technique, I have fielded a few common questions, mostly relating to the corks themselves.
Q. Is a Belgian cork different than a Champagne cork?
A. Yes. The composition of the two types of corks is different, but most importantly, a Champagne cork has a much larger diameter. This is to hold up to the tremendous pressure of sparkling wines. Next time you are in your local homebrew shop, see if they have any Champagne corks on hand and compare them to the Belgian corks.
Q. Would a Champagne cork work for Belgians?
A. No. A Champagne cork is much too big to fit in the Colonna capper/corker used for the procedure described above. If you used a proper floor corker designed to work with Champagne corks, you could probably get the cork into the bottle, but you would be stuck with another problem. It may not be obvious, but different types of corks are designed to resist different forces from the contents of the bottle. Simply put, a Champagne cork takes the pressure you only get with a sparkling wine in order to reasonably push out the cork. With typical beer carbonation levels, you would have to pull like crazy to get that cork out.
Q. Do those straight-sided corks result in a mushroom shaped cork coming out later?
A. Absolutely. After a month or so in the bottle neck, the cork comes out looking just like it would with any other Belgian beer (e.g. Chimay.) So just to be 100% clear, all corks start out as straight-sided cylinders. Any cork that sticks out of a bottle will develop some degree of mushroom character over time. The more the cork is compressed to get it into the neck, and the more time the cork is in the bottle, the greater the mushroom character.
Final Notes
While the Colonna capper/corker clearly is not designed for this procedure, it works quite well. I have corked a few hundred bottles this way without problems. Most importantly, I am able to easily get repeatable results so that, across two cases of bottles, there is very little variation in the cork placement.
For me, the best part of corking Belgians is that people really enjoy receiving these bottles as gifts. The results are indistinguishable from commercially corked Belgians. It is clear to anyone receiving the bottle that the brewer put in extra time on this batch. As with other visual queues — such as brilliant clarity and a nice frothy head — a properly corked beer sets the expectation that the drinker is in for something special. Just be careful to not leave this issue of BYO sitting around or your loved ones may discover that it is nearly as easy as bottling with crown caps.
You are probably aware that Belgian ales come in a wide variety of carbonation levels and recommended serving temperatures. You’re also probably aware that most Belgian breweries have glassware specific to their beers. If you do give your beers as a gift, a small card explaining the proper serving temperature — and how to decant the beer — can be a big help to the recipient. And, if you also give them a Belgian goblet or tulip glass, you may receive some corked bottles from a newly-minted Belgian beer fan next year.