Countertop All-Grain Brewing System
There is often a common progression in homebrewing. Brewers begin making extract beer in a pot on the stove. Next comes steeping grains to tweak the flavor of the beer. For many, this is followed by the lure of all-grain brewing and the addition of a simple mash/lauter tun to their brewing setup. By this point, the homebrewer is hooked and begins eyeing full brewing systems with cryptic names like RIMS or HERMS, all while devising ways to hide the bills from the spouse.
My evolution in brewing was no different, but after a year of doing all-grain using nothing more than a 24-quart (23-L) 120V electric kettle I had built, a 5-gallon (19-L) cooler mash/lauter tun (MLT), and a small pot to heat strike water on the stove, I knew my ultimate brewing system would be different.
Living way out in the sticks, the only beer drinker in the house, “standard” 5-gallon (19-L) batches were just too much beer for me. Three gallons (11 L) seemed to be my personal sweet spot — enough so that I wasn’t killing myself brewing all the time, yet not so much that I’d get bored drinking the same beer. I also realized, being a creature of comfort, I wasn’t about to move my brewing to the garage, far away from my TV and recliner! Still, I coveted the “big boy” systems and the reproducibility they offered. Then I saw Lonnie McAllister’s Brutus 20 system.
Parts and Tools
For the Kettle:
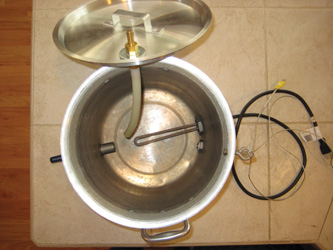
- (1) 24-qt aluminum kettle w/lid
- (2) 3⁄8-inch female barb
- (1) 3⁄8-inch close nipple
- (1) weldless thermometer sight gauge
- (1) 1⁄2-inch to 1⁄4-inch NPT reducer
- (1) 1⁄2-inch weldless fitting set
- (1) 1⁄2-inch close nipple
- (1) 120V 2KW water heater element
- (1) water heater element nut
- (1) 14-gauge appliance cord
- (1) pvc end cap
- (1) 4-inch K type liquid safe thermocouple
- (1) roll self-stick duct insulation
For MLT:
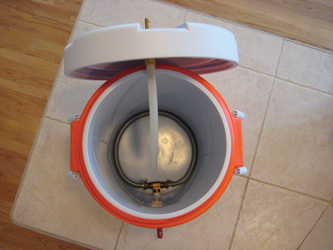
- (1) 5-gal. (19-L) cooler
- (2) 3⁄8-inch female barb
- (2) 3⁄8-inch nipple
- (1) 3⁄8-inch ball valve
- (3) 3⁄8-inch male barb
- (1) 3⁄8-inch female tee
- (1) stainless braid
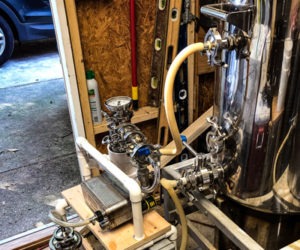
For Pump / CFC:
- (1) HD bucket w/ lid
- (1) march pump
- (1) 1⁄2-inch close nipple
- (1) 1⁄2-inch nut
- (1) 1⁄2-inch coupler
- (1) 1⁄2-inch female barb
- (1) 1⁄2-inch female to 3⁄8-inch barb
- (1) 3⁄8-inch female barb
- (1) 3⁄8-inch close nipple
- (1) 3⁄8-inch ball valve
- (1) 3⁄8-inch male barb
- (2) female garden hose end
- (1) male garden hose end
- 1 ft. 1⁄2-inch copper pipe
- (2) 1⁄2-inch copper tees
- (2) 1⁄2-inch to 1⁄4-inch copper reducer
- 20 ft. 3⁄8-inch od soft copper tubing
- 50 ft. 5⁄8-inch id high-temp garden hose
- 4 ft. 1⁄2-inch high-temp silicone tubing
- 8 ft. 3⁄8-inch high-temp silicone tubing
- 1 set 1⁄2-inch QuickConnectors
For Controller:
- (1) 6×4 electric job box
- (1) 14 gauge appliance cord
- (1) 40A SSR
- (1) SSR heat sink
- (1) SYL-2362 PID
- (1) thermocouple panel mount
- (2) 120v switch / plug
- (2) switch cover plate
Many know Lonnie from his spectacular 10-gallon (38-L) Brutus 10. Lonnie’s Brutus 10 system and instructions on how to build it can be found in the November 2007 issue of BYO. The November 2007 issue is sold out, but you can still order the Build Brutus Ten plans special reprint from www.byo.com/store. Lonnie also has an unorthodox Brutus 20 experiment. He called it CRDFM — (Constant Recirculation Direct Fired Mash). Two pots, two pumps, and two heat sources. It certainly was compact. What was obviously missing from the system was the hot liquor tank (HLT). The Brutus 20 was essentially a two-vessel, no-sparge brewing system. After mashing in at a high liquor-to-grist ratio, wort is pumped from the mash/lauter tun (MLT) to the kettle, where it is heated and pumped back to the top of the grain bed. In this way, the mash temperature can be maintained or raised. When the mash is over, the wort is already clear from being recirculated. So, at that point, all you need to do is shut off the return flow to the grain bed and the kettle can be filled.
I can hear the mash efficiency addicts screaming already. During my first year of all-grain brewing, I beamed with pride at my frequent 90% mash efficiency, yet still had this nagging feeling my beers weren’t all they could be. They were quite good, but tasted like, well, homebrew.
Then I read about and started tinkering with thin mashes — mashes with 2.0 qt./lb. (~4 L/kg) liquor-to-grist ratios and even higher. These thin mashes made for so much first-runnings that my sparge volume dropped to as little as a gallon (3.8 L). My mash efficiency dropped dramatically into the 75–80% range, but something strange happened — my beers became amazing. No more “homebrew” flavors (perhaps because, in my quest for high efficiency, I was oversparging and extracting excessive amounts of tannins from my malt). I finally realized what Lonnie knew all along, “This ain’t a grain race here; it’s about beer man!”
Whereas your efficiency will likely go down if you switch to no-sparge brewing, the tradeoff here is a brewing system with a smaller “footprint” — two vessels instead of three and one heat source (in the kettle) instead of two (for the kettle and hot liquor tank) or more. This may be more important to some brewers than a few extra percentage points of extract efficiency.
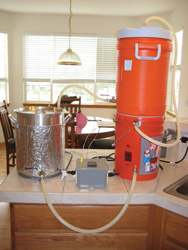
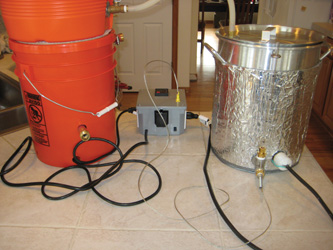
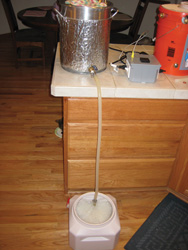
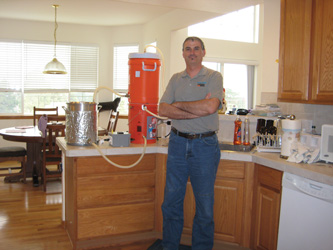
By the early fall of 2008, my mind was made up. I spent a good bit of time drawing sketches, thinking about the Brutus 20 and how to scale it down to 3–4 gallons (11–15 L) for indoor brewing. I quickly realized by leveraging gravity I could simplify the system further, eliminating one pump and burner. (Lonnie’s Brutus 20 was a one-level system, necessitating two pumps. On his system, both vessels had burners.) So I was left with the following: An electric kettle to heat the wort. A pump to push the heated wort to the top of the MLT. Gravity to drain the MLT back into the kettle. CRDFM! My final eureka design moment came when I thought about chilling. My immersion chiller worked well enough, but it was very hands-on. Could my ultimate brewing system have chilling integrated into it? I needed a housing for the pump and a way to lift the MLT above the kettle, so why not use a bucket? Pump fits well enough in the bottom of a bucket, but there’s a lot of wasted space. Would a counterflow chiller (CFC) fit in there as well? Bingo! Plus, if I permanently plumbed the CFC onto the pump output, that would eliminate several plumbing changes during the brew session, reducing mess – always an important factor for brewing indoors.
Finally, a little automation can aid any brewing system in the temperature control department and this one is no different. Fortunately, the electronics used here are extremely simple – a PID controller, a thermocouple to read the kettle temperature, a solid state relay (SSR) to drive the kettle heating element and a couple combo switch/outlet plugs from the hardware store. Having good temperature control takes the stress out of brewing.
OK, enough theory, how does this thing actually work? It’s probably easiest to describe both by stepping through a typical brew session.
Fill the kettle with 4.0 gallons (15 L) or so of water and set the PID to strike temperature plus 2 °F (1 °C) to account for loss of heat to the CFC and a slight temperature overshoot in the MLT. Begin full system recirculation as PID set temperature approaches to pre-heat the mash/lauter tun (MLT). Once the PID set temp is reached, close the MLT valve and allow it to fill to the desired mash infusion volume. Shut pump off, add any water mineral adjustments and double-check strike temperature with a thermometer. Dough in once everything looks good.
Calculate the balance of water needed to meet the desired pre-boil volume. For example, if the mash infusion was 2.25 gallons (8.5 L) into 6.0 lbs. (2.7 kg) of grain, and I expect a loss of 0.1 gallon/lb. (0.83 L/kg) due to grain absorption, then there should already be 1.65 gallons (6.2 L) in the system. Assuming a desired pre-boil volume of 4.5 gallons (17 L), I should fill the kettle to 2.85 gallon (11 L). Set the PID to 170 °F (77 °C), the mash out temperature.
Once the mash is complete, begin recirculation by closing the CFC valve, opening MLT valve partially, and re-opening CFC valve to balance MLT inflow with outflow. This normally takes a couple minutes of fiddling and a re-check every 10 or so minutes during the recirculation. I’ve got a sight glass on the kettle to help monitor this. Recirculate for 30 minutes or until the full system recovers to 170 °F (77 °C), whichever takes longer.
Shut the pump off and open all valves fully to allow wort to fall back to kettle. Switch the PID to manual mode, 100% output to begin the boil. Once the boil starts, you are done with MLT for now, so remove and clean it if you are so motivated. At boil end, the kettle element gets shut off, the kettle lid goes back on and the CFC output gets plumbed to the kettle lid. Turn the pump on to allow hot wort to circulate and sanitize the CFC and pump.
While sanitizing, hook up CFC to a cold water source and dump lines to the sink. After 5–10 minutes, begin cool water flow through CFC.

After the wort is chilled, shut off the pump and momentarily raise the CFC bucket above kettle level to allow all the wort to flow back into kettle. Close kettle-out valve and it’s now ready to dump into the fermenter.
From this point on, all that’s left is clean-up. I rinse out the kettle and restore the system to a chill configuration so I can recirculate hot Oxyclean solution through the kettle and CFC for 10 minutes. I dump and repeat with rinse water and I’m done. Rolling the CFC bucket counter-clockwise above the sink about a dozen times drives out any remaining water in the coils and it’s ready to put up. Beer time!
I get asked a lot of questions about my “weird” brewing system. Here are some of the most common ones:
“Can you brew high gravity beers? Doesn’t your extract efficiency suffer?”
Not in my experience. In fact, efficiency seems to be impacted more by grist than gravity. Wheat beers seem to want to drop into the low 70% range while the last barleywine I did hit 74%.
“Could this be scaled up to do 5-gallon (19-L) batches?”
When I built my electric kettle, I did a lot of boil tests and found I wasn’t happy with anything beyond 5.0 gallons (19 L) using a single 120V 2KW element. Running two elements off separate 20A circuits (most kitchens have at least two dedicated to small appliances), or using a 240V element are possible options. Kettle geometry also has a big impact. Tall and narrow has less heat loss than short and wide.
Also, consider that a 5.0-gallon (19-L) MLT would be limiting for 5.0-gallon (19-L) batches, especially when brewing high gravity beers without supplementing the grist with malt extract.
“Does the heating element scorch the beer?”
No, I’ve done everything from Pilsners to barleywine on this system and have never seen or tasted even a hint of scorching.
“Can you do step mashes?”
Sort of. It’s more of a ramp than a step however. I’ve doughed in at 145 °F (63 °C) and recirculated the system up to 158 °F (70 °C) with good results. It takes 15–20 minutes to ramp through the full mash range. It’s also certainly possible to simply heat and pump additional water infusions up to the MLT without circulating.
“How do you drain the wort from the CFC before boiling?”
I don’t. There’s not enough wort in there to worry about and it all gets recirculated at the end of the boil anyway during the heat-sterilization of the CFC.
“How long is your brew day?”
Depends on how efficient I am at multitasking, but it generally goes like this: 30 minutes to heat the strike water, 60 minutes to mash, 30 minutes of recirculation and heating to reach mash out temperature, 60 minutes of wort boiling, 20 minutes of chilling and 40 minutes to cleanup.
“Where’s the GFCI (Ground Fault Circuit Interrupter) in your wiring?”
Excellent point. I always brew in my kitchen where all outlets are already GFCI protected.

Building the Brewery
Building this system really isn’t too difficult and can be done in a weekend or two. The wiring is straightforward – particularly if you’ve done any household wiring like adding an outlet. The PID comes with great directions for its hookup. I used a drill and jigsaw for cutting out the component holes in the electronics box. Hole cutters sized for the 1/2” and 3/8” nipples as well as one large enough for the water heater element are needed, as well as a file to clean up rough edges on the holes.
Possibly the most challenging part of this project is sweating the copper fittings for the counterflow chiller. A propane torch, solder and flux are needed here. There’s plenty of great plumbing how-to articles online if you’ve never messed with soldering copper before.
Lastly, be sure to have plenty of Teflon pipe tape on hand when assembling the weldless spigot and sight glass on the kettle. This will insure leak-free fittings.
The materials list covers everything used in the system, except fender washers and hose clamps. Lots of both are needed. Just get a big bag each of stainless clamps for 3/8” and 5/8”. Fender washers are used to shim up various bits around the 3/8” nipples. Get a bunch of zinc ones and at least two stainless ones for the insides of the kettle and MLT lids. The 120V 2KW water heater element can be tricky to find. Lowe’s and Home Depot around these parts carry only 1,500W ones, but Ace Hardware carries 2,000W in 120V. So, what’s the bottom line on building a Countertop Brutus 20? As I built mine gradually over the winter and leveraged many parts from my scrap bins, I can’t say exactly. A rough run of the numbers leads me to believe this system could be built from scratch for $400–500, worst case.
I’ve now run roughly 20 brews through my system since completion and absolutely love it. I still learn little tricks and process improvements along the way, but I haven’t changed the hardware one bit. Countertop small-batch all-grain brewing is here to stay – in my house at least!
Lastly, I must give a big tip of the hat to Lonnie Mac. I definitely owe you a brew the next time you pass through Colorado!