Bottle Carbonation and Conditioning
 Nothing in life is as uncomfortable as getting something right and then blowing it at the end. Losing at the finish line after running a great race. Dropping a piece of pizza in the brief-but-chasm-like distance between the oven and your plate. It’s in that spirit that, today, we take a thorough look at what finishing the brewing process really looks like: Successfully carbonating and conditioning your beer in a bottle. Beer isn’t really beer in my opinion, well unless it’s lambic, until it’s been carbonated.That beer you put in the bottle (or keg) also isn’t “finished” — it’s just consumable, and will keep evolving (for better or worse) as time passes. Conscientious care of your beer in the carbonation, conditioning, and aging stage of the process will help you get (and keep) the flavor you want.
Priming
Most new homebrewers (and some experienced brewers) carbonate their beer in the bottle, and this final stage of the process is far and away the most common area of inquiry from the new homebrewers who ask me questions. Their questions tend to revolve around three topics: Yeast, what form of sugar, and how much of it.
First, is it necessary to add additional yeast to the beer at bottling? I can’t claim that it’s never necessary, but I haven’t yet needed to add yeast to achieve successful bottle conditioning. But my experience is only one among millions; so I will never say, “Don’t dose your beer with yeast for bottle conditioning,” but conversely, I have never instructed a person to do so either. Long after the beer drops clear in the fermenter there remains a substantial amount of yeast in suspension. The residual yeast should be more than capable of taking your beer down the home stretch and eking out one last bit of fermentation to provide carbonation. This has been true for me in every batch for eleven years, even for long-aged lagers that I forgot under the stairs and mid-teens ABV eisbocks. If you’re not filtering your beer pre-packaging, then adding more yeast at bottling probably isn’t necessary. Now, having said that, if you want to add some fresh yeast at bottling, it won’t hurt, and you don’t need to be that particular about which yeast strain you choose — we’re talking about a minimal amount of fermentation, and odds are you’ll get virtually no flavor impacts. Any clean ale yeast like the famed Chico ale yeast or a German ale yeast will be fine. A small starter to get them up and moving is advisable, since you’ll be pitching into a truly toxic environment. Again, though, this is very much an optional step.
The second thing to consider is priming sugar method. Here we have two methods, and within one method you will find a lot of options. The two broad methods would be carbonation drops versus bulk priming. Carbonation drops are small lozenges of sugar (glucose and sucrose) added individually to each bottle of beer at packaging. They have the advantage of simplicity and predictability in terms of the amount of sugar added: One drop to carbonate a twelve-ounce bottle, two to carbonate a 22-ounce bottle (smaller drops exist that allow for somewhat-finer control) will generally produce about 2.5 volumes of CO2. They have two key disadvantages, however. First, brewers report inconsistent results caused by incomplete dissolution; they’ll dissolve completely eventually, but you might prematurely open bottles that haven’t yet fully carbonated. Second, you lose a significant degree of control since you’re working with fixed addition amounts, and the final carbonation level may vary significantly based on the amount of residual CO2 in the beer after fermentation. Your other option – bulk priming — is only marginally more complicated, significantly cheaper, and allows for fine-tuned levels of carbonation in a thoroughly predictable timeframe. Instead of adding sugar to each bottle, the brewer creates a simple syrup that is added to the bottling bucket at bottling. The syrup dissolves evenly into the beer (usually with no need to stir – the action caused by siphoning into the bucket is usually sufficient), which is then packaged in any sized bottles you choose.
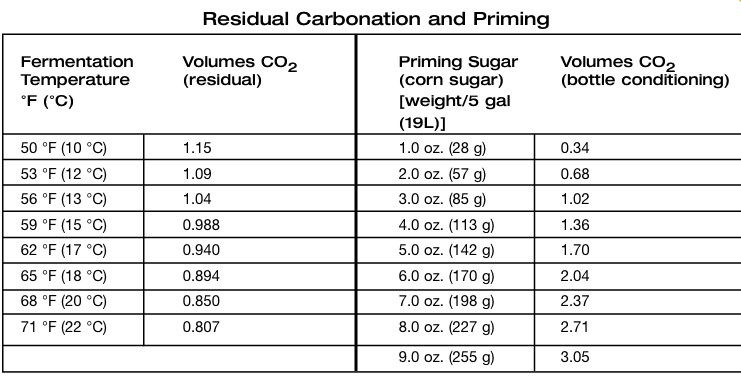
Almost any sugar will do for bulk priming: Dextrose (corn sugar) dissolved into water and boiled briefly is the most common, but you can also choose to prime with candi sugars or syrups, maple or birch syrup, molasses, honeys, and more. Your choice might add a slight finishing flavor, but don’t expect too much of an impact. “Which” sugar, is to me, less important than “how much?” Different sugars have different attenuation rates, and while you could develop rules of thumb for each, it’s best to use calculation to reach the decision of how much sugar to add. Rather than adding a set number of drops or a fixed weight or volume of a sugar, visit a priming calculator online or you can calculate this value yourself. You’ll need the volume of beer to be carbonated, the targeted level of carbonation and a temperature: The highest temperature your beer reached in fermentation (see Chart A below). This number is important because it allows the calculator to factor in how much CO2 is already in solution in the beer. Beers that reached higher temperatures in fermentation will have less CO2 remaining and will therefore require more priming sugar, and vice versa. A beer that has cooled from that temperature or has been cold-crashed/lagered, at a lower temperature before packaging, will not reabsorb much CO2, so the current temperature is negligible. Calculations will provide a specific weight of sugar to add to the beer, (see Chart B, on page 94) and all you’ll need is a small scale (a hop scale will do nicely). This will greatly reduce the risk of over- or under-carbonation.

Your average table sugars – sucrose, demarara, turbinado, and (of course) dextrose/glucose are the most-fermentable, easy to find, and inexpensive. Don’t feel like you have to use these though, you can get creative and maybe add some subtle flavors. Molasses, honey, maple or birch syrup, and — my personal favorite for old ales — black treacle are options for bottle conditioning, too, though you’ll generally require more of them. Whatever your sugar choice, though, you shouldn’t expect a big punch of flavor. These are accents, and some (maple syrup) might add effectively no flavor at all, especially in stronger-flavored beers.

In terms of process, move your fermenter to wherever your bottling will take place, then wait a beat — you’ll probably shake some yeast and trub up into the beer, but it should settle out again within a few minutes. While you’re waiting, go ahead and prepare a sanitized bottling bucket, tubing, and bottling wand. At this point, you can also prep your priming sugar. Whatever priming sugar you’ve chosen (even the syrups) it’s a good idea to dissolve it into about one cup of water (assuming a five-gallon batch) before adding it to the bottling bucket. I put a small pot on the stove, add the water and priming sugar, and heat to a boil while stirring. Kill the heat, allow to cool for several minutes, then pour the syrup into the bottling bucket. Rack the beer gently off of the trub into the bucket, and the natural action of the liquid should disperse the syrup evenly throughout the beer, but if you want to be sure you can give it a gentle stir or three before bottling. A word of warning, though: Oxidation at this stage is lethal for flavor and flavor stability, so when I say “gentle,” I mean it! Bottle, cap, and you’re ready to condition.
I do recommend a calculator for this step such as the ones found on many homebrew websites. I wish I could tell you there’s a tried-and-true rule of thumb for how much of each sugar you should use, but there are a lot of variables in play. One thing I’m confident of is that that five-ounce package of dextrose that comes in most kits is usually too much.
Conditioning
Once you’ve mixed your priming sugar into the beer and packaged, we need to provide appropriate conditions for refermentation. There’s no need to specifically raise the beers to room temperature (after cold-crashing) before packaging, and doing so invites trouble – since in my opinion all temperature fluctuations are risky. They inevitably create conditions via changes in pressure that may allow oxygen and contaminants to make their way into your fermenter if not properly managed. Once packaged, pressure differences are no longer important, allowing you to bring the bottles up to room temperature, or even a bit higher — 82 °F (28 °C) is a good target. If you don’t have a particularly warm room to choose from, consider placing your beer over a heating vent with a towel draped over it (which will shield it from light penetration as well as capture some heat!). This can be especially useful in cold winter months. Any time of year, though, my go-to spot in the house is on top of the laundry dryer. The surface warms, the room itself tends to be fairly warm, and I believe (though can’t prove) that the subtle agitation speeds along the refermentation process by shaking the bottle slightly, keeping the yeast in suspension. Typically, I have beer that’s ready to drink within seven days, and I’m confident of complete carbonation within 14 days. In extreme cases (very high alcohol, very long pre-packaging conditioning/lagering) this process could take longer, but should not take more than 3–4 weeks. You could dose with a bottle conditioning strain of yeast for these extreme examples, but I prefer to wait as this process should not cause off flavors even if the yeast count is low.
Bottle conditioning is advantageous in that it creates a beer that can continue to develop in flavor, is slightly protected from staling/oxidation effects thanks to a small amount of oxygen take-up in refermentation, and my experience judging homebrew competitions for seven years suggest that these combined effects lead to greater flavor stability than in force-carbonated beers. It does, however, generally take longer, and there’s always the risk that it doesn’t work. If you add priming sugar, let the beer warm, wait it out, and still get a failed carbonation, there are two likely culprits. One, your initial calculation was off, and you under-primed. Two, your bottles were not kept sufficiently warm. For those who live in colder climates and store their beer in the basement or other cool spot, try moving them to a warmer location in the house and wait a bit longer – this is most often the cause and solution for my bottle priming mishaps. If, however, they’re still flat, you can either add low-dose carbonation drops if you believe you’ve under-primed, or add a small dose of yeast to each bottle, if yeast viability and density are suspect, and recap. I’ve been party to a technique used by three brewers who took the (extreme?) step of uncapping and gently adding each bottle’s beer to a CO2 —flushed keg and force-carbonating, but all three cases ended with a beer that was badly oxidized. I don’t recommend it — time and temperature should solve most carbonation issues.
One final note here. Some may recommend flushing your bottles with CO2 before packaging, and I don’t dispute that it will protect against excess oxygen pickup at packaging. This best practice, though, does not bear up to qualitative examination compared to beers of mine that did not receive this treatment. It may provide marginal benefits, but if you don’t have the capacity to do so, don’t sweat it.
A Matter of Time
One final point about conditioning: Be kind to your aging beer. All beers are likely oxidized and/or contaminated to some (hopefully small) degree. Slowing the effects of oxygen and the growth of contaminants is simple — store them cold. The warmer the beer is, the faster chemical reactions in the bottle or keg will occur; look up the Arrhenius Rule. This empirical relationship states that a 10 °C (18 °F) increase in temperature doubles the speed of the reaction, while a similar decrease doubles the time that reaction will take. If your beer will stale in two months at room temperature (72 °F/22 °C), you can extend that time to four months at 54 °F (12 °C), and eight months at 36 °F (2 °C); a typical refrigerator temperature. Plus, refrigerators are dark, and light is the enemy.
Some age effects are unavoidable, of course — IBU loss, loss of hop aroma and flavor, the development of off-flavors from low-grade contamination, etc. — but cold, dark storage will slow their onset. And, of course, some beers develop complex flavors with age. So you may want to store the beer in a slightly warmer location (like room temperature) if you are looking to alter the profile or mellow certain components such as those found in wood-aged beers.
Proper conditioning and carbonation will help us finish our beers in such a way that makes it a more pleasurable experience. Treat them well in this final stage and store them responsibly, and you’ll be able to do so for a while to come.