Build a Bottle Washer/Sanitizer
 I built this bottle washer to help out with the huge task of bottling in my homebrewery (and also for my home winemaking efforts). As any homebrewer can agree, anything that can be done to make bottling time easier is worth it.
Instead of washing each of the bottles one at a time, with this washer build I am able to sanitize twelve bottles at one time quickly and easily.
At bottling time this bottle washer works so well I thought other people should know how to build one of their own. It’s easy to assemble and fairly inexpensive (I spent around $140 for all of the components). I was able to source everything I needed from the Internet and my local big box hardware store. I would advise, however, buying your Rubbermaid tub, water pump, bottle rinsing base, bulkhead fitting and barbed garden hose fitting before buying the rest of the fittings so that you can be sure that all of the parts will fit properly. Take your bulkhead fitting with you to the hardware store when you buy the threaded barbed fitting to be sure of a tight fit.
I also listed a remote on/off switch in the parts and tools list (to the lower left), but you don’t have to include that modification if you don’t want to.
The choice of which portable water transfer pump model to use is up to you as long as it will fit comfortably in the tub. Remember to always run your pump fully submerged so that you don’t run it dry. Also, as with any project that requires combining electricity and liquid, be sure to always plug your pump into an outlet with a GFCI adapter for added safety.
The bottle washer design is completely self contained. The sanitizer solution of your choice is held within the tub and is circulated through the pump and into the bottles, then back into the tub through holes in the lid so there is no need to be near a sink.
If you’re also using inert gas prior to bottling, you can modify this design to use another sparging base for the gas and just transfer the bottle rack from the washer to the gas set up. It works very well for both beer and wine bottles.
Before you start building, I have to remember to give credit where credit is due. I got the original idea for building the washer in this style from Alan Holtzheimer, the owner and winemaker of Silver Bell Winery in Burlington, Washington. Please visit Alan at Silverbellwinery.com and support him!
Parts and Tools
• (1) 10- to 20-gallon (38-76- L) Rubbermaid (or similar) tub
• Portable, water transfer pump
• Bottle rinsing base (part # CE970 from morewinemaking.com)
• 2 bottle racks (part #CE971 from morewinemaking.com)
• ~2 feet (~1 m) of 5⁄8-inch diameter heavy duty tubing (length will depend on how far your away your pump will be)
• 1-inch diameter bulkhead fit- ting (found at aquarium stores)
• Barbed garden hose fitting
• 1-inch threaded to 5⁄8-inch brass barbed fitting (the threaded end needs to fit into the bulkhead fitting. Take it to the store to make sure a snug fit is achieved before you buy anything.)
• 2 pipe clamps
• Remote on/off switch for the pump (optional, but helpful)
• Drill
• Razor knife
• Flat-head screw driver
• Zip-ties
• Teflon tape
 1. Bulkhead fitting
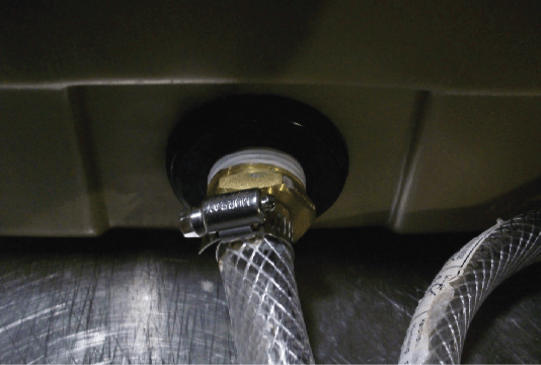 1. Bulkhead fitting
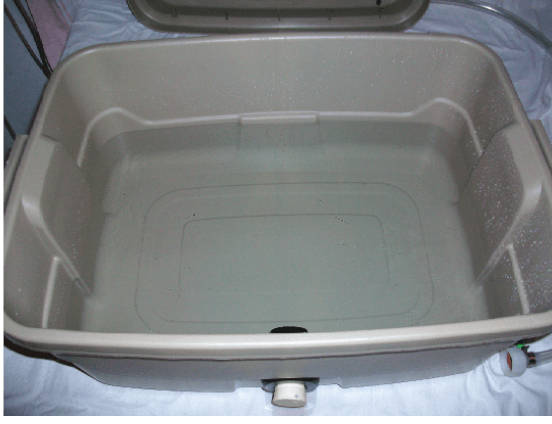
Once you have all of your parts together, the first step to making the bottle washer is to put a hole in the side of the plastic tub for the bulkhead fitting. Trace a circle around the bulkhead fitting about 1 inch (2.5 cm) or so from the bottom of the tub and use the razor knife to carefully cut out the circle. Insert the bulkhead fitting with the flat side on the outside of the tub, you’ll want a nice snug fit to help prevent leakage.
2. Tube assembly
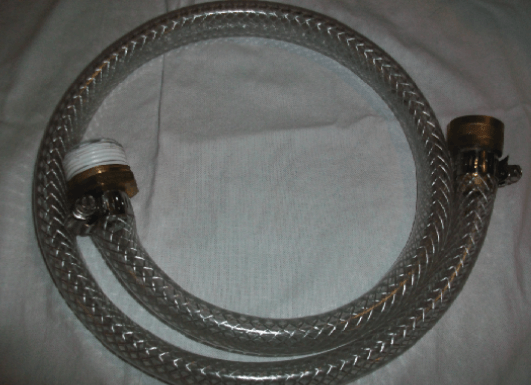 2. Tube assembly
Now it is time to construct the tube assembly that will go from the bulkhead fitting to the water pump. Slide one end of the tube over the barbed side of the threaded 1-inch brass fitting, and apply the pipe clamp. Wrap the Teflon tape tightly around the threaded part of the fitting to help avoid leaking. The other end of the tube can be slid on to the barbed end of the garden hose fitting. A separate pipe clamp can be applied there too, to ensure a nice tight fit with no leaking. Once this is assembled you may screw the 1-inch brass fitting into the bulkhead fitting and the garden hose fitting can be screwed to the inlet port of the water pump.
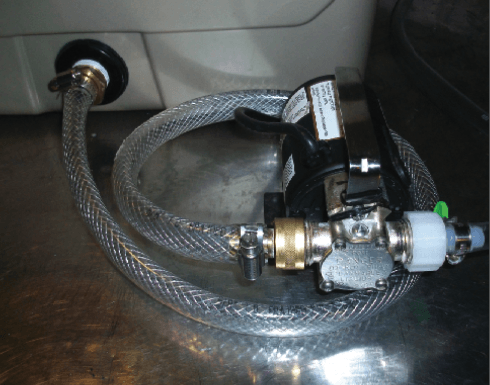 3. Fill
Once this is all done, fill the tub with about 3 gallons of your favorite no-rinse sanitizer solution so that the bulkhead fitting is fully submerged. This ensures your pump will not run dry. Hook up the supplied tubing that comes with the sparging base to the outlet port on the water pump and place the lid on the tub. Make sure the pump is filled with sanitizer water as not to run it dry.
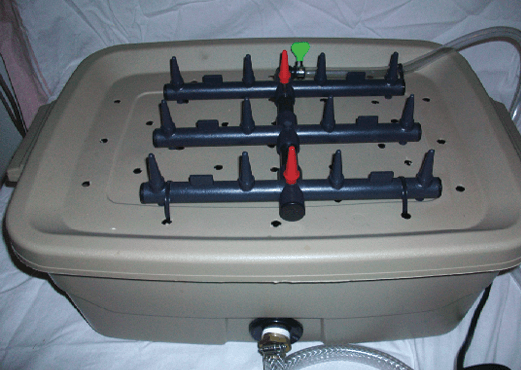 4. Put it together
Now you may drill a series of holes in the lid of the tub to allow the sanitizer solution to drain back into the tub after flushing the bottles. Then place the bottle rinsing base on the lid of the tub, I affixed the rinsing base to the lid with zip ties through the newly drilled holes, so everything stays in place.
 5. Test
Plug the water pump into the remote controlled outlet and fill the bottle rack with bottles. Prior to using the bottle washer, the bottles should be free of debris and labels, ready for bottling. Place the rack of bottles onto the bottle washer. Turn on the pump and test the setup. If anything is leaking, go back and check your fittings and apply more teflon tape if needed.
 6. Sanitize
Once everything is in working order, you’re ready to start sanitizing. I suggest using a 15-20 second rinse and a quick spin of each bottle to ensure good coverage inside the bottle, and with the press of a button you’ll have evenly sanitized bottles in no time!


