Bottling & Kegging

There are two popular options when it comes to packaging homebrew — bottling and kegging. For many, choosing between the two is a classic case of time vs. money. Bottling is fairly time-consuming, but costs next to nothing. Kegging requires you buy some equipment, but saves you time at the packaging stage.
The basic idea in bottling is to move beer from one big container (your fermenter) to numerous small containers (the bottles). In the process, you want to avoid introducing any oxygen, bacteria or wild yeasts to the beer. Oxygen introduced after fermentation will cause the beer to go stale faster. Bacteria or wild yeasts can lead to off flavors in the beer or gushing bottles. For bottle-conditioned beers, you also want to prepare the beer so it will carbonate to the right level in the bottle. There are four steps to bottling: cleaning, sanitizing, preparing the beer and filling the bottles. The equipment you’ll need is: a bottling bucket, a racking cane, a large spoon, tubing to move the beer from the bucket, a tubing clamp or a bottle filler, bottles, sugar, bottle caps and a capper.
Bottle Selection
You can modify how much work bottling is by selecting bottles of different sizes. The chart on page 13 shows the number of bottles of various sizes needed to bottle a five-gallon (19 L) batch. If possible, use brown bottles and store your bottles in a dark place. Clear or green bottles offer less protection from UV rays and beer can get “skunked” quickly if exposed to sunlight.
Cleaning the Bottles
Cleaning bottles can be the worst part of bottling, especially if you leave the job until bottling day. You can save yourself a lot of time if you clean your bottles as soon as you empty them. Hot water will rinse out any yeast, bacteria and residual beer. Then you can clean the bottle with a small amount of TSP (trisodium phosphate) or PBW (powdered brewery wash).
Store your clean bottles dry and upside-down. Many homebrew shops sell drying racks for bottles. Some of these “bottle trees” also have a sanitizer sprayer built in.
If you waited until bottling day to clean your bottles, you’ll need two things to clean your bottles — a jet-washer and a bottle brush. A jet-washer is a tube that connects to your faucet and releases a stream of water that blasts the bottom of the bottle. Jet-washers are inexpensive and greatly reduce the time it takes to wash or rinse bottles.
Any remaining yeast that is not blasted out by the jet-washer can be removed with a bottle brush. Once the bottle is visually clean, use a little bit of water with TSP or PBW and the bottle brush to remove the stuff you can’t see. Really nasty bottles can be soaked in a bleach, TSP or PBW solution overnight before cleaning.
Sanitizing the Bottles
Clean bottles need to be sanitized before they are filled. Most homebrewers sanitize their bottles by soaking them in a sanitizing solution. Bleach is a cheap and effective way to sanitize bottles. Bottles can be soaked for 30 minutes in a bleach solution of 1⁄2 cup of bleach per five gallons of water. Iodine solutions provide more killing power and the soak time is shorter. You can soak your bottles for 2–3 minutes in a iodine solution made from one ounce of Iodophor to 5 gallons (19 L) of water.
It really saves time if you soak all your bottles at once. A 100-quart cooler holds sixty 12-ounce bottles, more than enough for a 5-gallon (19 L) batch of beer.
To sanitize your bottles, fill the container with water, add the sanitizer and mix. Submerge the bottles for the appropriate amount of time. Remove and rinse thoroughly with your jet-washer. I triple-rinse to ensure that no sanitizing solution is left although some sanitizers can be used without rinsing.
Bleach is also effective in cleaning bottles. It’s tempting to think about combining the cleaning and sanitizing steps, but don’t — you run the risk of infecting the entire batch.
Preparing the Beer
Before you can fill the bottles, you need to siphon the beer from the fermenter to the bottling bucket and prime it so it will carbonate. The bucket and the racking cane should be cleaned and sanitized first. Try to minimize the amount of splashing or agitation, which can introduce oxygen into the beer and accelerate staling. Place the end of the racking tube at the bottom of the bottling bucket, below the liquid level as the bucket fills.
Most homebrewers use corn sugar to prime their beer. Between 2⁄3 and 1 cup per 5-gallon (19-L) batch is enough to carbonate it. Two-thirds of a cup of corn sugar will provide a soft carbonation suitable for some English ales. A full cup of sugar will produce a more fizzy brew.
Measure the sugar into a small sauce pan and add water until the sugar just dissolves. Boil the sugar solution for 15 minutes, cool, then add it to the beer in your bottling bucket. Gently stir the beer and sugar with a sanitized spoon.
There are times when adding fresh yeast at the bottling stage is a good idea. If beer is left in secondary fermentation for an extended amount of time, almost all of the yeast drops out of solution. After a high gravity fermentation, the yeast may be tired. Beer may take a long time to bottle condition when few yeast cells are present or the yeast are not in good health. Adding a bottling yeast will help your beer to condition faster.
Sometimes, the yeast doesn’t flocculate well or has other undesireable characteristics. A bottling yeast that is flocculant (it clumps together well during fermentation and sinks to the bottom) can help pull down some of the less-flocculant yeast in the bottle.
If you are using bottling yeast, use a cleanly-fermenting strain that flocculates well. The bottling yeast only ferments a small amount of sugar, so its impact on the flavor of your beer should be minimal. Be sure to choose a compatible yeast strain for your beer style. Don’t pick a highly attenuative yeast if your main yeast was not as it will ferment sugars left by your main yeast. This can result in overcarbonation, changing a sweet beer into a dry beer. If you use a yeast with decent flocculation and don’t let your beer sit in secondary for an excessive amount of time, you don’t need to use bottling yeast. Most homebrewers don’t. To use a bottling yeast, add about a teaspoon or less of dried yeast to your bottling bucket.
Filling the Bottles
Next you need to move the beer from the bottling bucket to the bottles. Some homebrewers use a racking cane to siphon their beer into bottles. If you have a bottling bucket or plastic carboy with a spigot, this stage is easier because you don’t need to start another siphon. To minimize spillage, use a tubing clamp to stop the flow of fluid between bottles.
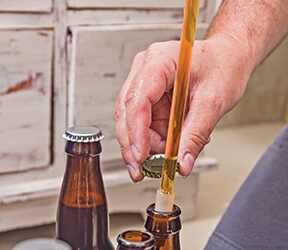
To begin filling, set the bottle on a white background such as a paper towel. This will help you see the liquid level as the bottle fills. Put the end of the tube in the bottom of the bottle. Open the clamp and let the beer start flowing. As the liquid level rises, slowly retract the tube from the bottle while keeping the end below the level of the liquid. The proper fill level is the level most commercial beers are filled to — about an inch (2.5 cm) below the top of the bottle.
When the bottle is filled, close the clamp. Remove the tube and place a blank cap on top of the bottle. When you’re done filling your bottles crimp the caps on with your bottle capper.
Kegging
The most obvious advantage of kegging is the simplicity of cleaning and filling a keg. A 5-gallon (19 L) batch forces you to handle 50 or more 12-ounce (355 mL) bottles. With a keg, you clean and fill one.
You can also use your kegging system to force carbonate your beer; that is, carbonate without adding priming sugar. Force carbonation results in less sediment and a quicker-clearing beer, as well as the option to carbonate and serve the beer within a few hours.
If you want to precisely control the level of carbonation in your beer, kegging is the only way to go. Force carbonating with a keg and CO2 tank allows you to set the level of carbonation to any level you desire.
Another potential reason for kegging is that most filtration systems require a keg system. Likewise, having a kegging system will allow you to use a counter-pressure bottler.
There are some drawbacks to kegging your beer, however. A kegging setup costs more than bottles. You need the keg, a CO2 tank and regulator, fittings, hoses and some sort of dispenser. Bought new, this can cost well over $200. Most homebrewers will buy a reconditioned keg and CO2 tank, but with new fittings, hoses and regulator; they will end up spending $120–160.
When you keg your beer, you also have to figure out a way to cool the beer. While a bottle or two of beer can be put in the family fridge, a keg cannot. Most people who keg their beer have a dedicated cooler and that’s the best way to go.
Equipment
The first and most obvious piece of equipment that you need is a keg. Most homebrewers use 5-gallon (19 L) stainless steel kegs that are made for holding the syrup used in soda dispensers. These are commonly called “Corny” kegs, after one of their major manufacturers, the Cornelius Company. Corny kegs come in two varieties: ball-lock and pin-lock. The difference between them is the type of fittings they have and the kind of disconnects they use. Since they use different connectors, you will have to have duplicate sets of quick-disconnects if you mix keg types. Get at least one “in” and one “out” quick-disconnect once you settle on a keg type to purchase. Also, get some food-grade lubricant, such as “keg lube,” to use sparingly on the lid gasket and disconnects.
Next you need a CO2 tank. For this you have two options: buy or rent. Welding supply and fire extinguisher businesses are the usual places to get a CO2 tank filled and many will rent you a tank. Or you can buy a tank of your own. These are available either new or reconditioned, in steel or aluminum. The most common tank sizes are 5, 10 or 20 lbs. (2.3, 4.6 or 9.1 kg). Larger tanks obviously last longer, but they’re bigger and heavier.
You will need a regulator for the CO2 tank. You can buy either single-gauge or double-gauge regulators. Single-gauge regulators have one gauge showing the pressure being applied to the keg, with an adjustment knob to set that pressure. Double-gauge regulators have an additional gauge showing the tank pressure.
Next you need equipment for dispensing the beer. Here again you have two basic choices: a picnic tap or a faucet. A picnic tap (also called a cobra tap) attaches to the end of a hose and is held in your hand. A faucet is the kind of tap you see at your local pub. Picnic taps are cheaper and easier to set up, but I prefer the look and feel of a mounted faucet. Having a picnic tap as a backup is a good idea if you ever want to take a keg with you to a party.
You also need hoses to connect the CO2 tank to the keg and the keg to the tap or faucet. Either 1⁄4-inch (0.64 cm) or 5⁄16-inch (0.79 cm) inside diameter hose can be used from the regulator to the gas-in disconnect. The tubing used for gas should be rated to withstand at least 50 PSI (2590 Torr). Use small hose clamps to secure the hose to the fittings.
For the hose going from the beer-out disconnect to the tap, I recommend 3⁄16 inch (0.48 cm) inside-diameter, food-grade tubing. In this case the pressures will be low, so the psi rating doesn’t matter.
Filling Kegs
When you’re ready to fill your keg, start by putting CO2 into it. This will prevent oxidation of your beer during transfer. Release the pressure, take the lid off and rack 5 gallons (19 L) of your beer into the keg under the “blanket” of CO2. Now “purge” the keg. This is the process of removing air from the headspace and replacing it with CO2. You can do this by pressurizing the keg with CO2 then letting the air out through the relief valve on top of the keg two or three times.
Carbonating
The easiest way to carbonate a keg is simply to let it sit with CO2 pressure on the beer. The table on the bottom of page 13 shows the equilibrium pressure for different temperatures and volumes of gas in beer. Find the serving temperature on the right and the volumes of CO2 you desire on the top; where they meet in the table shows the equilibrium pressure (in PSI). For instance, if the beer is cooled to 45 °F (7.2 °C), and you want it to contain 2.1 volumes of CO2, you would pressurize it to 10.2 PSI and let it sit with the tank connected to the keg until as much CO2 as possible had dissolved into the beer; this process should take about a week.
Kegs give you the option of serving your beer much quicker, though. Cool the beer first, turn the pressure up to 20 psi (1040 Torr) or higher and shake the keg to make the CO2 dissolve quickly. When the CO2 stops hissing out of the tank, let the keg settle for an hour or so. Then, turn the CO2 pressure down to your serving pressure during this time and pour away. The drawbacks to carbonating with this method are that you lose the benefits of aging and you won’t know how many volumes of CO2 are initially dissolved in your beer.
The final method for carbonating beer in kegs is to prime and condition. Priming in kegs is essentially the same as priming bottles; you just treat the keg like one big bottle. The difference is that you use proportionally less priming sugar; 1⁄3–1⁄2 cup for a five-gallon (19 L) batch is all you need; any more and you’ll get excessive foaming. The drawback to this method is that you end up with yeast sediment in the bottom of the keg. This sediment will mostly be drawn out with the first glass or two that you pour. After you start pouring, connect your CO2 tank to maintain the level of carbonation and push out the rest of the beer.
Dispensing
The objective is to dispense your beer with enough foam to give it a nice head, but not too much foam. The dip tube in the keg, the fittings, the hose and the tap — everything between the beer and your glass — will restrict the flow of beer out of the keg. When pouring, the amount of restriction needs to match the pressure in the keg. Three feet (91 cm) of 3⁄16-inch (0.48 cm) ID hose between your keg and your tap will provide 9 PSI of restriction. This is just right if you have the regulator on your CO2 tank set to around 9 PSI.
Although there is some initial expense, most homebrewers who have taken the plunge into kegging say they will never go back to bottling.