Brewing an All-Grain Beer
In the previous chapters, we made our beers using malt extract for some or all of the fermentable sugars. In this chapter, we’ll brew a beer in which the fermentables come entirely from malted barley or other malted grains. This is called all-grain or full-mash brewing. We’ll perform a single-infusion mash, the simplest kind of full mash.
Although a full mash works on the same principles as the partial mash, the increase in the amount of grain used requires us to alter our procedures slightly. In the partial mashing chapter, we put our entire grain bill in a mesh bag and later lifted this bag out of the pot, leaving behind wort. In all-grain brewing, lifting a grain bag containing all the necessary grain would be highly problematic due to its weight. So, in all-grain brewing, the grain bed stays in place during the wort separation process (called lautering). For this, you will need some additional equipment, specifically a combination mash-lauter tun (more on this later).
Advantages and Disadvantages of All-Grain Brewing
Brewing beer from a full mash takes significantly more time than brewing an extract beer. Some of the extra time comes from added steps in the procedure, such as the mashing, recirculating and lautering. (We’ll explain these terms later.) More time is also needed to heat the larger volumes of water needed to brew an all-grain beer. You also have to clean the additional equipment used in brewing an all-grain beer.
Although it takes more time, there are many advantages to brewing “from scratch.” All-grain brewers can manipulate the conditions of the mash to make their wort exactly as they want it. They can, for example, adjust the fermentability of the wort. In this chapter, we’ll include recipes for a big, full-bodied beer — a hoppy, Northwest-style IPA — and a somewhat crisper, drier beer — a classic American Pilsner (or CAP). In the CAP recipe, we’ll learn another benefit of all-grain brewing — the ability to brew using starchy adjuncts.
In the long run, brewing all-grain beers is more economical. When you buy malt extract, you are paying not only for the malted barley, but the expense of mashing the grains, separating the wort from the husks, and condensing the wort into extract. So, malted barley grains cost about half as much as an equivalent amount of malt extract. Of course, the start-up cost for brewing an all-grain beer can be substantial. At a minimum, you need a mash-lauter tun to hold the grains.
A homebrewer contemplating switching to all-grain brewing may be intimidated by the amount of information out there. Homebrewing books and online homebrewing forums are filled with talk of appropriate mash thicknesses, stepped temperature regimes, pH and mash efficiencies. These are all important theoretical considerations. However, in most cases a practical brewer can brew without worrying about all these variables. And keep in mind that, although there are many varieties of stepped-temperature mashes, many commercial brewers and homebrewers use a single-infusion mash for their beers. For your first all-grain beer, you should be fearless —just jump right in.
Heating the Water
Although some of the later steps may be intimidating to a first-time all-grain brewer, an all-grain brew day starts with a simple task — heating water. When mashing, you need a large volume of hot water to mash the grains. About an hour later, you will need another large volume of water for rinsing the grains, or sparging. You will need about 10 gallons (38 L) of water to brew 5 gallons (19 L) of beer.
If you begin heating all your water first, you can clean and set up your brewing equipment while it heats. Having a reserve gallon or two of cold or room-temperature water will come in handy on brewing day. Likewise, having a reserve gallon or two of boiling, or near boiling, water will also come in handy.
Heating all the water needed for an all-grain batch can literally take hours on a kitchen stove, especially an electric stove. Most all-grain brewers eventually switch to a propane cooker to heat their water and boil the wort. These cookers will decrease the amount of time it takes to heat water and will give you the power to bring your full wort to a nice, rolling boil.
Mashing In
To begin the mash, or to mash in, you combine your grains with the hot water (called strike water). If your grains are roughly at “room temperature,” you will want your strike water to be roughly 11 °F (5 °C) hotter than your target mash temperature. You will need from 1.0–2.0 quarts (~1-2 L) of strike water per 1.0 lb. (0.45 kg) of grains, with 1.25 lbs/gallon (0.15 kg/L) being a common ratio.
To begin the mash (or mash in), place the crushed grains in your mash-lauter tun. With a large measuring cup or a beer pitcher, add your strike water to the grains a few quarts (liters) at a time. Stir the mash each time you add water to break up any clumps of grain. These clumps can form a ball that seals liquid away from their dry core. Having dried clumps in your mash lowers the amount of fermentables you extract from the grain. It may also add starch to your beer.
As you ladle water onto the grains, work quickly. As you are working, heat is escaping from your mash into the environment. You don’t need to rush, but work at a steady pace. Once there is enough water in the mash tun to barely cover the grains, take the mash temperature — it should be close to to your target temperature. If the temperature is much higher, stir in cool water from your reserve until you hit the right temperature. If the temperature is too low, stir in some near boiling water. When you stir in this water, make sure to stir the mash enough that the temperature is even throughout the mash. Once you’ve added the full volume of stike water, and your mash is at the correct temperature, you’re ready to let the grains mash.
When mashing in, you also have the option of adding your strike water to your mash-lauter tun first then stirring in the grains. If you do this, try to stir the grains as quickly as possible into the water. As before, there’s no need to rush, but work as quickly as is feasible. Once you’ve added all your grain to the strike water, check the temperature. Adjust with hot or cold water if needed.
For your first all-grain brew session, do not sweat the details too much. If your mash temperature is off by a couple degrees, don’t worry. As long as you are within 148–162 °F (64–72 °C), you’ll be making wort. Take good notes on how much water you added, how hot it was and what your mash temperature ended up at and you will be able to tweak your procedures next time you brew.
The Mash
At this point, seal your mash tun. If you are mashing in a modified picnic cooler, shut the lid. If you are mashing in a brew-pot or modified brewpot, put on the cover and insulate with towels or a mash-jacket. Let this mash sit for an hour. If your mash tun is insulated well enough, the temperature should stay roughly constant. It may drop a few degrees, but that’s nothing to worry about. While the grains are mashing, heat a couple gallons (~8 L) of water to the boiling point. We’ll use this later in a step called the mash out.
A lot occurs in the mash. Hot water soaks into the center of the grains and dissolves the starch. Starch is a large molecule found in great abundance in the barley kernels. Starch molecules are chains of simpler sugars. The starch is cut up by enzymes, called amylases, present in the grain. The starch molecules are thus gradually reduced to smaller sugar molecules, mostly maltose.
Note that the enzymes from your grain may also degrade starches from adjuncts — such as corn and rice — added to the mash as well as their own starches. When adding starchy adjuncts, keep the amounts under 30% of the grain bill or your grain may not be able to supply enough enzymes to degrade all the starch in the mash.
Although a lot is going on in the mash, the brewer doesn’t need to do anything. If you’d like, you can stir the mash occasionally. You may increase the efficiency of mash by doing this, but you will also lose heat every time you open the mash tun. If you do open it, you will likely need to stir in boiling water to boost the temperature back to your target. If you just let the mash sit for an hour, you can be cleaning brewing equipment used in later stages. In any case, you will need to heat the water used to rinse the grains — the sparge water — towards the end of the mash.
The Mash-Out
After an hour of mashing, open your mash tun and take the mash temperature. Then, raise the temperature of the mash to 168° F (76 °C). To do this, stir in boiling water a few cups at a time. Take the temperature each time. Once you reach 168° F (76 °C), seal the mash tun again and wait for 15 minutes. Boosting the temperature to 168 °F (76 °C) will make the sugary wort less viscous and easier to drain from the grain bed. You can skip this step if you’d like. Due to limitations of their equipment, many brewpubs do. But, it can increase the amount of fermentables you extract from your grains. It will also stop the enzymatic action in the mash.
Recirculating
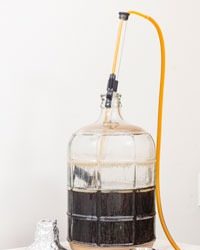
Once the grains have been mashed, your wort needs to be separated from the spent grains. Your mash lauter tun will have either a false botton or a manifold, depending on the type you choose. Opening the valve to your mash-lauter tun will allow the wort to drain, leaving the grains behind. However, the first bit of wort you collect will be very cloudy and have a lot of solids dissolved in it. To clarify the wort, brewers recirculate their wort, letting the grain bed act as a filter.
To begin recirculation, open the valve on your lauter tun. Once you open the valve, cloudy wort should start flowing. Collect this wort in a large measuring cup or beer pitcher. Once the container is full, pour this wort on top of the grain bed. As you continue recirculating, you will notice the wort clearing. For a 5-gallon (19 L) batch of beer, 20 minutes of recirculating is usually sufficient.
While recirculating a 5-gallon (19 L) batch, you want the wort to drain from the grain bed at a rate of about 2–3 qts. (~2–3 L) every five minutes. At this rate, a standard beer pitcher should fill in about 3–5 minutes. To control the rate that the wort drains, you may need to adjust the valve on your mash tun frequently. (Don’t worry if you’re draining the mash a little faster or slower here, especially if it’s your first all-grain batch.) At the end of twenty minutes, you will have recirculated the entire volume (or nearly so) of wort in the grain bed. The wort should now be much clearer and free from large husk pieces or other large grain particles.
The Run-Off
Once the recirculation period is over, continue draining the wort from the grain bed. However, this wort should go now to the brew kettle. You can begin heating the wort as you collect it, but don’t bring it to a boil. During the run-off period, you should be draining wort at about 2 qts. (~2 L) per five minutes or slightly less. The run-off period will be relatively short; it ends when the liquid level in the lauter tun falls to the level of the grain bed. Once the grain bed is about to be exposed, it’s time to start sparging, so be sure your sparge water is ready.
The Sparge
During sparging, you continue running off clear wort at the same rate as in the run-off. However, you add hot water to the top of the grain bed at the same rate as wort is being drained off. As a result, as you collect the remainder of your wort there will always be a little water on top of the grain bed.
There are a couple different ways to add sparge water. You can ladle a quart (liter) or two of water on top of the grain bed when the level gets low. Alternately, most homebrew stores sell sparge arms to deliver the water at a steady rate. Sparge arms are like little lawn sprinklers for your mash. Hot water drains from a container (often the homebrewer’s bottling bucket) through nylon or plastic tubing to the sprinkler. The rate of water can be adjusted either by opening or closing the valve on the bottling bucket or by partially clamping the nylon tubing leading to the sprinkler.
However you deliver it, the sparge water should be heated to 170 °F (77°C) — or a bit higher if you skipped the mash out. The heat from the sparge water should keep the temperature of the grain bed just under 170 °F (77 °C). At this temperature, the thick, sugary wort will flow freely through the grain bed.
If the grain bed cooled substantially, your flow of wort would slow down. On the other hand, at temperatures higher than 170° F (77 °C), tannins could be leached out of the grains. So, avoid overheating your sparge water. (This is another detail not to stress overly much about on your first brewing session.)
Remember to keep checking the rate at which the wort is draining. You should be collecting wort at a rate of about 2 qts. (~2 L) every 5 minutes. Faster run-offs are less efficient, and you run the risk of collapsing the grain bed, slowing or stopping the flow of wort. Slower run-off rates give better yields, but take longer. At the rate given above, you should be able to collect your wort in 60–90 minutes (depending on the size of your grain bill) and get a good yield of fermentables from the mash. As you continue collecting wort, the valve may become progressively blocked with small particles from the mash. If the rate of wort drainage drops too low, or stops altogether, open the valve all the way for a few seconds until the flow resumes. Then slowly close the valve to the proper flow rate.
It can be difficult to get the wort to drain at a constant rate. You will probably need to fiddle with the valve quite a few times. As long as your rate is in the right ballpark, you’ll be fine. If you finish collecting your wort in less than 45 minutes, you’ve gone too fast. If it takes over 2 hours, you’re going too slow. Keep collecting wort until the specific gravity of the runnings drops below 1.010. At this point, there is still a small amount of sugar that could be rinsed from the grains, but you’d also extract a lot of tannins at the same time. (You might also have to boil your wort longer to reduce its volume.)
Once you’ve stopped collecting wort, adjust the volume of your wort to around 6 gallons (23 L) by adding water, if necessary. With a rolling boil, you should be able to boil off a gallon (3.8 L) of liquid in an hour and hit your target volume of 5 gallons (19 L). If you have more wort collected than six gallons, you may have to boil your wort longer than 60 minutes. Likewise, some recipes call for 90-minute (or longer) boils; in this case you will need around 6.5 gallons (25 L) or more of wort to begin with.
Boiling, Cooling & Fermenting
You will finish brewing this beer as you would any other beer made with a full-wort boil. You will boil and cool the entire wort. The cooled wort will be siphoned to your fermenter, aerated and pitched. Please review earlier chapters for details on boiling, cooling, aerating and pitching.
You may get a larger hot break from an all-grain wort than from an extract wort. Very soon after the boil commences, you will see little light-colored flakes in your wort. This is the hot break. Break material will settle to the bottom of the kettle while the beer is cooling. If all goes well — and with a good rolling boil, it likely will —there will be 5 gallons (19 L) of clear wort sitting atop a few quarts of break material. This clear wort will be siphoned to the fermenter, leaving behind as much of the break material as feasible. In an extract wort, the hot break may have already been left behind in the process of making an extract (although procedures for making extract vary).
Is That It?
If you’ve thought about all-grain brewing before, you may have read a lot about water chemistry and pH. These factors are of great theoretical interest and can adversely effect your beer if they are out of whack. However, on the practical side, you will likely be able to brew good beer without worrying about them. Homebrewers considering all-grain brewing should not be scared off by the seeming complexity of these issues. If you do switch to all-grain you may wonder why you waited!
Many Ways to Mash Your Malt
Most homebrewers use one of two arrangements for mashing grains and draining the wort. One set-up involves modifying a picnic cooler to hold a framework of copper pipes on its bottom (see diagram above). The copper pipes are cut with slots that allow wort to flow through but are too narrow for the grain. The pipes channel wort outside the cooler. A valve allows the homebrewer to control the flow of wort out of the cooler when draining the wort. Picnic coolers are well insulated and can hold the mash at a steady temperature for the entire duration of the mash.
The second common type of mash tun is a large brew pot with a “false bottom” inserted. The false bottom sits an inch or so above the kettle’s floor and is perforated, so the grain stays behind but the wort can flow through. A valve below the false bottom is used to drain wort once the mash is complete. An advantage of this type of mash cooler is that it can be directly heated. The diagram below shows a picnic cooler mash tun with a false bottom, but a brewpot mash tun would look similar.