Calibrate Your Brew System
Being able to produce a consistent beer and hit all of your targets should be the ultimate goal for any brewer. It demonstrates precision and skill as a brewer. The only way to accomplish this goal is to know your brewing system and all of its variables. Over the years I have brewed on many systems — both amateur and professional — and gotten to understand how to easily calibrate any brewing system. Once everything is calibrated and you can predict exactly how it will perform, you can utilize this information during recipe formulation to create a more precise recipe that you can be reasonably sure will hit your targets.
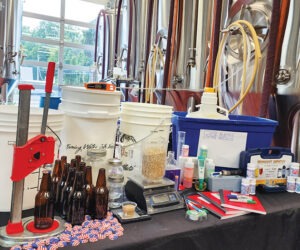
Homebrewers these days have systems all across the board ranging from a pot and 6-gallon (23-L) bucket (or less) to all stainless steel, professional-style systems. For homebrewing, I run a simple setup with basic equipment to brew 6-gallon (23-L) post-boil batches. I will be using a few examples of my homebrew system to help elaborate a few key points. While I enjoy brewing with fancy state-of-the-art equipment, I also love brewing with minimum equipment and relying more on the knowledge of procedures. It is not your equipment that makes the beer, rather the knowledge on how to use it properly and efficiently.
The advice that is given in this article can be used on any equipment and for brewing any size batch. What we are doing is finding factors and then applying those numbers to make the system, as a whole, run efficiently so that we can repeat the results. It may take a batch or two to fully calibrate your system, and definitely will require some back and forth adjustments on paper to dial everything in, but it is worth the time and effort to take the steps, document the findings, review the data, and finally adjust your recipes. Before any daily brewing activity, be sure that your brewing tools for taking measurements are in good working order and are calibrated.
Cold Liquor Tank (CLT)
It is a great practice to record all of your water usages in each stage of brewing beer. You will find out how much brewing liquor (water used as an ingredient in the production of beer) you will need and to store it for later use or transport. Some homebrewers just opt to use the water from their sink, however, you still need to measure how much water you need for mashing and for sparging to reach your final pre-boil volume. This will tell you how much total brewing liquor you will need. The amount of water needed to brew a batch of beer will vary depending on the recipe and the target end volume. Knowing your dough-in grist-to-water ratio or dough-in volume, water absorption by the grains, and sparge water volume to reach your target pre-boil will give you an overall estimate on the total water needed to produce a batch. This is helpful for when doing water treatments in your batches, or quickly trying to heat up the minimum amount of water needed for a task, which will cut down on heating time as well as fuel costs. While having enough water is usually the first concern of a brew day, it is often the last thing that I tackle when writing a recipe. I like to work through my recipe so that I can see what the other specifications are that will help guide me to a final volume number. These specifications will be discussed throughout this article. For my homebrew system, I have three 5-gallon (19-L) containers to hold up to 15 gallons (57 L) of brewing liquor to produce my 6-gallon (23-L) post-boil/9-gallon (32-L) pre-boil batches using a vigorous 90-minute boil. If 10 lbs. (4.5 kg) of grain is used I can expect to use 11 gallons of water using this formula:
10 lbs. X 0.2 grain water retention = 2 gallons water loss.
3.325 gallons (at 1.33 quarts per lb.) dough-in volume – 2 = 1.325 gallons first running.
9 gallons pre boil – 1.325 gallons = 7.675 gallons sparge water needed.
7.675 + 3.325 = 11 total gallons of brewing liquor needed.
Mash Tun
1.Volume
Knowing the maximum weight of grain that can fit safely into your mash tun will allow you to calculate and know your maximum possibilities, especially when using 100% base malt to achieve maximum extract. Most of the time you won’t fill the mash tun to the top, but depending on recipe or equipment size this factor is good to know. You can determine the volume needed in a mash tun using one of the following equations (the metric vs. imperial equations are slightly different and I credit that to how many decimal places you include in your math. I personally prefer including up to at least the thousandth decimal place.)
A: Mash-in volume (L) = kg malt X (L:kg grist ratio + 0.7)
B: Mash-in volume (gallons) = (gallon:grist ratio X lbs. of grain) + (lbs. of grain X 0.084)
So, if using 10 lbs. (4.536 kg) grain at a water-to-grist ratio of 1.33 qt./lb. (0.3325 gallon per lb. or 2.762 L per kg) then you get 3.325 gal. or 12.528 L dough-in water volume.
A: 15.703 L mash-in volume space (4.146 gal.) = 4.536 kg X (2.762 L + 0.7)
B: 4.165 gal. mash-in volume space (15.772 L) = (0.3325 gal. X 10 lbs.) + (10 lbs. X 0.084)
You can also reverse the equation to find out the maximum pounds of grain that can fit into a mash tun.
C: Mash-in volume (L) / [(L per kg of grain) + 0.7] = Total kg of grain needed
D: Mash-in volume (gal.) / [(gal. per lb. of grain) + 0.084] = Total lbs. of grain needed
When using a 15.5-gallon (58.69 L) keggle mash tun, we should target 15.0 gallons (56.8 L) as our maximum mash-in volume to give room for stirring and sparge water bed. Using the same water-to-grist ratio of 5.32 gal./lb. (2.762 L per kg) we can determine the maximum weight of grain that can fit into a mash tun.
C: 56.804 L mash-in volume / (2.762 L:kg + 0.7] = 6.407 kg of grain (36.172 lbs.)
D: 15.0 gal. of mash-in volume / (0.3325 gal.:lb. + 0.084) = 36.01 lbs. of grain (16.336 kg)
2. Water Usage
A. Total usage
I always measure and record how much water I dough-in with, how much sparge water I use, pre-boil wort volume, and after lautering the volume that drains out of the mash tun or wasted wort. With these numbers, you can figure out the total amount of brewing liquor (not to include brewery function water for cleaning and such) of the batch. Now you can adjust your CLT containers to match your water volume needs. For my system to produce 6 gallons (23 L) of 1.050 SG post-boil wort I can expect to use roughly 11 gallons (41.6 L) of water. This comes out to be about 1.83 gallons (6.93 L) of water needed to produce one gallon (3.8 L) of wort. Of course, the grist bill weight and the boil-off volume will need to be taken into consideration.
B. Water-to-grist dough-in ratio
Some brewers prefer a thicker mash while others prefer a thinner mash, however, the volume is usually within a particular range. Most homebrew texts suggest an average of 1.33 quarts of water per pound of grain to dough-in. I personally prefer a thicker mash and find that I average around 1.125 qts./lb. We record the hot liquor tank (HLT) before and after volumes of dough-in and sparge volumes to measure those usages. By subtracting the pre-boil volume and the wasted wort volumes from the total water used you will find the water-to-grist dough- in ratio.
Another factor to consider is how much water is retained by the grain, which is roughly 0.2 gallons per pound (1.7 L per kg). Once you know your water volumes for each section you can properly predict your water usage for each recipe or set a standard number to use.
C. Mash, sparge, or kettle salt additions
Depending on the chemistry of the water being used, a brewer might choose to use brewing salts such as calcium chloride, calcium sulfate (gypsum), calcium carbonate (chalk), or pickling lime, to name a few, to help regulate their mash pH of 5.2–5.4. When dealing with brewing salts we adjust for parts per million, or ppm, which is expressed in mg/L. By knowing the dough-in and sparge volumes you can properly adjust any salt additions to reach your target ppm within the mash as well as any kettle additions. To do this you will need a scale that measures in grams to a minimum of the tenth decimal place. Depending on your water source and your target mineral profile your results will vary, but I have found that my average salt weights do not exceed 5 grams of a particular salt. When you turn on the scale be sure to zero the scale by pressing the “tare” button along with the measuring container. This will give you a true net weight.
3. Mash Efficiency
A. Determining the mash efficiency
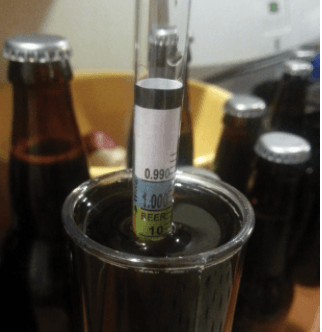
The main factor for your mash tun is the mash efficiency, which I record for each brew before the boil has started. Points per gallon, or ppg, is the maximum specific gravity given from one pound of malt in one gallon of water. Lists of average malt and grain ppg’s can be found on the internet and are usually pretty accurate despite yearly crop fluctuations. In malt analysis available from the supplier, the number is given as a fine and coarse grind extract weight percentage (so 78% extract would mean that 1 lb. of malt yields 0.78 lb. of extract). The extract percentage of sucrose has a ppg of 46. So if Maris Otter has a given extract of 82.5% then 0.825 X 46 = 37.95 ppg. Take each malt and multiply the ppg by the pounds used for each variety of fermentables. Each malt will give you a “gravity unit” or GU, and when added together it gives a “total gravity unit” or TGU. Both of these will be at 100% efficiency. Next, take all the added GUs to make a total gravity, which is at 100% efficiency, then divide by the measured pre-boil volume to get your maximum original specific gravity (OG). Next, divide your pre-boil gravity by the maximum total gravity to get your mash tun efficiency percentage.
In regards to recipe writing, when adding any simple sugar kettle additions such as honey, table sugar, maple syrup, molasses, and Belgian candi sugar; while they provide gravity to the post-boil wort they were not involved with the mashing process so do not include them in your calculations.
Here’s an example of the above:
15 lbs. American 2-row malt (36 PPG): 36 X 15 = 540 GU
1 lb. honey malt (34 PPG): 34 X 1 = 34 GU
Total = 574 GU
Say we have a pre-boil GU of 50.0 (1.050 SG), then 50/63.7 = 0.7849, or 78.49% mash efficiency.
B. Post-boil target volume and gravity
Knowing the actual variables and the mash efficiency you can now apply the numbers to pinpoint a gravity at any given pre- or post-boil volume and then adjust your recipe accordingly to hit your targets.
[TGU at 100% X Mash Efficiency as a decimal] = TGU
TGU / Post-Boil Volume = OG represented as a GU.
Example:
[574 X 0.7849] = 450.53 batch TGU / 6 gallons post-boil volume = 75.08 post-boil (1.075 SG) target OG.
Kettle
1. Safe Maximum Kettle Volume
Maximum kettle volume for wort production is different from that of the HLT maximum volume, even if using the same kettle. When producing wort you need to account for room to safely have a vigorous boil without causing a boil over. Most commercial kettles allow for about 40% headspace, which falls in line with my 15.5-gallon (58.7-L) keggle setup. Forty percent of a 15.5-gallon (58.7-L) keggle is 6.2 gallons (23.5 L) for head space, leaving 9.3 gallons (35.2 L) of room to safely fill wort.
2. Boil-off Rate
The boil-off rate will depend on a long list of variables, some of which will change with each brew, but it is primarily a function of how much heat is put into the system and how long the wort is boiled. Some of the other major factors include: Elevation, weather, kettle geometry, type of heat source and its output, wort gravity to a small degree, and boil time.
I always boil my wort for 90 minutes as I feel it produces a better quality wort. I use a Bayou Classic Brew Burner with 60,000 average BTU (British Thermal Unit) output. To reach my targeted 6-gallon (23-L) post-boil volume utilizing a vigorous 90-minute boil requires me to start with a 9-gallon (32-L) pre-boil volume giving a 33% reduction in wort. With these kettle numbers, I can apply them to my recipe formulations to hit proper volume and gravity targets.
3. Volume Calibration with No Sight Glass
I have no calibrated sight glass for any of my homebrew equipment. When collecting my dough-in water, sparge water, and pre-boil volume I use homebrew buckets with volume markings to take my measurements. With a post-boil volume and gravity, we can take the actual TGU and divide by the original gravity in GU. This will give you the exact post-
boil volume.
Example: (Post-boil gravity of 1.072)
450.53 TGU / 72 GU = 6.257 gallons post-boil (hot).
4. Volume Loss
A. Trub loss
It is wise to measure your trub loss for recipe adjustments to reach your wort-in-fermenter target volume. This can easily be done dumping the trub into a calibrated bucket. On a homebrew scale, this may be a small amount but still worth recording.
B. Thermal shrinkage
When knocking out or heat exchanging the wort from 212–190 °F (100–88 °C) to pitching temperature of 50–68 °F (1–20 °C) you can expect a 4% reduction in volume from thermal shrinkage. For my 6-gallon (23-L) post-boil target, I can expect a loss of 1 quart (1 L) due to shrinkage.
C. Transfer loss
Depending on your equipment and size of your batches, transfer loss from the kettle to the fermenter during the knockout will vary, however, the volume should be very low.
Fermenter
1. Headspace
I base my recipes on how much volume of wort I can fit into my fermenter, while leaving a respectable amount of headspace room for the kräusen to form and not clog up the airlock or pressure relief valve (PRV). Depending on yeast strain and fermenter geometry, the headspace required could range from 20–50% of the total volume of the fermenter space. Taking notes and kräusen measurements on your fermenter will help guide you to max out the volume in your fermentation vessel.
2. Maximum Volume the Fermentation Vessel Can Hold
For the most part, you already know the maximum liquid, or water, the vessel can hold. A 5- or 6-gallon (19- or 23-L) bucket holds just that, and conical fermenters are sized for batches. This means that, for the most part, a 1-barrel conical fermenter can ferment 1 barrel worth of wort and allow for kräusen headspace. This means the true volume is typically 25–33% larger than the batch size. It is up to you to find out what you can squeeze out of your fermenter, and base your target post-boil kettle volume along with the loss variables to hit your target in fermenter volume.
3. Fermenter Losses
Whether you use a conical fermenter with adjustable racking arm or a simple bucket, you will experience some beer loss when transferring to the pre-packing vessel such as a brite tank or a bottling bucket. During fermentation the yeast cells will multiply, consuming sugars and taking up liquid. Once fermentation is complete in conjunction with cold crashing the temperature, the yeast will flocculate and drop out of suspension. This will create a compacted yeast slurry on the bottom of the fermenter. Yeast slurries are usually 25% yeast solids and the remaining volume is mostly beer that can not be easily separated from the yeast solids. Some other factors to consider include cold break and dry hopping. You can expect to have greater volume losses as your hopping rate increases. Each recipe, yeast strain, pitching rate, dry hop amount, and system dead spots all add up to your total fermentation losses. Use these variables to find your constant average loss so that you are able to better hit your final packaged target volume.
I use a 7-gallon (26.5-L) (gross volume) Nalgene bottle for my fermenter. With a 6-gallon (23-L) hot post-boil volume, 1-quart (1-L) thermal shrinkage loss, and 1–2 quart/L trub loss, I can expect to get 5.25–5.5 gallons (20–21 L) of wort into my fermenter, with 1.5 gallons (6 L) worth of headspace.
Depending on the gravity, the kräusen may slightly overflow but I am ok with that if it does. This is the maximum that I can produce without getting into high gravity and water dilution brewing practices. Because of this, I start the base of my recipes off of 6 gallons (23 L) hot post-boil volume to hit all my other targets. This one factor really is the pivot point for writing a beer recipe.
Packaging Options and Container Size
There are several packaging options to choose from with the two biggest topics being carbonation methods and the serving vessel. Force carbonating a keg is fairly straightforward, and bottling can be done with a carbonated beer in a keg using a beer gun, or by using a bottling bucket with priming sugar. When kegging, most brewers force carbonate, while others may choose to keg condition using priming sugar. For most homebrewers that keg their beer, a 5-gallon (19-L) Cornelius keg (Corny keg), or 5.16 gallon (19.4-L) Sanke keg will act as the serving vessel or brite beer tank when bottling. It doesn’t matter if you force-carbonate the beer or prime with sugar to reach the desired carbon dioxide saturation level; the end target volume will always stay the same. In this case, the keg volume is the constant variable in which you are aiming to reach with as little loss as possible in each stage.
I am fond of using a wide range of sugar types for bottle conditioning. To do this I need a precise scale to measure out sugar weights to achieve the target CO2 saturation level. Kegs are standard volumes but when using a bottling bucket it is best to have a bucket that is calibrated and marked. The finer the markings are the more accurate the math is to find a sugar weight that will reach your target CO2 saturation volume.
For me, I try to max out my fermenter so that I can get as much beer transferred over into the bottling bucket. Here I will record the volume as exact as I can get and quickly do the math to figure out how much sugar of that type I need to weigh out to reach my desired CO2 saturation volumes. Once I am done bottling I will calculate the packaged volume of beer then run an analysis of the entire batch worth of volumes and losses to better calibrate recipes to match my brewing system that now has actual factor numbers that we can work with and adjust.
Conclusion
After reviewing the long list of variables, you can begin to dial in your system to hit all targets. Many of these numbers are constant and can be calculated. These include all equipment vessel sizes, thermal shrinkage, ingredient specs, and system losses. Other numbers are more swinging estimates such as boil-off rates, varied post-boil volumes after target time is reached, or actual batch mash efficiencies. I have been able to hit my targets on any sized system, or at least come respectfully close to hitting them, even if it is the first time brewing on that system. What equipment you have to work with will dictate how you write your recipes so you can maximize your packaged beer volume per batch to hit all of your targets. With the knowledge outlined in this article, you should be able to dial in your brewing equipment and accurately predict, write, and produce a repetitive quality product.