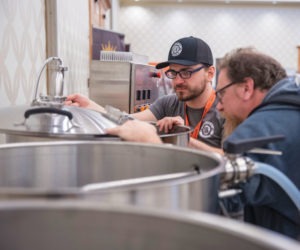
Choosing Tubes and Hoses

Tubing gets your liquid from one place to another. If it’s not leaking and it doesn’t make your beer taste funny, you’re done, right? Mostly. As homebrewers, we are good at having answers in search of problems. Let’s take a deep dive into a possibly overlooked area of your brewery. As both a homebrewer and a professional draft system installer I have spent some time sorting out the good, the bad, and the mysterious. Once you know what to look for you can purchase the appropriate tubing. Your investment should last many years or even decades. Let’s do it right and do it once.
Tubing, pipe, line or hose? All of these terms are frequently used interchangeably but there are differences. In fact, we suffer from an abundance of options and sorting all of it can be frustrating, even for a professional. A few common materials found in modern tubing are polyester, polyethylene, poly vinyl chloride (PVC), silicon, stainless steel, polyolefin and so on . . . a variety that only a chemical engineer could decipher. The variety is multiplied once we take different sizes into consideration. Add some clever marketing pitches from the folks in the beverage transfer products industry and soon we have close to a hundred choices.
Your homebrewery probably already has a few different varieties lying about because we need different tubing for different applications. Some tubing can be pressed into multiple applications; other varieties have one job. Use a less-than-ideal tube while transferring beer or wort, and your brew day might become one long cleanup. Use the wrong line while force-carbonating your keg and that is another problem altogether. Choose to use copper tubing with your beer and you could be poisoning yourself. Yes, your copper wort chiller is fine because wort is not beer. Once wort becomes beer and the pH drops, then copper is out (this is in the FDA’s Food Code, item 4-101.14 if you are curious). Maybe we should be paying more attention to all of this stuff.
Tube Terminology
Pipe is round, rigid, and measured by its inner diameter (ID). The wall thickness of the pipe is measured by its schedule and can vary even for two pipes with the same ID. Pipe is used in the fixed parts of a commercial brewery but is relatively rare in a homebrewery. Like plumbing, once it is installed it requires some effort to dismantle. If you are curious about various pipe sizes there are charts that detail dimensions. This data is critical for commercial applications that need to engineer pump capacities, friction loss, or flow rates, but for our hobby brewery the choices are fairly small. We do need to know the pipe dimensions to select appropriate fittings though, so be sure your supplier has the information available. In practice we deal with tube much more than pipe in our homebreweries.
Tube may be rigid or flexible and is measured by the outer diameter (OD). When we select our tubing we are first concerned with getting the ID of the tube over the OD of the fitting. Suppliers of tubing for brewing applications know this and market their tubing products by material and ID. As we shop for the correct tube be aware that the OD can vary. The choker used in a kegerator is 3⁄16-inch ID and 7⁄16-inch OD but it may be 3⁄16-inch ID by 5⁄16-inch OD as well, with the former having thicker walls and generally being more desirable. Overall we don’t have too much concern about the OD as long as the ID is correct. The OD will determine the clamp size though so it is helpful to know this data.
Hose is a tube that has been reinforced, usually with braided nylon, like garden hose. There’s also braided hose that is reinforced with other materials and other reinforcing methods besides braiding that allow for pressure ratings into the thousands of psi (pounds per square inch). Polyester reinforced tubing handles the job quite well for brewers and is the most practical choice. It is also the most abundant variety. The reinforcement material increases the rated pressure of the hose but it also increases cost and usually results in a less flexible tube as well. Braided hose can be a bit tricky to slip over fittings if not sized correctly because it does not stretch very much. So, all hose is tubing, but only reinforced tubing is hose. When we speak of tubing with pressure ratings, we’re talking about hose.
Line is a generic term. Get yourself some beer line. Or a roll of gas line. All of these terms are often used interchangeably, if incorrectly, even by people in the industry. For research purposes it helps to know what we are dealing with.
Tubing Meets the Brewery
We have a variety of applications in our personal brewhouse, each requiring a specific performance characteristic, with temperature and pressure applications being the most important considerations. Physical characteristics such as the minimum bend radius, resistance to kinking, opacity, flexibility, friction, and cost are also important. Industry has responded with numerous products to meet the needs of homebrewers. Or rather, industry has met the demands of large beverage companies and we can buy small quantities of the product from resellers. Assume that all of your acceptable choices will be at a minimum labeled “NSF,” indicating the product has been accepted for the stated purpose by National Sanitation Foundation International. The two standards we are concerned with are NSF 51, which is for plastic materials in food equipment and NSF 61, which is a standard for drinking water system components. Since we are not dealing with drinking water, the NSF 51 standard is preferred and often a product listed as NSF 51 is also NSF 61 compliant. If the tubing you are considering is a generic no-name variety that is not labeled NSF or if the retailer can’t tell you, choose another brand. Our professional draft installation business had an unfortunate call-back after running out of tube and had to install some unknown “beverage line” bought from the nearest plumbing supply house. You’ll know if your tube does not cut it because it will have a distinct plastic odor and taste. Lesson learned. Make no mistake, NSF is worth it.
To determine what tube/hose goes where, consider the application and then eliminate choices based on performance characteristics. You can take a deep dive into all sorts of manufacturer specifications but be aware; the performance data can get really dense really quick. Instead, let’s take a look at some of the most popular items as well as some relatively recent innovations and determine which tube is best for your application. We will go in the brewing order, starting with the hot wort, then cold crashing and fermentation, packaging, and if you are kegging, draft beer dispensing.
Hot Side
Getting 5 or 10 gallons (19 or 38 L) of boiling wort from one vessel to another requires some care and planning. High-temperature tubing is necessary. All quality tubing will have a maximum temperature rating, but it may not be easy to determine if you don’t know the specific brand or where to look. High-temperature tubing on the other hand will be marketed specifically for high-temperature applications. As the liquid temperature goes up, the pressure rating drops considerably.
The most popular choice, and the one you should probably be using for gravity transfer, is silicone tubing. This material can withstand tem-
peratures up to 500 °F/260 °C (and -100 °F/-73 °C if you should ever need to experiment with cryogenics) so it can easily handle boiling wort. Sili-
con is very flexible with good bend radius and does not kink very easily. It is translucent so you can inspect the tubing before putting it into service after you may or may not have remembered to flush out the wort from the last time you brewed. The downside is silicon tubing has a typical pressure rating of 10 to 30 psi at 70 °F/21 °C. Non-braided silicone is only appropriate for gravity transfer. It has the strength of a wet noodle when it is transferring hot liquids and it is therefore not an option when transferring via pressure. It is a dangerous situation if the tubing bursts and results in boiling liquid being sprayed everywhere, so carefully adhere to the manufacturer’s specification for temperature and pressure. If the specification is not available assume your tubing will fail and save yourself a trip to the emergency room.
A braided version of silicone is available, known by the trade name Silibrade. It is fairly expensive but a viable option. Silibrade Platinum Cured Braided Silicon Hose has extraordinary hot liquid properties and is available from our supplier in 50-foot (15-m) rolls only. The 3⁄8-inch ID variety is available for a bit over $500. So, back to our more affordable options most homebrewers will be seeking.
Do a Google search for thermoplastic elastomer (TPE) tube. This is more expensive than ordinary silicone tubing but a good solution. Options will list a temperature rating and a burst pressure. Note this is burst pressure, not operating pressure. As the temperature of the fluid increases, the operating pressure rating goes down significantly so be smart and don’t overload your transfer tubing. A Canadian supplier, creatively named Canadian Beverage Supply (CBS), has a TPE that is NSF that I use. While CBS is a wholesaler and won’t sell 10 feet (3 m), you can ask your homebrew supplier to get some.
Now, here is the thing about high- temperature hose; manufacturers provide all sorts of performance characteristics, including maximum temperature rating, but there is very little published data for working pressure capacity at boiling temperature. Silibrade, for example, is a high-temperature braided silicone hose and the manufacturer publishes working psi at 70 psi. The 3⁄8-inch Silibrade is good for 166 psi at 70 °F/21 °C. If you want to know the pressure rating at 212 °F/100 °C you are on your own. This leaves us in a lurch. Drop the temperature of your wort before pushing it under pressure and you can get the liquid to within published specifications. Still in a lurch. One solution is to put on your plumber’s hat and incorporate copper or stainless steel tubing into your brewery. Working with rigid copper or flexible copper tube (aka refrigeration tube) is not particularly difficult. I find the end result to be satisfying if a bit unwieldy. Refrigeration tubing kinks quite easily and once it has a crease it can’t be used. Copper will hold plenty of pressure if installed correctly and has no problem with boiling liquid. Or you may consider a braided polyethylene or PVC tube, which we will discuss in the next section.
TPE tubing has some great properties that make it one of the few dual-use materials. TPE is flexible at temperatures as low as 0 °F/-18 °C, is more inert than other materials, and is phthalate-free. The TPE I use at home and at commercial installations is sort of a super-PVC, if a bit less friendly to work with. TPE does not easily slide over barbed fittings. Uttering a few inventive curse words usually seems to help the situation. So does dipping the end in very hot water, employing the assistance of a hair dryer or careful use of a paint gun. A few seconds at a temperature setting below 400 °F/204 °C is ideal. This is good practice for any tubing but especially so for TPE. Be aware that clamps fail more easily as the fluid temperature inside increases or if you accidently melted the material when you heated it up prior to placement over the barb. When these materials get hot they also get softer and can slip off of a fitting if not securely attached.
Silicone tube is a good option for gravity transfers but should not be used to move hot liquid via pressure.
Cold Side
Cold-side transfers require tubing that remains flexible when cold and are preferably clear or translucent to facilitate inspection. PVC is the most popular choice and it is also the cheapest and easiest to find. For many of us it works just fine. PVC tubing hits almost all of the marks. It’s easy to work with, comes in a variety of sizes, can incorporate braided polyester reinforcement to increase the working pressure rating, and it is cheap. So cheap that it is advisable to buy at least twice as much as you need and dispose of the tubing if it gets stained or otherwise requires heavy cleaning. The environmental impact of disposal is arguably equal to or less than the impact of chemical cleaning and rinsing.
A downside of PVC is that it sometimes has a bad habit of absorbing odors and flavors. So much so that your light lager may end up tasting like the previous keg of coffee stout if the coffee stout sat in your PVC tube for an extended period. This problem is much less common with modern tubing but was quite a thing years ago. Soda beverages, including birch beer and root beer, are particularly prone to foul PVC lines — so much so that the flavor would sometimes migrate straight through the wall of one tube and into an adjacent line.
Alternatives to PVC include polyethylene (aka “poly” tube) and polyolefin (aka barrier tube). Polyethylene is not as flexible as PVC, is semi-transparent or opaque, and fairly cheap. It’s not nearly as easy to work with as PVC and if you bend it too much it will kink, sometimes with a crease that can’t be worked out no matter how hard you try to reshape the tube. That crease is going to create a flow restriction and a weak spot forever, so it’s probably going to need replacement. Just one moment of careless handling and that tube is toast. Polyethylene is lately used less and less and is being replaced with barrier, ultra-barrier, and other polyolefin-based type tubing. More on those later. If you have a permanent installation where you can mount polyethylene or it will remain in place such as within an insulated glycol loop then poly is a fine choice, otherwise polyethylene offers little other than some cost savings.
Racking It
Time to get your beer into bottles or kegs. For this we want a tube that is flexible. I like a clear tube so I can see if I am transferring bright beer or sediment. PVC or TPE tubing are the obvious choice. If you pump your beer through a filter you’ll need a tube that can handle the pressure, so a braided poly or braided PVC tube is appropriate. Consider the ID of your tubing. I use a 3⁄8-inch ID tube in order to get a good flow rate going from my siphon into the keg. If you bottle with a bottle wand, the tube ID should fit over the end of the wand.
Gas Line
When dealing with pressurized gas, CO2 in our case, we need to recognize the maximum pressure rating of each component in the system. CO2 regulators used for beer usually have a pressure relief valve (PRV) rated for 65 psi, and the regulator won’t go much beyond 60 psi when the dial is wide open anyway. Your Cornelius keg on the other hand is probably rated for at least 120 psi but the PRV may be set to a much lower pressure. If you happen to have a high-pressure regulator, it was made for the soda beverage industry and will max out at around 120 psi. Brewers really don’t need to ever exceed around 40 psi, even when force carbonating. PRV’s provide an obvious level of protection but are only one component in the system so do not solely rely on the release valve. Mechanical devices do fail after all. Your tubing from the regulator should always have a pressure rating above the maximum pressure you could theoretically apply to your system.
Braided tubing is desirable for gas. The ID of your gas hose does not need to be anything greater than 1⁄4-inch but if you are using braided hose somewhere else in the brewhouse it is a good idea to consolidate sizes. PVC braided hose that is specifically marketed for use with draft systems is ideal because it will stay relatively flexible when cold. A trade-off is dual durometer PVC, which is not braided and depending on the ID, will have a working pressure of 50 to 80 psi if you purchase the thick wall variety. Dual durometer remains very flexible at cold temperatures and can make keg jockeying a bit less cumbersome.
Barrier Tubing
Barrier tubing is a newer variety of polyolefin tubing that has a very useful characteristic. “Barrier” refers to the ability to limit oxygen permeation into the beer. A secondary benefit is that the barrier is also very slick. This means less opportunity for bacteria, yeast, or any detritus to stick. We take great care to limit oxygen exposure to our finished beer. Reducing oxygen uptake is certainly a good thing. The barrier works both ways, too. Flavor transfer is pretty much eliminated. A recent advancement is “ultra barrier.” Just like barrier only more so. Given the choice between the two, go with ultra since it has better performance than ordinary barrier and costs only a bit more.
Barrier tubing also has some disadvantages. It is more expensive than most other varieties, though not tremendously so. Barrier tubing has moderate resistance to kinking and it does not have a very good bend radius either. The biggest drawback, though, is that barrier tubing can be too slick. You need to use quite a bit to balance a direct draw draft system such as a kegerator. If you need to move beer over a long distance, an application where a lot of beer sits inside the line for extended periods and line resistance can be an issue, then barrier is the by far the best choice. If you have a keezer or kegerator and believe you have a stale beer problem, first do everything you can to eliminate oxygen exposure in your process. Folks have been using PVC without problems forever, but as stated previously I’m a homebrewer with solutions looking for problems. There is nothing wrong with experimenting and upgrading. This is why many of us homebrew.
My personal kegerators (yes, plural, I am aware of my vices) and all of our commercial installations have transitioned to the CBS TPE tube discussed previously because it is NSF and also has barrier properties. It also provides 3.0 psi of resistance per foot in the 3⁄16-inch size.
One unique brand of barrier tube incorporates a silver lining and is said to be effective against the top four beverage spoiling bacteria: Acetobacter lovaniensis, Wickerhamomyces anomalus, Lactobacillus Brevis, and Pseudomonas aeruginosa. Don’t have these issues? Then let’s take a pass on this product. That said, it is supposedly good for 528 gallons (2,000 L), which if my math is correct is a lot of homebrew.
Clamping It
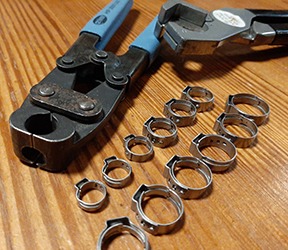
Let’s not forget we need to secure our tubing to the fittings. We have two choices here, one intended to be permanent and the other easily removed. You likely already know about worm clamps, which are tightened and loosened via screw, so not much to discuss here other than that if you have not already noticed, no name worm clamps will rust, especially the screw. I always buy Ideal or Economy brand. Worm clamps are cheap. The clamp has one job and it better work properly. Buy a good worm clamp.
Oetiker clamps are used in industry in place of worm clamps. Oetikers come in a huge variety of sizes and can be found across all industries, from automobiles to dishwashers. Once they go on they stay there. Beverage industry uses a variety of Oetikers called StepLess®. These are the clamps that are typically with the PEX fittings in the plumbing supply section and sold in bags of ten. The StepLess® clamp has a tongue in groove design that provides uniform pressure across the tube wall and fitting. When installed with the special crimper tool they are neat and much less bulky than worm clamps allowing for lines to be placed close together. The drawbacks by design are that they are meant to be permanent and difficult to remove. Not impossible to remove but trust me, you’re not going to enjoy wrenching one off. They also have a fairly close tolerance, so the correct size is needed. Buy a variety of sizes and return what you don’t need. If you are a belt and suspenders kind of person I recommend Oetikers.
While tubing is certainly not the most glamorous aspect of brewing it does require some arcane knowledge in order to get it right. Hopefully you now have a better understanding of some of the choices available and can go about evaluating your options to make informed decisions.