Continual Improvements

Most brewers want to make better beer. Whether we define “better” as tastier beer, conformance to the Beer Judge Certification Program (BJCP) guidelines, or a more efficient brew day, we want to improve our processes and outcomes. My day job is helping people improve business and production processes where improving a process generally means increasing the quality or reducing the cost of the product.
My profession defines quality as conformance of a product to expectations. Mass-market American lagers conform to consumers’ expectations very closely, the hallmark of a high-quality product. Many of the procedures I like to call “beer lore” are industrial solutions to produce beer more efficiently. That mass-market American lager is the beer that consumes the least resources, including ingredients, energy, labor, and time, in the production of what most Americans, thanks to efficient marketing, consider potable beer.
A process is what needs to be done to make something, a procedure is how a step is done. An example of a process step is “chill wort to pitch temperature.” All brewers do this. Where I use a counterflow chiller and water, another brewer may use the “no-chill” process to save water. Moving my boil indoors using an induction cooktop rather than boiling outdoors on a propane burner is another example of using a different procedure to accomplish the same task. No-chill brewers changed their procedure to save resources, I changed mine for convenience: Here it always seemed the wind kicked up right about the time the hot break formed. My procedure change also saved resources: The electricity to power my cooktop comes from my rooftop solar panels and I no longer have to buy propane.
In 2009, Sir Dave Brailsford created Britain’s first winning Tour de France team. To do this, he decided to focus on small improvements to the team’s racing and support procedures such as painting shop floors white to easily detect dirt (which could undermine bike maintenance) or bringing team members’ mattresses along to ensure a good night’s sleep. In three years, the team won the Tour, then went on to win it three of the following four years.1 The team’s goal was to improve the outcomes of each of their procedures by just 1%; the outcome of all those tiny improvements was their Tour wins. Brailsford called this “marginal gains.” We call it “continual improvement.”
Winning the Tour de France is easy to measure: The rider that finishes the race in the least amount of time is the winner, some rather Byzantine rules aside. Beer quality is not quite that cut-and-dried. Winning brewing competitions depends on intangibles — are the flavors what are expected for a style? Are there flaws? What is the overall impact of the beer? Is it a world-class example of the style? Does taking a sip make you want to take another? Is something missing? To define these factors, most competitions turn to the BJCP Style Guidelines.
Love them or hate them, the BJCP guidelines are a global standard for classifying beers. It was pretty cool seeing the BJCP guidelines used in Gdansk, Poland to signal drinkers what to expect from what is in their glass. But the style guide is not the only possible measure of your beer’s quality. You may be brewing an experimental style not described in the style guide, or you may choose not to accept the style guide as a definition of your beer’s quality. Neither approach is wrong. To excel at brewing you have to measure the beer’s quality, and to measure quality you must calibrate the most important instrument in your brewer’s toolbox — your palate.
Improvement is based on measurement and measurement requires calibrated instruments. Fortunately, the BJCP provides us an excellent calibration tool, the Checklist Scoresheet.2 While most competitions use the “free-form” scoresheet, the Checklist Scoresheet breaks the score down into the important aspects for each scoring category, then helps provide a vocabulary to describe the aspects of beer flavor, appearance, mouthfeel, aroma, and overall impact. Below is what this looks like in the section describing a beer’s flavor.
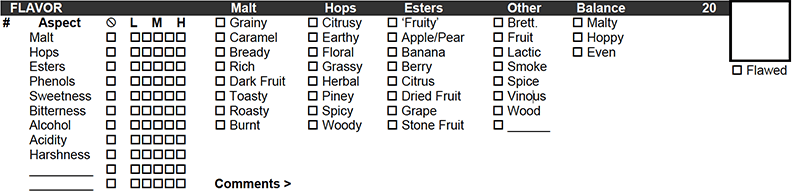
The major aspects of the beer’s flavors are listed down the left side along with a five-point (six if you count the box for absence) scale indicating the level perceived. A very malty English barleywine could score a 5 for “malt” while an American lager may score a 1, and both could be correct for their styles. This scale corresponds with the levels listed in the BJCP guidelines. For example, if a beer should have moderate to high hop flavor, any score of 3 to 5 would be acceptable. The scoresheet also provides detailed flavor descriptors for the major aspects of the category. You may want a “piney” and “citrusy” hop finish in an American pale ale, or you may want something completely off-the-wall if your beer is your own creation. Either way, the scoresheet provides you with a scale and a vocabulary for scoring your beer.
To further calibrate your palate, the style guidelines list reference beers for each style. You may use these reference beers to help calibrate your palate: Get one of the beers, understanding if it is not domestic you may be tasting a beer that has been in the supply chain for months. By tasting a beer you know to be an excellent example of the style, you can determine what is meant by moderate malt flavor, grainy with some dark fruit notes. Or, if you are not brewing to style, fill out the scoresheet as a prediction of what your brew will be. Then brew your beer.
I’ve spent a good deal of ink on calibrating your palate for a reason. For continual improvement purposes, treat every brew session as an experiment. To design an experiment, you must make a prediction of the outcome. To keep yourself honest, it pays to document your prediction and then refer to it once the experiment, in our case a beer, is done. As an example, I’ll use a recreation experiment I have done, with the most recent recipe provided at the end of this article.
While in Houston, Texas with my wife, we stopped by a Mexican restaurant for dinner and a beer. I rolled the dice and asked for “something dark” and looked forward to being surprised. I had no idea what the beer was but I liked it, so I wrote down some notes:
Dark, almost black, ruby highlights
Table-strength
Not roasty; chocolatey, dark chocolate with a hint of sweetness, corn
No esters apparent
Medium bitterness
Limited hop nose; noble hop character
Back home in Colorado, I put a recipe together to replicate the beer based on those characteristics. I have brewed it five times since with minor modifications every time. On a subsequent trip to Houston we visited the same restaurant. This time I asked the bartender what it was. It turns out the beer was Saint Arnold’s “Santo,” which the brewery calls a dark Kölsch. My version was a bit stronger and I did it as a lager using Mexican lager yeast; otherwise, the results were very close.
The notes were a description of what I wanted to brew. A newly formulated recipe is a starting point. Start with an idea of what you want to produce and describe it. You may do so as I did, by taking notes, or you can use the Checklist Scoresheet. Then formulate your recipe and brew it.
Brew the beer exactly as you planned. No audibles, on-the-fly changes, nor substitutions. Follow the recipe and procedures as closely as you can using your standard brewing procedures. Once the beer is carbonated, taste and fill out another score sheet without referring to the first one, then compare your outcome to your prediction, answering the questions:
Is the beer what you expected? If not, how does it deviate from your prediction?
What could have caused the deviations?
Is the beer good? Are there flaws?
What could have caused the flaws?
What could be improved?
Another approach is to have your “brain trust” taste the beer. Your brain trust could be your homebrew club or other beer aficionados. Asking them for honest feedback could identify potential areas of improvement. Our local homebrew shop puts on a “Homebrewer’s Night” every two months. Putting your beer out there will result in feedback (the more honest that feedback is the more helpful). Another potential source of feedback is competitions. Judges are trained to find and write about one thing you can do to improve your beer.
Now that you have identified what could be improved, it’s time to start improving.
Making Improvements
You now have a choice in how to approach improving your beer. You have hopefully documented what you originally intended and know how the beer deviates from your intent, including flaws. If your beer contains more than one flaw or you missed some major brewing parameter such as original gravity or attenuation, you may want to make major changes for your next brew of the beer, particularly if two factors are not related. Otherwise, if the beer is close to your prediction, the experimentation style most recommended in my field is called One Factor at a Time (OFAT) experimentation.
OFAT is the style of experimentation most often used by the Toyota Motor Company, the originators of the continual improvement process. Workers on the shop floor are encouraged to change things using a variation of the scientific method called “Plan-Do-Check-Act,” most often abbreviated as PDCA. Employees change something about the procedure and then observe the result. If the change results in an improvement in efficiency or quality, the change becomes the new procedure. If not, the change is abandoned and something else is tried. Using this method, Toyota rose from being a laughingstock in the late 1950s and early 1960s to become the world’s dominant automaker by the 1990s due to the compounding effect of these changes over time.
Here is where all the ink about calibrating the palate and documenting results pays off. After you have eliminated flaws and are hitting your numbers on brew day, start improving. Pick one of the factors on your score sheet and research what you need to do to change it. As an example, if your malt flavor is low, you may want to change base malt, yeast, fermentation temperature, or look at potential oxygen ingress. This is important enough to deserve all caps: DO NOT CHANGE MORE THAN ONE FACTOR! If you do, you will not know what worked.
It may be helpful when planning your changes to know what factors have the most effect on a beer’s outcome. For that, I’d refer readers to my article “Brewing Priorities for Beginners” from the March-April 2021 issue. No amount of recipe adjustment will remove a harsh phenolic taste in your beer unless you are brewing a smoked beer; however, a Campden tablet might. Water chemistry is a low-order factor in beer’s flavor but if you are brewing a light lager, it is an important one and a bit of chloride or sulfate may be just what your beer needs.
Make your change to ingredients or process and brew the beer. When it is finished, fill out a new score sheet and compare to both the previous brew and to your desired outcome. You may have gotten closer to your intention or you may be farther from it. If you are closer, great! You have improved your beer. If there is no change or if you are farther away from what you intended, you have learned something that does not work and you can revert to your previous recipe and process. Time to try another change. Using this method, which works best with more frequent brews of smaller batches, will allow you to zero in on the results you want.
Using the continual incremental approach, I’ve known brewers to progress from producing seriously flawed beers to winning large competitions in just a few years. Applying continual improvement practices to your own brewing will not win you the National Homebrew Competition overnight but it will, gradually, improve your beer.
Mamacita’s Dark Kölsch
(5 gallons/19 L, all-grain)
OG = 1.050 FG = 1.014
IBU = 27 SRM = 21 ABV = 4.7%
An homage to St. Arnold Brewing’s Santo, which was in the brewery’s regular rotation from 2011 until they discontinued brewing it in 2021.
Ingredients
4 lbs. (1.8 kg) American six-row malt
2.5 lbs. (1.1 kg) Munich dark malt (20 °L)
2.5 lbs. (1.1 kg) Munich light malt (10 °L)
1.5 lbs. (0.68 kg) flaked corn
3.5 oz. (100 g) Carafa® II (425 °L)
3 oz. (86 g) American chocolate malt (350 °L)
5 AAU Tettnanger hops (first wort hop) (1.1 oz./31 g at 4.5% alpha acids)
4.5 AAU Tettnanger hops (15 min.) (1 oz./28 g at 4.5% alpha acids)
SafAle K-97 or other Kölsch/German Ale yeast; SafLager 34/70 or other German lager yeast; or White Labs WLP 940 (Mexican Lager) yeast
¾ cup corn sugar (if priming)
Step by Step
Mash in with 4.1 gallons (15.5 L) of water treated to moderate alkalinity at 152 °F (67 °C) and hold for 60 minutes if doing single-infusion mash. If doing a step mash, mash in at 144 °F (62 °C) for 30 minutes and then raise the temperature to 156 °F (69 °C) and rest an additional 30 minutes. Mash out at 170 °F (77 °C) for 10 minutes if desired. Recirculate the wort until clear, add first wort hops to the brew kettle and drain the first runnings into the kettle. Batch or fly sparge to collect 6.5 gallons (24.6 L) of wort, this should take approximately 4.1 gallons (15.5 L) of additional water.
Boil for 90 minutes, adding hops as indicated. Yeast nutrient and kettle finings may also be added, if desired.
Chill the wort to 2–3 °F (1–2 °C) below your yeast’s lowest recommended fermentation temperature and pitch an adequate quantity of healthy yeast (1 packet of dry ale yeast, 2–3 packets of dry lager yeast, or a minimum of a 3-L/3-quart starter of liquid yeast plus adequate oxygen). Let the temperature rise to the desired fermentation temperature, hold until high kräusen or half of extract has been consumed, then let the temperature rise uncontrolled.
When fermentation is complete, the beer benefits from lagering appropriate to the yeast type, 2–4 weeks for ale, 4–6 weeks if a lager yeast was used. Spund, force carbonate, or bottle condition to 2.5 volumes.
Partial mash option:
Replace the six-row and both Munich malts with 3.75 lbs. (1.7 kg) of light or Pilsen dried malt extract and 1.5 lbs. (0.68 kg) light Munich malt.
In order to convert the starch in the flaked corn, use about an equivalent (1.5 lbs./0.68 kg) of light Munich malt. Place both grains in a muslin bag and submerge in 5 quarts (4.8 L) of 164 °F (73 °C) water. The mash should stabilize around 152 °F (67 °C). Try to maintain this temperature for 45 minutes. In a separate small grain bag, add the crushed roasted malts. Steep those in the mash for the final 15 minutes. When one hour has passed, remove both bags, place them in a colander and slowly rinse them with 1 gallon (3.8 L) of hot water. Add water to make 3 gallons (11 L) of wort and stir in 2 lbs. (0.91 kg) of a light or Pilsen dried malt extract and the first wort hops.
Bring to a boil and boil for 60 minutes adding the second hop addition
for the final 15 minutes along with a yeast nutrient and kettle fining if desired. With 10 minutes remaining, add the remaining 1.75 lbs. (0.8 kg) Munich dried malt extract. After the boil is complete, chill the wort, transfer to your fermenter and top off to 5 gallons (19 L). Follow the remainder of the all-grain recipe.
Recipe Notes:
The name for this beer came from enjoying a beer at Mamacita’s restaurant in Pasadena, Texas that inspired this recipe. I didn’t know what the beer I ordered was, but I was enchanted! I took notes on the flavors (chocolate, malt, breadiness, low to no hop character, some maize flavor, no esters, table strength) and, unfortunately, forgot to ask what the beer was on the way out.
Back in Denver I attempted to reproduce it. The first brew was close, at least to my notes. It was a clean, dark lager, good chocolate notes, perhaps a bit more intense than I intended. I was on the sixth iteration before we were back in Pasadena. It was then that I sat at the bar and chatted with the bartender, eventually figuring out that the beer in question was Santo, a dark Kölsch from Saint Arnold Brewing. This recipe is iteration #9 for me, and the first I’ve done with a German ale yeast. Previously I’ve used a Mexican lager strain. Both versions are quite delicious. The key to success is to manage the fermentation well using temperature control appropriate to your chosen strain of yeast and pitching plenty of it.
References
1 https://www.inc.com/jeff-haden/why-brilliant-leadership-minds-embrace-rule-of-1-percent.html