Decocting While Recirculating? Also: Iodine Starch Testing and Defining Mash Conversion
Q
I’m about to delve into brewing dark lagers and I’m wondering if there have been any articles written on decoction mashes when you are using a Heat Exchange Recirculating Mash System (HERMS) or Recirculating Infusion Mash System (RIMS)? I’ve got a three-pump, all-electric heat, HERMS setup using a modified keg with a false bottom as the mash/lauter tun and am typically recirculating my mash continuously. I’ve never done a decoction mash and am not sure what the best way would be to pull a thick or thin decoction when I’ve been heating and recirculating the mash to get it to my first rest temperature. Is it feasible to pump the decoction to my boil pot and then back into my mash tun so I’m not handling hot liquids? Could I just pump liquid from the mash tun to the boil pot and add grains from the mash tun and then pump the mixture back into the mash tun after the decoction?
Randy Halseth
Vicksburg, Michigan
A
Randy, this is an interesting question that I will address with a few different perspectives. The first is a short answer to your basic question; I don’t know of any articles that address using a RIMS or HERMS brewing setup for decoction mashing. There are a few key reasons why doing this is not practical, and the leader of this list is that RIMS and HERMS designs are based on pumping wort, not mash. This simple fact really has two implications for even the most die-hard MacGyver brewers.
Challenge number one is the pump suction connection point; these systems pull wort from the non-mash side of a screen and pump the wort through a heater. In a RIMS design, an in-line heating element, usually electric, is used to heat wort that flows back to the mash tun. The HERMS design is similar, except the heat exchanger is usually a copper (or stainless) coil that is submerged in hot water. Without worrying too much about the ease of changing the location of the pump suction from the wort side of the mash tun to the mash side, let’s look at the pump, the suction diameter, and the line size.
When liquid piping systems are designed, flow rate, viscosity, and pressure drop across the system are the key variables that really define the pipe/hose diameter selected for the duty. In most brewing applications, the maximum wort/beer velocity is set to about five feet per second (1.5 m/s). Let’s say that a RIMS/HERMS brewhouse is designed to turn the entire wort volume every 10 minutes. For discussion purposes, let’s assume a liquid volume of 5 gallons (19 L). In this case, the design flow rate is 5 gallons (19 L) 10 minutes, or 0.5 gallons per minute or gpm (1.9 L/min.). The pressure drop across the piping system is negligible because the flow path is very short and there is no real change in elevation (liquid head), so I am not going to touch on these topics that are very important in larger pumping systems. The 0.5 gpm (1.9 L/min.) flow rate through a ¼-in. (6-mm) ID (inside diameter) hose translates to a velocity of 3.27 feet per second (1 m/sec). In practice, no one wants to build anything using ¼-in. (6-mm) stainless or copper fittings and tubing because they are too delicate, so larger fittings and lines are used. That’s why 3⁄8-in. (9.5-mm) hose is a common diameter for this type of design.
The good news is that decoction mashing is doable and is actually pretty easy to perform.
Now let’s look at this system from a mash-pumping perspective. Even though mash is not particularly viscous, the particle sizes of the grain bits in the mash are the size and shape to cause clogs in pipes that are less than about 1.5 in. (38 mm) in diameter. On a homebrewing scale, 1.5-in. (38-mm) piping is huge! Yes, smaller line sizes are sometimes used, but they are prone to clogging. And forget about pumping mash through a skinny HERMS coil. Carrying this what-if scenario to completion, even if mash could easily be pumped through a smaller line, say ¾ in. (19 mm) in diameter, a pump with that size connection is required to make this work and now you are also looking at an expensive pump upgrade. The bottom line is that mash pumping on small systems is not practical. In my opinion, this challenge is the real deal breaker for the proposition. Not to mention that piping modifications, including the location of your pump suction on the mash tun, are also required.
The good news is that decoction mashing is doable and is actually pretty easy to perform. My suggestion is to go rogue and use some tools that are not part of your normal brewing setup. Going rogue is the technical term for cobbling together a solution using any number of approaches to solve a problem. My rogue solution to decoction mashing uses a kitchen scale, an 8-in. (20-cm) handheld, stainless steel strainer, a pot or two, a heating source that is not tied to a hard-piped RIMS or HERMS rig, and some good pot holders. Without diving down the rabbit hole of decoction mash heat calculations, let’s simply assume that a typical decoction is equal to about a third of the total mash. A very convenient way of measuring this third is by weight, which is super easy for metric brewers. Those calculations that I am avoiding are based on weight, so there is a second reason for using weight instead of volume. Let’s look at a recipe with 3.5 kg (7.7 lbs.) malt and a water-to-malt ratio of 3:1 as an example; this translates to 10.5 kg water and 3.5 kg of malt for a total mash weight of 14 kg, and a third of this total is 4.7 kg (10.4 lbs.). One or two stockpots can be used if you don’t have something handy in your homebrewing equipment arsenal.
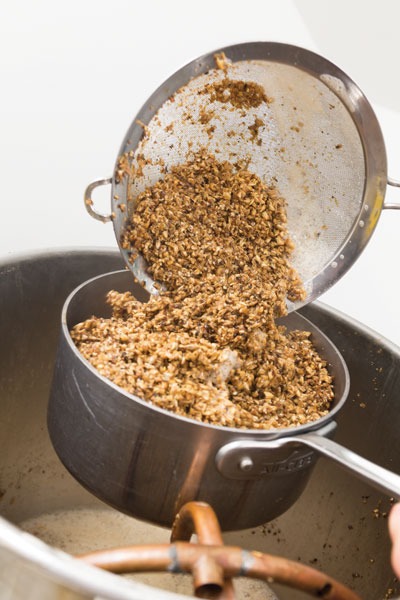
Traditional decoction mashing draws the thickest portion of the mash to be boiled. This is easy to do at home with the assistance of a strainer. Simply use this device as a ladle of sorts and pull out 4.7 kg (10.4 lbs.) of mash. Because mash is like a sponge, you can let most of the free-draining wort drain into the mash tun before transferring the scoop of mash to the pot and have plenty of retained wort for the boiling that is soon to commence. Once you have removed the required amount of mash, place your pot(s) of thick mash on your secondary heating device (a kitchen range or outdoor cooker works great for this), and gently heat to the boil while mixing. I say gently heat because you do not want to burn your decoction. You will notice that as the mash heats that it will become thinner and less viscous as alpha amylase acts upon starch up to about 162 °F (72 °C), and due to the rise in temperature. At some point you will find that stirring is not required to prevent scorching. The length of the decoction boil varies, so boil for whatever duration, and then return the boiled mash to the mash tun. Longer boils contribute more color and flavor than shorter boils.
This is the step you wanted to avoid, but without major design changes to your equipment this is what I am suggesting. The reason that multiple pots be used is to address your safety concern and also to allow for the use of kitchen pots versus more brewing equipment. If a big pot of pasta can be boiled and moved to the sink for draining, transferring a similarly sized pot of boiled mash should be manageable.
Decoction mashing is a very cool method in terms of mashing biochemistry, brewing history, and flavor. It also solves some very practical problems for homebrewers who have unheated mash tuns and want to conduct multi-temperature mashes from time-to-time. Your question was specific to the mechanics of the process, so that’s what I covered. Decoction mashing for your dark lager may indeed be worth the extra work. Check out: “Heart of Darkness Dunkel, Springfield Brewing Company” and read the Q&A about this beer for some anecdotes. Cheers!
Q
I’ve been brewing for a few years now and have very recently joined up with BYO. In the last few days I’ve reviewed the Double IPA recipe listings, which look really good and I’m gearing up to start my first clone attempt. In the instructions is the phrase “until the enzymatic conversion is complete.” Problem is I’ve never heard that phrase before so could you help by explaining what it means and advising how I can tell when it’s complete.
Andrew Robb
Sydney, Australia
A
Welcome to BYO where we are committed to providing current, helpful, and technically sound brewing advice to our readers! It’s always nice seeing great homebrewing questions from all parts of the world and we thank you for the query from down under. Now, onto the question at hand: Mash conversion.
Brewing is an ancient practice and the terms used by brewers are a hodgepodge of words, phrases, and units used by brewers who came before us. Some of these terms, like conversion, are commonly used by brewers but not always very helpful when it comes to really trying to make meaningful changes to beer flavor. Conversion simply refers to how starch, specifically amylose, reacts with iodine. Take a sample of wort early in the mash, place it on a white plate, hit it with a drop of iodine solution, and a deep purple/inky black color immediately forms. As the mash rest is extended and starches are transformed by malt enzymes, especially alpha amylase, the color-forming reaction between wort and iodine ceases and the mash is said to be converted. Although this may sound like some religious experience for the mash, conversion is a bit nebulous. Let’s dig a bit deeper into malt starch, malt enzymes, and what happens during mashing.
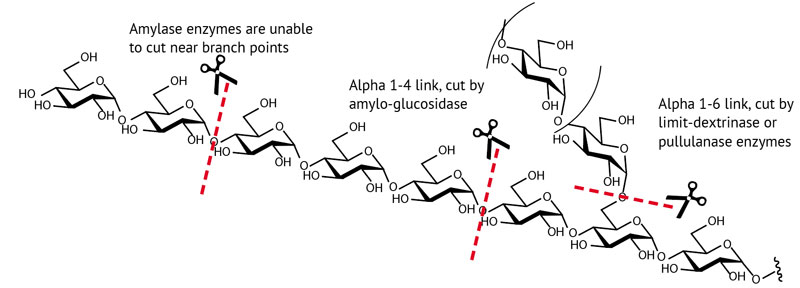
There are two types of starch found in cereal grains ranging from Amaranth to Zizania: Amylose and amylopectin. Starch is a glucose-based polymer, where each glucose sugar molecule is a monomer. And these glucose monomers in starch are either linked by a bond referred to as alpha 1-4 or alpha 1-6. Amylopectin is a branched molecule including alpha 1-4 and alpha 1-6 bonds, but amylopectin doesn’t react with iodine and is not part of this discussion. However, all of the glucose monomers in amylose are linked by alpha 1-4 bonds and amylose polymers react with iodine to form colors ranging from colorless to deep purple/inky black. Although the color is related to the size of amylose polymer, the iodine test used by brewers is declared in absolute terms of positive and negative. Iodine-positive wort appears purple/black in the presence of iodine and iodine-negative wort has no real color change. Pretty subjective for sure. So, what does this test reveal?
Although beta-amylase is the enzyme in malt that produces fermentable sugars, mainly maltose, from amylose and amylopectin, it does not have a drastic effect on the reaction between amylose and iodine. Alpha amylase, on the other hand, produces little fermentable sugar from amylose and amylopectin, but it handily chops large starch molecules into smaller chunks that beta amylase can digest. Brewers need both enzymes to produce wort that has a high percentage of fermentable sugars. The iodine test is really telling us something about the action of alpha amylase on amylose. Iodine-positive wort is low in fermentable sugars and the iodine test is a handy way of signaling brewers that the enzymes need more time to do their thing. That’s an anti-climatic conclusion, but that’s really all the iodine test tells us. Wort could be very low in fermentability and be iodine negative, but in most cases, conversion signals that things have generally gone as planned. In that regard, an iodine-negative test result is a pretty good indicator of a successful mash.
Time for a Mr. Wizard digression about this test. There was a time when I followed the rules of brewing and always checked for mash conversion before mashing out because good brewers follow rules and enzyme denaturation is irreversible. After umpteen negative iodine tests after the 70 °C rest (158 °F for brewers who are not yet hooked on metric) I said to myself “Ashton, this is silly. Modern malts are super consistent compared to malts from the past when this test was made popular. It’s time to stop pulling samples that don’t tell me anything new.” And that was when I stopped performing the iodine test. That was about 25 years ago. I thought this was maybe my lazy little secret and kept it to myself.
A few weeks ago, I was having a phone meeting with a great brewer at a brewery that will remain nameless and two of my work colleagues who are both brewing scientists. We were discussing the use of exogenous enzymes, amylo-glucosidase and pullulanase, to produce highly fermentable wort (you can learn more on this topic in the October 2020 issue’s “Advanced Brewing” column). One of my colleagues asks the brewmaster we were meeting with “was the wort iodine negative?” And the brewmaster said “I am embarrassed to admit that we did not perform an iodine test because they are always negative and we eliminated that step in our process years ago.” Oh boy, I was smiling a toothy smile after that confession because I knew that I was not alone! Indeed, many modern brewers declare starch conversion complete when the mash cycle, defined by ratio of malt and water, mash pH, mash temperature, and mash time has ended. Some always use the iodine test just to be certain and others get on with the day. One counter argument to this though is that your thermometer is not reading correctly and you have missed your target mash temperature. You can see one such example in the May-June 2020 issue of Mr. Wizard, available at https://byo.com/mr-wizard/always-question-your-instruments-iii/
And that, Andrew, is what brewing recipes really mean with the phrase “when conversion is complete.” Now, it’s time to vorlauf; ciao!