Double Up: Two Brews in the Time of One

My entrance into the joys of homebrewing began at an office Christmas party in 1991, when a colleague brought two six-packs of his homebrew to the party. My first thought was, “Oh dear, I’m gonna have to try this slop and be polite.” One taste and I said, “This has real flavor! How do you make this stuff?” His supplier, and my first, was an elderly gentleman who used one room of his house to sell beer supplies. My first beer was an old ale made from a kit that had 3 pounds (1.35 kg) of hopped liquid malt extract, a packet of dry yeast, and instructions to add 6 cups of corn sugar and water. I thought it was wonderful at the time, but my brewing has come a long way since that humble beginning.
Even as I’ve gotten more experience and my understanding and technique has improved, one thing that that hasn’t increased is available time. That limitation was a motivator for me to develop a technique (or maybe it is more of a planned-out schedule) that allows me to brew two delicious beers in one session with little more time than it takes to brew one beer. Other significant benefits are that it has less impact on the environment and cuts many of the “chores” required in our hobby in half. I’m here to explain the process so others who find time constraints hindering their supply of homebrew can follow suit.
My process takes a little over two hours and yields two 5-gallon (19-L) batches of different style beers from liquid and/or dried malt extract and steeping grains. This time estimate does not include the time it takes to set up the equipment beforehand or chill the wort and pitch the yeast, nor clean and put away the equipment afterwards. How long these activities take depends on your equipment, how you chill the wort, etc. I can say, based on my own experience with single-batch brew days, that these activities take only about 10% more time for two batches than for one, whereas two batches on two separate brew days takes 100% more time — so there are significant time savings to be had there as well.
So, how’s it done?
My step-by-step process for a typical brew day goes like this:
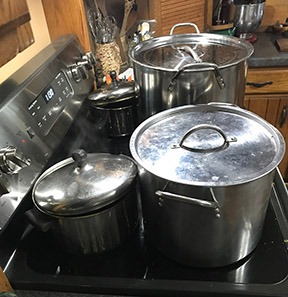
1. Gather all the equipment and ingredients. I often do this the day before if it’s convenient. This takes about the same amount of time whether I am brewing one beer or two. Most of the equipment is the same either way. I do have two 8.5-gallon (32-L) brew kettles and two propane burners in the garage, so it takes an extra two minutes to set up the second one. That and gathering ingredients for the second beer are really the only differences in time to set things up.
(Note: The propane burners and large brew pots are great to have but my technique can be adjusted for 3-gallon/11.5-L pots on the stove and doing a partial boil before topping off in the fermenter.)
2. Fill two 2- or 3-quart saucepans about half full of water to boil the hops in. Fill two larger pots with the amount of water the recipe calls for to steep the grains (assuming the recipes call for them). On most stoves, the saucepans fit on the small burners in the back and the larger pans on the front burners.
(Note: Boiling hops in water is somewhat controversial but it has knowledgeable advocates. It might be better for an all-grain beer to boil the hops with the wort, but I, like many others, have not found any difference in the results using extract and specialty grains.)
3. Turn on all of the burners. While the water is heating, weigh the hops and put them into hop bags. Also, weigh and grind the specialty grains and put them into grain bags. While doing this, monitor the heat in the pots for the grains and turn their burners off when the water gets to the heat the recipe calls for, around 150–170 °F (66–77 °C).
4. The water for the hops usually boils before the grain water gets to the right temperature. When it does, put the hop bags into the water and set a timer for 60 minutes (assuming the recipe calls for a 60-minute hop addition). When the water returns to a boil, set the cover ajar and reduce the heat so it doesn’t boil over. You’ll want a full rolling boil but not so strong that steam condensing from the cover drips onto the burner. That can be really difficult to scrub off. If the recipe calls for additional hop additions, add them to the water when you would normally add them
to your wort.
(Note: You might consider doing what I do — increase the amount of hops by 10% and decrease the boil to 45 minutes to save a little electricity. Hop utilization charts indicate that this yields about the same number of IBUs.).
5. When the water for the steeping grains is at the right temperature, remove the pots from the front burner and put the grain bags into the water. Set timers for the grains or watch the clock. I am usually still milling the grains for a while after I’ve started the hops. This works out well because the grains typically only take a 30-minute steep vs. the longer boil time for the hops, so no time is lost.
6. With the front burners now free, use one to boil a quart or two (1–2 L) of water. You will find the water gets low in the hop pots, so add boiling water from this pot as needed to keep the level up.

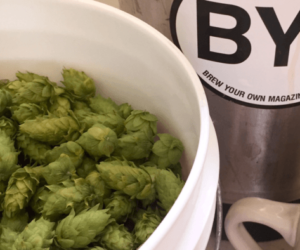
7. When the boil and steep are done, put a large strainer over each of the two brew kettles. Put the hop bags into the appropriate strainer and press all the liquid out of them with your brew spoon or paddle to be sure you collect all of the precious hop juice. Discard the spent hops.
8. Put the grain bags into the appropriate strainers and rinse the grains. Now you have liquid with the flavor and aroma you want from the hops and specialty grains in each kettle.
9. If you have large enough kettles, fill them with enough water to have 5 gallons (19 L) after you’ve added the extract. If you only have 3-gallon (11.5-L) brew pots adjust accordingly.
10. Heat the worts to around 195–200 °F (90–93 °C). Sanitize your fermenters while it heats. When the temperature is reached, turn the burners off, stir in the extract and any other ingredients, and let it sit for 15 minutes to pasteurize.
Note: I have found that with 5 gallons (19 L) of wort, adding either liquid or dried malt extract lowers the temperature by 13–17 °F (7–9 °C). If the temperature is less than 180 °F (82 °C), heat it up to 180 °F/80 °C and hold for 15 minutes to essentially kill all spoilage organisms that may be present.
11. Chill, oxygenate the worts if pitching a liquid yeast, transfer to your fermenters, and pitch the yeast.
12. Clean and store your equipment. You will have two brew kettles, four stovetop pots, and maybe additional bowls, etc. you use to weigh the ingredients. This will take longer than with a single batch of beer, but you’ll use the same chiller and can reuse some of the miscellaneous bowls, utensils, etc., so it’s not twice the time.
Every brewing technique has pros and cons. This one definitely does. Here are some of them that I have experienced over two decades of using this method.
PROS

• Time savings. As I said before, the time from weighing hops and crushing grains through when the wort is ready to chill is about two hours. This is the same whether you’re brewing one or two batches. This is because there is enough time while you’re waiting for the water to heat on the stove and then in the brew pots to do the additional weighing, measuring, etc. for both batches.
• Better for the environment. Boiling hops in 1–1.5 quarts/liters of water uses less energy than boiling hops in three or six gallons (11.5 or 23 L) of thick wort. You can reduce the energy use a little more by adding 10% more hops and reducing the boil to 45 minutes.
• Less chance of a boil over. It is still possible to have one if you don’t monitor the temperature of the wort you’re heating to 195–200 °F (91–93 °C). But it’s much easier to catch it between 195–212 °F (91–100 °C) than it is just when it hits boiling and the foam is rising rapidly in the brewpot.
• Getting two batches of delicious beer from a single brew day. No need to elaborate on this benefit.
• The ability to keep multiple batches of beer in stock so you can enjoy different brews that you crafted whenever you want. I always have about a dozen batches in stock so I can choose the beer I want to have with dinner and then a different pre-dinner beer. My current stock includes:
• American IPA (recipe below)
• New England IPA
• Brown ale
• Robust porter
• Imperial stout (clone of Goose Island’s Bourbon County Brand Stout, recipe from November 2015 BYO)
• Belgian dubbel (recipe below)
• Belgian strong pale ale (clone of Duvel)
• Belgian quadruple (clone of Rochefort 10)
• Belgian quadruple (clone of Westvleteren 12)
• Lambic
• Flanders red ale
• Gose
• Hefeweizen
As you can see, there’s really no limit to the styles you can brew with this technique.
CONS
• More stressful brew day. This is by far the biggest potential negative to my brewing method. During the boil you might be weighing or measuring various additions (e.g., additional hops, yeast nutrient, Irish moss), each of which has to be added at a certain time. It’s easy to get the timing wrong or put an addition into the wrong kettle if you are not well organized.
Even after the boil, mistakes can be made. I once chilled a pale ale and forgot to replace the filled carboy with an empty carboy to chill the porter I was brewing at the same time. I got a quart or two of porter into the pale ale before I noticed. (It was actually quite tasty in its own way — you could almost say I created a new style.) Another time, I added the malt and yeast for a brown ale to the hops and specialty grains for a pale ale and vice versa. Both were drinkable but not at all what I wanted. Still, in 20+ years of brewing about 20 batches a year, almost always two batches at a time, that’s not too much harm. The main downside is the stress involved.
There are a couple of things you can do to minimize the likelihood of getting things mixed up. I put the ingredients for each beer into its own box on separate counters and when I prepare ingredients to add to the boils I put those ingredients next to the respective recipes. And I note the time I start each boil on its recipe and add the times when I should add any other ingredient to the boil. Not drinking until the brew day is complete helps.
• More equipment expense. You’ll need two brew pots. That’s not much expense if you’re doing stovetop brewing with 3 gallons (11.5 L) of wort and top off water. It’s more with larger brew pots and propane burners. You will definitely need two large carboys, buckets, or other fermentation vessels. And you’ll need more bottles or kegs if you want to have a number of styles in stock.
• Your beer may not be as fresh if you keep several styles in stock. For most styles that’s not a real problem, but hop-forward styles like pale ales and IPAs are definitely best fresh.
• You will never fully master the science and art of brewing without going all-grain. Depending on what you really want from your hobby this may or may not be an issue. I very much enjoy the extract brewing process and relative ease and time savings, but I understand that others would rather focus on all-grain brewing. It’s a personal choice.
Conclusion
Brewing two batches a day is not for everyone. But if you want to minimize your time and impact on the environment, are organized and have the ability to multitask (and can also handle a little additional stress), it might be worth giving it a try. And if you’d like to have a number of styles in stock, it really helps to minimize the number of brew days you need to get there.
2-for-1 Belgian Dubble
(5 gallons/19 L, extract with grains)
OG = 1.080 FG = 1.018
IBU = 30 SRM = 25 ABV = 8.3%
Ingredients
7.7 lbs. (3.5 kg) light dried malt extract
5.6 oz. (160 g) caramel malt (40 °L)
4 oz. (113 g) aromatic malt
8 oz. (227 g) Simpson’s DRC malt
1 lb. (0.45 kg) D-180 candi syrup
10 AAU Sterling hops (45 min.) (1.3 oz./37 g at 7.5% alpha acids)
Wyeast 1214 (Belgian Abbey Yeast), White Labs WLP500 (Monastery Ale), or LalBrew Abbaye yeast
¾ cup corn sugar (if priming)
Step by Step
Make a 1.8-quart (1.7-L) yeast starter prior to brew day if you’re using liquid yeast.
Add hops to a muslin bag and boil hops in 2–3 quarts of water for 45 minutes. At the same time, heat 1 gallon (4 L) of water to 160 °F (71 °C), then steep the grains for 30 minutes at this temperature.
Put a large strainer over the brewpot. Pour the closed hop bag and hop water into the strainer. Press the bag with a paddle or spoon to get all the liquid from it. Remove the hop bag. Put the grain bag into the strainer. Rinse the grains with 1 gallon (4 L) of hot water. Add water to the level in your brewpot that will yield 5 gallons (19 L) after adding the dried malt extract and D-180 candi syrup. Heat to 195–200 °F (90–93 °C). Turn off the heat and stir in the malt extract and candi syrup. Wait 15 minutes to pasteurize the wort. Chill the wort to the lower end of the ideal temperature range for the yeast you choose.
Aerate or oxygenate the wort, if using a liquid yeast strain, and add the yeast. When fermentation is complete, keg or bottle as usual.
2-for-1 Citra® IPA
(5 gallons/19 L, extract with grains)
OG = 1.069 FG = 1.016
IBU = 55 SRM = 10 ABV = 6.9%
Ingredients
7.2 lbs. (3.3 kg) light dried malt extract
1 lb. (0.45 kg) caramel malt (40 °L)
12.9 AAU Simcoe® hops (45 min.) (1 oz./28 g at 12.9% alpha acids)
26.4 AAU Citra® hops (hopstand) (2 oz./56 g at 13.2% alpha acids)
4 oz. (113 g) Citra® hops (dry hop)
1 tsp. gypsum
2 tsp. calcium chloride
SafAle US-05, LalBrew Voss Kveik Ale, or any clean fermenting yeast
¾ cup corn sugar (if priming)
Step by Step
Boil Simcoe® hops in a muslin bag in 2–3 quarts of water for 45 minutes. At the same time heat 1 gallon (4 L) of water to 160 °F (71 °C), then steep the caramel malt for 30 minutes.
Put a large strainer over the brewpot. Pour the closed hop bag and hop water into the strainer. Press the bag with a paddle or spoon to get all the liquid from it. Remove the hop bag. Put the grain bag into the strainer. Rinse the grains with 1 gallon (4 L) of hot water. Add water to the level in your brewpot that will yield 5 gallons (19 L) after adding the malt extract. Heat to 195–200 °F (90–93 °C) and add your salts. Turn off the heat and stir in the extract. Wait 15 minutes to pasteurize the wort, or longer if necessary to get the temperature down to 170–176 °F (77–80 °C). Add the bagged hopstand hops and hold for 90 minutes.
Remove the hops and chill the wort to the lower end of the ideal temperature range for your yeast. While the wort is chilling, put a strainer on top of the brewpot and put the hopstand hops bag into the strainer. Press the bag with a sanitized paddle or spoon to get all the liquid. Aerate or oxygenate the wort if using a liquid yeast, and then pitch the yeast.
When the fermentation is 80% to 90% complete, add the dry hops. After two or three days remove the dry hops. Put a strainer over the top of your carboy if it is a wide mouth. Otherwise, put the strainer over a sanitized saucepan. Press the hop bag with a sanitized paddle or spoon to get all the liquid out of it.
When fermentation is complete, keg or bottle as usual.