Electric Brewing Q&A
Kal Wallner, the creator of The Electric Brewery and frequent BYO contributor, and Trent Neutgens, the creator of the all-electric all-grain brewing setup featured in the January-February 2015 issue of BYO, took over BYO for a live chat about electric brewing. Here are the highlights.
 Kal Wallner has been homebrewing since the 1980s and went all-grain in 2008. In the process, he decided to build an all-electric brewery, and designed and built everything the ground up over a 12 month period between 2008 and 2009. Pictures were taken throughout so that he could eventually document the whole process. That documentation blossomed into his website, www.theelectricbrewery.com, a wealth of electric homebrewing information which includes all the plans for his system, plus many resources for building your own all-electric brewery, photo galleries, a newsletter, and an electric brewing forum. Kal has contributed to BYO in the past, including “The Ultimate Brewing Man Cave” in the November 2013 issue, as well as helping out as a technical editorial reviewer on Trent’s all-electric story in the January-February 2015 issue of BYO.
 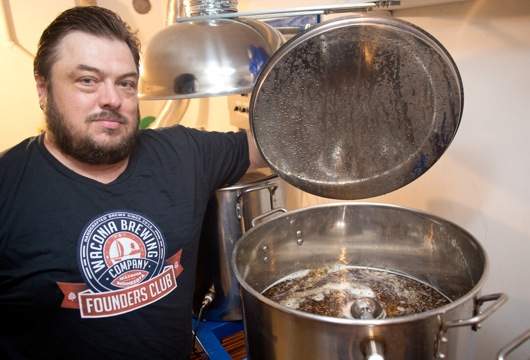 Trent Neutgens is an IT professional and homebrewer living in Chaska, Minnesota with his wife and three children. He started homebrewing back in 1995 and after a few extract batches switched to brewing 10-gallon (38-L) all-grain batches using a system made up of a combination of keggles and coolers. Life, family and career got in the way, which lead to a nearly 10-year break from brewing. When Trent finally decided to get back into brewing in 2014, he decided to say goodbye to brewing outdoors in the Minnesota winters and build an all-electric indoor brewery. In the January-February 2015 issue of Brew Your Own, Trent made his Brew Your Own writing debut by showing off his indoor homebrewing system, including specifications and advice for building your own electric brewery.
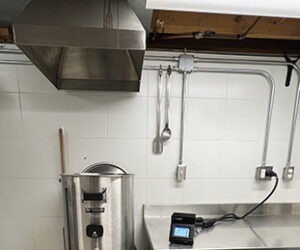
Jeff Melton: Trent- can you tell me about your hood over the boil kettle?
Trent Neutgens: I wish I came up with the idea but I did not. I got the idea from here. http://www.homebrewtalk.com/f256/easy-cheap-stainless-vent-hood-418665/
Casey Mussman: …and what a great idea it was! It was pretty cool seeing one of my ideas on the cover of my favorite magazine.
Shawn Perreault: Not really a question but a comment. I have Kal’s system and it’s fantastic. I highly recommend buying it completed as the wiring inside is immaculate. – perogi
TheElectricBrewery.com: Mike does do a fantastic job with his wiring! (Puts my own panel to shame)

Trent Neutgens: Kal’s system is a work of art. And the system he sells are wired so beautifully. When I was working on my article I was hesitant to show the insides of my control panel, it’s wired correctly and does the job but it’s not something to look at and admire.
Aaron Tyler: Do you have any recommendations for environmental control of your setup? I’m trying to decide between installing in my man-cave (more ventilation, plumbing, and water spill issues due to carpet) or the garage (I’d be most worried about winter temps hurting the system since it’s not insulated and potentially dust).
Trent Neutgens: A huge benefit to the electric system is getting out of the outdoors/garage and bringing it inside but there is no way I would consider brewing over carpet unless I could come up with a way to put some sort of water proof mat down.
TheElectricBrewery.com: I originally wanted to brew in my garage and was working out a plan to do so back in 2006-2007, but it’s too darned cold up here for 6+ months of the year so I knew I wouldn’t enjoy myself. To go indoors, as long as you properly vent out the steam (no different than a stove or cooktop) and make sure you have make-up air to replace it, there’s no other environmental controls needed. I brew in a basement brewery with the door closed so that I don’t exhaust the air conditioned air from the rest of the house in the summer, or the heated air in the winter. Complete details and pictures here: http://www.theelectricbrewery.com/ventilation
As for surfaces, while I don’t spill much, I wouldn’t want to brew on carpet. Most of what hits the floor for me is simply water and drips.
Getting water anywhere in the basement is usually easy too – it’s the draining that may require you to break concrete, depending on how far away your stacks are.
Aaron Tyler: Thanks guys! I wish my basement was finishable, sadly it’s only about four feet high.
TheElectricBrewery.com: I did brew for ~6 months in my garage while the basement was being finished (from spring to fall one year) and I have to say my results were not nearly as consistent as I was used to, due to different environmental factors like different boil off rates, different ambient temperatures, etc. Flies just seem to love wort too when you’re brewing outdoors! Not a big deal pre-boil but seeing them crawling around on top of my sanitized fermenters never made me happy. I was happy to get back indoors.
Aaron Tyler: I might just have to redo the floors in my office. I think it’s wood under the carpet, then I could just put a metal spill-catcher under it and not worry about the small quantities that make it out of that area.
Luke Stevenson: In the midst of building my panel now. Question: how much space should be between a SS HERMS coil and the heating element? I’m worried my element is gonna be too close to the coil.
TheElectricBrewery.com: If you’re using an ULWD heating element (low wattage per inch) and keeping the HLT water in constant recirculation (as you should to avoid stratification), there’s really no minimum space. I wouldn’t worry about it too much. Even 1/4″ would be fine. I have about an inch or so myself between the heating element and the HERMS coil.
Luke Stevenson: Sweet. All aforementioned conditions are correct. Thanks for the response man! Your website is killer.
Richard Marzec: On your HERMs system you use 30 amp control box and the RIMS uses a 50 amp control box. Is this because with herms you have it set-up to use one element at one time, but with the RIMS you would be using two at once?
TheElectricBrewery.com: On my 30A HERMS setup I only ever need to fire one of the two 5500W elements at once so a 30A control panel is adequate. You can build a 50A HERMS panel if you decide you want to brew back to back batches (one batch after another). This would allow both the HLT and Boil elements to be on at the same time. You can heating up strike water and mash while boiling the first batch. I’ll let Trent describe his 50A RIMS setup.
Matthew Wassum: Kal, I see some e-brewing set-ups use a power regulator instead of a pid. I like the control of the element but they don’t have a tank temp readout so what good is it?
TheElectricBrewery.com: Do you mean a simple rotary dial for the boil kettle (like a phase angle controlled SSR)? Basically a dial that goes from 0 to 100%? Something like that can work and some people may find it simpler to use but there are certain downsides that I didn’t want myself with my setup:
(1) You can’t have alarming: With a PID you can set the alarm to sound at 208F (for example) just before you reach boil, warning you to watch for boil overs. I will often go one step further and set the alarm to 208F and also run the PID is automatic mode (instead of manual/duty cycle). In auto mode I set the temp to 208F and the boil kettle will heat up to 208F, hold there, and the alarm sounds. I then turn the alarm off, switch over to manual mode, and continue up to boil while watching and stirring. This completely eliminates the chances of a boil over happening because I wasn’t paying attention.
(2) Extended hop stands (steeping hops at specific temps for extended durations after the boil is done, sometimes as long as 1-2 hours): This process is used by new popular beers like The Alchemist’s Heady Topper. By using a PID you can do this as you can get the temp (170F for example) and have the PID hold that for an extended duration. The occasional on/off the element helps stir up the hops too. You can’t do it wth a dial-type boil control. I have an example hop stand recipe that can only done correctly if you use a PID: http://www.theelectricbrewery.com/forum/viewtopic.php?t=26503
(3) If you use an immersion chiller, with a PID showing you the temperature, you’ll know exactly when you hit the target temp. A thermometer on the kettle wall will arguably do this too, but you could set an alarm to go off with the PID to let you know when your target temp is reached. Brewers area easily distracted.
Matthew Wassum: Kal, would a retired construction worker with a good mech ability be able to program PID’s ?
TheElectricBrewery.com: Sure! If you can set your thermostat at home or use a microwave, you can set up a PID. There’s no programming to do. No programming knowledge is required. You simply set some values in menus. The software that runs in the PIDs is not something you have to program or change yourself. PIDs are an out of the box solution with very little adjustment or programming required, other than to tell it what type of temperature probe you have, and enter some temperature alarm values (if you want to have alarming for certain conditions), and so forth. Most of these are set up once the first time you use your PID. I would cal it more of a “setup” than programming. You can see the types of that values need to be changed on a PID in my instructions here: http://www.theelectricbrewery.com/control-panel-setup
Matthew Wassum: Thanks Kal, Trent baited me with his article and you set The hook with your web site. By far the Best and most informative handbook on e- brewing out there. Matt
TheElectricBrewery.com: I’m glad you like it Matt! Good luck with the setup. Do your research/reading and then start building!
Jeff Semroc: I’m in mid-build of my 62 qt. eBIAB system and am wondering if I’m asking for trouble by brewing indoors without a ‘range hood/exhaust system’?
TheElectricBrewery.com: EDIT: (Oops! I thought you were asking about using a simpler range good to vent vs something more elaborate, so I’ve edited my response!). Yes, as John mentions below, you need a way to vent. You could be putting 1-2 gallons/hr into the air which is a lot of moisture. That moisture has to go somewhere. Some sort of venting system should really be used. I have an article on ventilation requirements and things to look for, along with some of the tests I did myself if you’re interested. It’s here: http://www.theelectricbrewery.com/ventilation
John Focht: I know I’m not on the ‘panel’, but I’ll answer anyways. Having built an eBIAB system, I would say YES you need an exhaust system. The boil can easily evaporate 1 gallon of liquid and you probably don’t want that absorbing into the inside of your house. – mold issues.
John Focht: Jeff Semroc BTW, I built my hood out of foil-lined insulation and aluminum tape for ~$25. I sprung for the fan though and got the 6″ Vortex. I only have a 4 foot run and still run into condensation issues, even though I’ve insulated my ducting. Any fan you buy, make sure to follow Kal’s instructions and seal the electrical box so condensation doesn’t short your fan. Or kill you.
Trent Neutgens: You can build a simple vent hood for not a lot of money. Since I brew in my laundry room I use the same exhaust exit from the house. I use a large 30-qt stainless steel mixing bowl for the hood, some flexible venting and an inline fan for a simple and inexpensive solution.
Jeff Semroc: The large mixing bowl sounds like a great idea. I was thinking of mounting a Vortex fan to a board placed into a window opening – much like a window mounted air conditioner – and then attaching flexible duct between the fan and the ‘hood’
TheElectricBrewery.com: Since we’re venting mostly steam, just about any hood will do. I built one for $20 out of foam to originally test to make sure the idea would work ok. Not pretty (and fragile) but it worked.

John Focht: I would use straight ducting (aluminum, galvanized, etc) instead of flexible ducting to avoid issues with condensation. The moisture will get caught in the grooves and potentially cause mold issues. I know straight ducting is not as easy to work with but it catches less moisture and dries more evenly. Insulate the ducting too so it doesn’t ‘rain’ from your ducting. That’s from experience.
Richard Marzec: How long does it take to ramp up to mash out temperature?
TheElectricBrewery.com: While it will depend on the rise you need (temp differential), the amount of grain (batch size), and the heating element size (Watts), a 5500W heating element such as the one I use will raise the temperature of 1 gallon of water by 1 degree Fahrenheit in approximately 1.6 seconds.
Some real world examples on my setup when brewing 10 gallons:
– Heat 20 gallons of strike water from 70 °F to 155 °F: 45 minutes
– Bring 14 gallons of wort from 150 °F to boil: 23 minutes
Unlike conventional gas burners where heat is applied from below, an immersed electric heating element is 100% efficient as all of the heat is transferred to the surrounding liquid. With a gas burner 50-80% of the heat bounces off the bottom of the kettle and is lost.
One thing that some brewers with HERMS electric setups like mine do is to add two heating elements to their HLT to have faster ramp times. Twice as much power means faster heating. I don’t do that myself as I find the times are fast enough for me and have never had issues doing long step mashes (sometimes 3-4 hours long at 3-4 rests).
Erika Padilla: Cleaning out the system. do you keep everything constructed inside the pots or do you take it apart.
TheElectricBrewery.com: Other than the mash tun false bottom and my hop filter in the boil kettle, I don’t take anything apart to clean as there is no need. Most of the equipment is on the hot side of the brewing process where everything will be boiled anyway. For example, there’s little point in keeping the mash tun completely sanitized because you’re going to pour grain into it which is not sanitary at all and (I hate to say this) has a allowable amount of rat/mouse hair and feces in it. Many brewers think that they have to keep everything on the hot side completely sterile and sanitary but it’s not true as everything will be boiled for 60+ minutes. On the cold side (fermentation and packaging) sanitation is very important however.
Matthew Wassum: Trent, how much did the e-brewery in the article cost?
Trent Neutgens: Since I was starting up again from scratch I would say I am around $3k. But if my wife asks, it was about $30 bucks.
Erika Padilla: i have been reading a lot on your page about begging and preasure amounts. how do you know the volume of c02 to put inside the kegs
TheElectricBrewery.com: Volumes of CO2 will vary by the style of beer you want to produce and partially by your own personal choice. Whether you brew gas or electric does not affect how to package/serve your beer.
Matthew Wassum: The BCS-460 seams much more complicated than the PID controls, are they?
TheElectricBrewery.com: It can be. I would say that if you’re looking at building your own, you need to be a bit more “computer” savvy and understand low voltage electronics better if you want to use BCS-460 or other embedded controllers. I do understand both (I’m an Electrical Engineer) and did consider BCS-460 for my control panel when I designed it years ago, but eventually chose to go a different way as there were no benefits for how I wanted to brew. I wrote an article that described the thought process I went through to come to that conclusion that you can read here: http://www.theelectricbrewery.com/forum/viewtopic.php?t=25382
Trent Neutgens: Part of the attraction of the BCS-460 for me(a tech nerd) was the web interface and the programming you can do with it. The old BCS-460 interface did/does leave some to be desired but after my article was published the folks who make the BCS-460 came out with a new beta web interface that is supposed to be much more intuitive and easy to use. I haven’t personally tried it yet but am looking forward to it.
Russ Neis: I live in a hard water area. What do you use maintenance wise to keep the elements free of deposits? Also is ro water bad for them as well?
TheElectricBrewery.com: I don’t think anything special is required for harder water. It’s important to clean the boil kettle element after each use, but no different than how you’d clean your boil kettle itself after every brew. I use a soft sponge and just quickly wipe it down. In the Hot Liquor Tank (the other place I use an element) no cleaning is required at all as the HLT only ever contains water. Nothing needs to be done. RO (or distilled) water is fine too, though you wouldn’t brew with straight RO water usually. You want some minerals for proper mash pH and for taste. I suppose you could sparge with RO water, and some brewers cut their hard water with RO to bring the hardness down a bit. No issues with doing either with elements. The thing to remember is that the heating elements that most brewers use are no different than the millions that are installed in hot water tanks around the world, and those are *never* cleaned. Give yours a quick wipe when cleaning the boil kettle and they’ll last forever.
Trent Neutgens: I to live in a hard water area but also have a well. I decided against installing my own RO system due to the amount of waste water expelled and the load it would put on my well so I use bulk RO drinking water from my local grocery store. No problems what so ever with RO water and the heating elements.
Erika Padilla: how ofter have you had to replace heating elements?
TheElectricBrewery.com: Never. They do not wear out. I’ve had the same ones myself since I started in 2008. I’ve put about 60-80 batches on them. I know brewers who have been brewing with the same elements for 20+ years.
Trent Neutgens: The only problem you may run in to is if you dry fire the elements for a long period of time. The elements we use are the same ones used in standard in home water heaters and they often last for 30+ years being used on a daily basis.
TheElectricBrewery.com: Good point Trent. If you do “dry fire” a heating element and don’t use an ultra-low-watt density (ULWD) you’ll likely damage it. By using an ULWD element you’ll lessen the chance of damaging one if you turn on a kettle by accident without any water or wort in it. Get your brewing process right and you’ll find that it never happens. For example, I purposely turn off my HLT heating element while I sparge (to have the temperature drop by the end of the sparge so that tannic extraction is less likely) and one of the advantages of this is that the element will never get exposed to air while on.
Kristopher Lopez: So what major differences in overall brew time, levels of efficiency and benefits to the actual final product did find with eB?
TheElectricBrewery.com: I would say if you properly size both gas and electric, there are no differences in brew time. Some might say electric is faster, but then they were probably undersized with gas to begin with. Where the benefits come from are in other places:
– Easier precise control of temperature.
– Safer for indoor brewing: No poisonous gases, no emissions. Brewing indoors with gas requires almost 10 times more ventilation as compared to electric, making installation very costly. (read more here: http://www.theelectricbrewery.com/ventilation)
– Absolutely silent: The bigger gas burners required for brewing sound like jet engines.
– Much more efficient use of energy: A 5500W heating element producing ~20,000 BTUs of heat outperform an 80,000 BTU propane burner.
– No tanks to refill.
– Cheaper to run: In most locations the cost to brew with natural gas is 2-3 times higher than electricity, while propane is 5-10 times higher.
I don’t know of one brewer who, after switching to electric, wished they were still using gas.
Trent Neutgens: I currently have 6 batches on my new electric system so I am still working on getting everything tuned properly. I also took a long 10+ year break from brewing so it’s hard to compare the efficiency I’m seeing now compared to what it was with my traditional gas fired system. With that said, I am still working on getting my efficiency up there and haven’t quite hit the numbers I expect to get out of my system. I’m not sure if it’s related to my new mill and it’s settings or something else in the system. When I do have everything dialed in I do expect to see very good numbers, mainly based on the steady temp and constant recirculation that the RIMS allows. As for brew times, I think my brew day has been cut down and the times I spend is a lot easier and less stressful. Being able to brew in doors during Minnesota winters regardless of the weather along with the much more silent operation of the electric system just makes things less stressful and more enjoyable.
TheElectricBrewery.com: One thing that electric does allow for is greater control which in turn can indeed lead to greater efficiency and consistency since you can hold your mash at precise temperatures for extended durations. I get a 95% mash efficiency on my setup.
Erika Padilla: the only cleaner you use is oxy clean?
TheElectricBrewery.com: On the hot side, yes. Similar to PBW but less expensive. I use liquid line cleaner for my beer taps. That’s about it.
Trent Neutgens: I got a 5 gallon pail of PBW so I’ve been using that with success. Since the mash tun only has a temp probe in it I remove that and take the whole kettle outside to dump out the grains and clean out. Everything else essentially gets washed in place.
Trent Neutgens: PBW for cleaning and Starsan in a spray bottle for sanitizing
Brew Your Own magazine: Kal and Trent, one question we have gotten many times since the Jan-Feb issue came out is how much does an all-electric homebrewery cost to build?
TheElectricBrewery.com: That’s a hard question. That really depends on your needs, what you may already have in terms of equipment, and how you define a “home brewery”. I went a different route than many have and decided to put cost as the last factor and instead focus on building something that was primarily:
(1) 100% electric for indoor brewing (of course!)
(2) Safe, easy, and enjoyable to use
(3) Not limit the brewer in any way
(3) Provide extremely repeatable and consistent results
(4) Use industrial quality parts that last (all stainless steel, limit the use of plastics)
(5) Use standard off the shelf parts to ensure long term serviceability (limit the use of special/proprietary parts)
I ended up spending about $7000 on the “hot side” of the brewing process (the side that creates the wort). If you’re willing to make changes or compromise in certain ways, or have different needs than my own, you can do so for much less. I have a breakdown of my costs here: http://www.theelectricbrewery.com/FAQ#How_much_will_it_cost_me_to_build_a_brewery_like_this_
Chelcie Rice: Thanks for that. It helped me get my answer
Trent Neutgens: That is a really difficult question. The costs can look like they easily get out of control but building any brewing system from scratch gets expensive. The biggest difference is that if you go with a traditional gas fired system you can build a budget system very easily, something that isn’t quite as easy to do when you employ electric since automation is usually employed along side it
TheElectricBrewery.com: Trent makes an interesting point – both gas and electric can be automated. You can make a gas setup with solenoid valves that will open and close properly to limit the heat programmatically, but it’s harder to implement than when you go electric. With electric it’s not that much more difficult to get a lot of those things essentially for “free” once you’ve built the basic setup, so you’ll often see electric setups that do a lot more than gas. Not because you can’t on gas, but because it’s so much easier with electric.
Richard Marzec: In the magazine schematic, shouldn’t the breaker for the 2000W rims element be 10amp 2 pole breaker? 2000/240= 8.3 amps
Trent Neutgens: I am not an electrician but the circuit breaker is there to protect the circuit even if the load on it is lower. The circuit is designed and wired to be able to handle up to 30amps so that is what the breaker is rated for. For example, if you have a 15amp circuit in your home but only have a single light plugged in to it, you don’t change out the breaker to a lower value based on the load.
Richard Marzec: On one of Chris Champine’s other drawings, which is exactly the same except for PID controllers, he used a 10 amp breaker.
Trent Neutgens: You probably could, and then use a lower gauge wire as well that is only rated to 10a.