Experiment with Yeast
In the beginning, fermentation was a mystery. We now know that the conversion of fermentable carbohydrates into ethanol and carbon dioxide is accomplished by Saccharomyces cerevisiae (or Saccharomyces pastorianus if we’re talking lagers). We also know that there is more to fermentation then just alcohol and CO2 — other yeast metabolism byproducts such as esters, carbonyl compounds, acids, higher alcohols, and sulfur compounds can all contribute to the final flavor, aroma, and mouthfeel of beer. Similar to changing wort composition or dry hop regimes, changing your yeast strain or varying fermentation parameters is one of the quickest and easiest ways to alter your beer.
The genetic makeup (genotype) of the yeast strain used can dictate the types and quantities of these organoleptic compounds (phenotype) — therefore changing the yeast strain can greatly affect the sensory attributes of your beer. However, changing the yeast strain isn’t the only way to affect a beer’s final sensory. Changing fermentation parameters can also be instrumental in honing in on the final flavor and aroma of your beer. This is because the environment that your yeast ferments in will affect its metabolism, growth, and overall health. This is not to discredit the role that wort composition or hopping regimes have on beer flavor and aroma; they play huge roles as well.
Nevertheless, experimenting with yeast strains and the parameters in which it ferments is a great way for brewers to optimize fermentation flavors. What’s the easiest way to see this in action? Perform yeast trials of your own, of course!
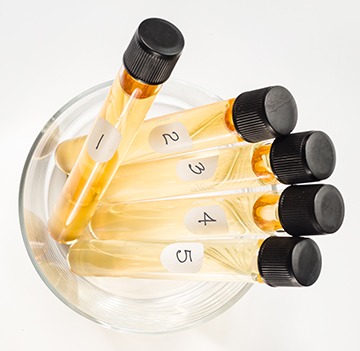
Yeast trials can be conducted relatively easily without the need of specialized equipment. All you’ll need is your wort and a couple of vessels to ferment in. Depending on your brewing setup, you can perform ferments in anything from 5-gallon (19-L) carboys to 1-quart (1-L) Erlenmeyer flasks. I’d recommend keeping the type of vessel consistent within an experiment and, of course, sanitation is paramount. In order to determine the impact that the yeast strain is having on your ferment you’ll need to ensure that the only variable changing is the strain of yeast being used. This means keeping other factors like temperature, pitch-rate, dissolved oxygen (DO) levels, etc., the same.
Experiment with Yeast Strains
You might ask yourself when designing a new recipe, “How do I know what yeast to try”? Think about what kind of attributes you want your beer to have and then research the yeast strains that fit those characteristics. When you have your list of possible strains then it is time to conduct an experiment.
Are you looking to make a hazy IPA? Don’t choose a super flocculent strain. Are you looking for a funky saison? Choose a high phenol-producing strain. You could also be looking for something completely out of the blue. Try brewing your award-winning pale ale in a split batch, one fermented with the recipe’s usual strain and one with a strain that has a little funk like WLP644 (Saccharomyces Bruxellensis Trois). The world is your oyster when it comes to choosing strains to experiment with.
Another interesting experiment you could try is to perform dry yeast versus liquid yeast trials. You’d be amazed at the differences that you can detect in terms of changes in metabolites. Even things like clarity or head retention, which you might not immediately attribute to a yeast strain, can be noticeably different due to the yeast’s interaction with wort proteins and hop compounds.
As far as wort goes, you can perform these experiments in any sort of medium like an IPA, a stout, or a blonde. Typically, when in the lab (I’m a Senior Research Scientist at White Labs), I tend to make a very simple all-malt wort with a specific gravity of 1.061 (15 °P) hopped to 25 IBUs with Iso-hop. Sounds appealing, right? Of coruse, you don’t need to work with anything this bland in order to gain an understanding of the yeast’s character; you want to be able to drink your experiment after all. However, the more neutral in flavor the beer is, the easier it will be to evaluate the differences in your experiment. So, at home, you may consider brewing a light lager, golden ale, or other style that has a low hopping rate and few specialty grains.
If the different yeast strains you’re using in your experiment vary in their optimal fermentation temperature (they should be in the same ballpark if you are choosing between multiple strains for a particular beer style), it is usually a safe bet to ferment at 68 °F (20 °C) for ales or 54 °F (12 °C) for lagers. Consistency is key when it comes to this type of experimentation, so whatever you choose to do, do it the same every time.
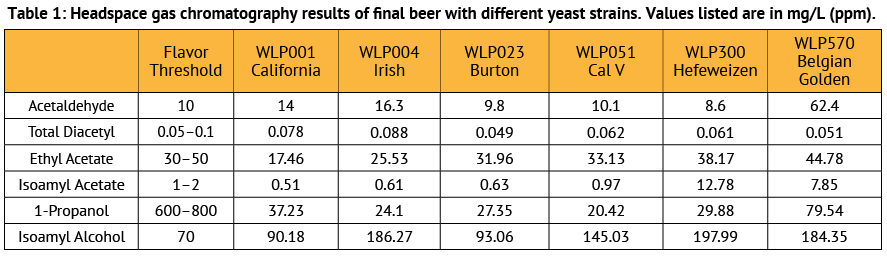
In order to see an experiment using different strains on a single wort in action, we performed mini ferments at White Labs on a benchtop scale and ran the beer through gas chromatography to quantify some of the aromatic compounds present. While some compounds don’t change much between strains, some compounds like Isoamyl Acetate, an ester that is typically described as banana, have huge variances between strains (Table 1, above). This experiment was performed in the lab wort I mentioned earlier, however similar trends should be seen with a more complex medium. Remember, this was the exact same wort split into multiple vessels; all fermentation parameters were controlled.
This experiment was performed in order to illustrate how these metabolites can vary between strains. You’ll notice that the values for the compounds listed are all different across strains; no two strains produced the exact same amount of a given metabolite. This data is cool (in my humble opinion) because it validates what we already know from a sensory aspect. For instance, esters, which are fruity in aroma, are higher in both the Belgian golden strain and the hefeweizen strain — two beer styles in which esters are a common descriptor.
Experiment with Fermentation Parameters
Another way to conduct yeast trials at home would be to vary fermentation parameters. These are things like dissolved oxygen levels, head pressure, temperature, pitch-rate, starting pH, mineral levels, agitation, etc. For the sake of brevity, we will focus on two of these variables: Fermentation temperature and pitch-rate. Similar to our yeast strain setup discussed before, you’ll only want to change one variable at a time in order to really see the influence that this variable has on the final sensory of your beer.
Pitch-rate can be altered and played with very readily at home. Adjusting pitch rate will lead to different amounts of growth in fermentation. This change in growth will affect the type and amount of metabolites produced. Pitching rates will vary depending on the type of beer you’re producing and the yeast strain that you’re using, but generally speaking 0.75–1.5 million cells per milliliter per degree Plato is recommended.
In our yeast lab we use a cell counting setup that allows us to determine the exact number of cells being added to each fermenter. But, how can you do this at home?
If you’re pitching directly from the manufacturer’s yeast packaging (without a yeast starter) try adding two packets of yeast if you typically add one. Most manufacturers will list the concentration of the yeast on the package, so if you don’t have a microscope, don’t fret, just use the information given to you by the manufacturer. The general rule of thumb is that the higher the pitch rate the more fusel alcohol production and the lower the ester content.1 Remember, the viability of your liquid yeast will decrease with age. The amount of death is yeast strain- and manufacturer-specific, but an overarching estimate for liquid yeast would be that about 5–10% of the yeast will die each month.
Varying fermentation temperature can be done at home if you have fermentation control or with a little ingenuity. Set up your ferments as before, this time only vary the temperature at which you’re fermenting. You’ll want to make sure that the temperatures are not out of the realm of normal fermentation temperatures. Most strains will come with a recommended fermentation temperature range. Try fermenting at the top and bottom of that range. For most ale strains I’d stay between 61–77 °F (16–25 °C) and most lager strains between 48–59 °F (9–15 °C). Generally speaking, a higher temperature will increase the metabolic compounds formed.1 The effect that temperature has will be yeast strain-specific as well. Certain yeast strains have the capacity to handle higher fermentation temperatures better that others and the same is true for lower temperatures.
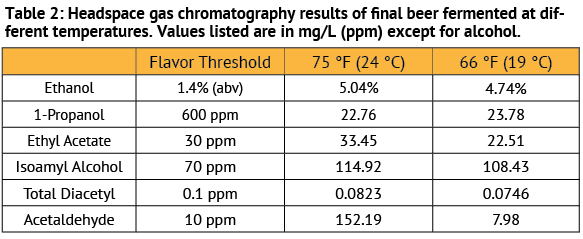
I performed a trial at White Labs using WLP001 (California Ale) in the aforementioned lab wort at 66 and 75 °F (19 and 24 °C). Interestingly, you don’t see much difference between metabolites except for acetaldehyde (green apple), which was significantly raised with higher temperatures (Table 2). Acetaldehyde is considered a major off-flavor in beer, therefore in this instance I would conclude that this strain performs better at lower fermentation temperatures.
How to evaluate your experiments
While I know that many of you have homebrew setups that would make even the most experienced brewer jealous, there is a good chance that most of you don’t have a gas chromatograph at your disposal. So how do you evaluate the effect that your yeast trials have had on your final product? An easy and quantifiable metric that you can measure is the speed of fermentation. This involves taking daily pH and gravity readings to track the progress of your fermentation. It’s possible that you might not notice a huge sensory difference between two strains, but one strain might reach final gravity a full two days before another and we all know time is money.
If you are interested in the quantifiable sensory attributes of your beer, you could send your experiment to an outside lab (like White Labs, however labs that can perform these tests are scattered across most regions). These services cost a range of money depending on what exactly you are after, but as they’re experts in the field and have the right equipment, you get results you can trust. Or you might be lucky and have a friend who works at a university or biotech company that might be able to run your samples for you in exchange for beer, (these are some of the best friends to have).
Another easy and enjoyable way to evaluate your results is to perform sensory on your final product. This can be done in more sophisticated ways than asking yourself “is this good or bad?” (though that is a valid question to ask). Sensory evaluation should encompass four aspects of your beer – flavor, aroma, mouthfeel and appearance. When trying to determine whether your experiment in yeast strain or fermentation parameters causes a noticeable change in sensory, try setting up a sensory test like a duo trio or a triangle test and then recruit some samplers. Details of how to set up these tests can be found online. Both methods are easy to set up and will help you evaluate whether there is a difference between your yeast trials. Another method you could use to evaluate your trials is to ask your panel (friends, homebrew club members, beer judges, etc.) to rank your beers using a 5-point hedonic scale.
When it comes to performing yeast trails, the biggest thing to remember is to only change one variable at a time so that you get a true understanding of how that variable affects the final outcome of your beer, mead, or cider. If your system allows for it, try your experiments at a small scale before ramping up to larger ferments. This will help keep you from making a bunch of bad beer. Overall, experimenting at home can be very enjoyable, especially when you get to drink your experiments.
Resources
1 Van Laere, S.D.M., Saerens, S.M.G., Verstrepen, K.J. et al. Appl Microbiol Biotechnol (2008) 78: 783. https://doi.org/10.1007/s00253-008-1366-9