Fermented Foods: Making Sauerkraut, Yogurt, Sourdough & Malt Vinegar at Home
It may come as a shock to some homebrewers, but beer isn’t the only delicious thing that fermentation is responsible for creating. If you already know how to brew beer, it is an easy leap to other alcoholic beverages such as hard cider, wine and mead. In fact, starting a batch of one of these is as easy as making a no-boil extract beer because fruit and honey are loaded with fermentable sugars (unlike starchy grains). There are nuances to the ingredient selection and processes for these beverages to be sure, but their fermentations are nearly identical to beer. On the other hand, as an alternative to making another alcoholic libation, consider fermenting some food to eat alongside a pint of homebrew.
Most of the microbes responsible for fermented foods are also found in certain beer styles. Saccharomyces cerevisiae, the same species of yeast used to ferment ales, also raises loaves of crusty bread. The Lactobacillus that gives Berliner weisse its refreshing lactic acidity is also responsible for creating the tartness and firm texture in a bowl of yogurt. The Pediococcus that dominates lactic acid production in lambics, also lowers the pH of traditional salami. The Acetobacter that adds sharpness to Flemish reds, given enough time and oxygen, creates the acidity of vinegar. The specific strains of microbes involved in the production of these foods are even added to sour beers by some brewers.In the same way that homebrewing allows us to brew beers that suit our palates and use the ingredients of our choice, home-fermented foods have similar benefits. After you succeed with a basic recipe, consider adding optional ingredients, or developing a house microbial culture. Want to use organic heirloom cabbages in your sauerkraut? Go ahead! You might save a few dollars making yogurt or vinegar at home, but the best reason to ferment at home is the satisfaction of making something for yourself that most people think only comes from a supermarket. This article gives an overview of four fermentations: malt vinegar, sourdough bread, sauerkraut, and yogurt. The recipe section below includes a recipe for each.
Malt Vinegar
In the absence of oxygen, yeast cells generate energy by fermenting sugar into alcohol. Once the yeast ferments all of the chains of carbohydrates short enough for its enzymes to disassemble, its work is finished. This doesn’t mean that all of the stored chemical energy has been expended, however; with the availability of oxygen, other microbes can generate energy by converting alcohol into acetic acid. Acetic acid is the primary acid in all types of vinegar. It is the alcoholic base that determines the type of vinegar. Beer is converted to malt vinegar, sake to rice wine vinegar, hard cider to cider vinegar, red wine to red wine vinegar, etc. Most of us occasionally brew a batch of beer that isn’t terrible, but isn’t good enough to drink proudly. Rather than dumping the beer, convert it into this traditional condiment with fish and chips.
Sourdough Bread
While most breads (like most beers) are fermented by a single species of yeast, sourdough is the bread equivalent of Belgian lambic. Sourdough is fermented by a combination of wild yeasts and bacteria and consequently requires a longer fermentation, but the result has a more interesting flavor which includes lactic acid tartness. All bread was made using such a process before bakeries started buying their yeast from breweries. The fermentationist can either start their own sourdough culture, or buy one (although as you propagate and reuse a culture, the microbes from your flour, water, and air will overtake the original microbes). There are enough ways to create your own sourdough starter to fill an entire article. I began my first starter by combining varied sources of yeast and bacteria (kombucha, sour beer, bread yeast, etc.) with equal parts of flour and water by weight. Leaving the starter at room temperature and feeding it with more flour and water each day for a week brings the microbes to equilibrium and allows you to assess their flavor and carbon dioxide production. My starter produced a good tart flavor, but did not create enough carbon dioxide to inflate the dough in a reasonable amount of time. I threw my starter out and purchased San Francisco sourdough starter from Fermented Treasures (now defunct). I managed to keep that starter alive for several years before eventually letting it die from neglect during a particularly hot DC summer.
The mixed sourdough culture does not need to be protected from invading microbes like a beer, so no special sanitation procedures are required. Once your starter is ready to use, keep it in the fridge at all times unless you are willing to feed it every day. When you remove some of the starter to bake with, simply replace that amount with equal parts (by weight) flour and carbon-filtered water (the chlorine or chloramines in unfiltered municipal water are added to kill microbes). If you have enough initiative to weigh ingredients when brewing, you should be doing the same for baking (flour is notoriously hard to measure accurately by volume). If you go more than a week or two between using your starter, discard half of it and then feed with flour and water. If you go too long between feedings, a grayish layer of alcoholic liquid called hooch will pool on the surface of the starter and this should be poured off before using or feeding. Even with such a low-effort recipe you may not want to bake a loaf of bread every week. The major advantage of using an even ratio of water to flour in the starter is that it makes it simple to swap the starter into other recipes in place of packaged yeast. Have a bagel recipe that calls for one pound (450 g) of flour and 12 ounces (340 g) of water? Add two ounces (60 g) of starter and subtract one ounce (30 g) from both the water and flour. How about sourdough pancakes or pretzels? Just extend the fermentation to get the desired amount of rise, but otherwise treat the recipe as you would when using dried baker’s yeast.
Sauerkraut
Sauerkraut is one of the easiest fermented foods to make at home. A basic recipe requires only two ingredients, both of which are cheap and available at every supermarket: salt and cabbage. Starting a batch takes less than 20 minutes, and the finished kraut will be ready to eat in just a few weeks. Sauerkraut is one of the only fermentations that has a history in my family. My mother remembers there always being a barrel of fermenting cabbage in the basement of her German grandfather’s house. Much like sourdough, sauerkraut is fermented with a mix of microbes which do not need to be cultured or purchased. Salt, in the right ratio, draws moisture out of the cabbage creating brine that protects the desirable lactic acid bacteria (including our friends Lactobacillus and Pediococcus, in addition to Leuconostoc) from other microbes that make unpleasant flavors. As a result, it is not advisable to reduce the amount of salt in the recipe. If the finished sauerkraut is too salty for your tastes, rinse it before eating or cooking.
Yogurt
Dairy products are the most diverse areas of fermentation. They include such standards as sour cream and buttermilk; gourmet items like crème fraîche, cultured butter, and kefir; not to mention countless varieties of cheese. Out of all of these the most common and easiest to make is yogurt. Starting a yogurt fermentation requires the introduction of the right bacteria, but luckily they are available at your supermarket in any commercial yogurt that indicates it “contains live cultures.” For subsequent batches you can use homemade yogurt, instead of commercial, to provide the microbes. Lactobacillus is responsible for both the tart flavor, and the thick texture of yogurt. The thickening is a result of protein coagulation brought on by the lactic acid-lowered pH.Before making your first batch, you will need to find a method to keep the fermentation between 110 and 115 °F (43–46 °C). Purpose-built yogurt makers are available, often for a few dollars at thrift shops. I use a cooler and an old heating pad that does not have an automatic shut-off. If you MacGyver your own rig, test it with water first to determine the ideal temperature setting. At warm temperatures the fermentation is so quick that you do not need to worry about the milk spoiling, so clean your equipment, but sanitation is not necessary.
Fermented Finish
Many beer nerds are foodies, and most of the homebrewers I know are also passionate home cooks. Once you get started with these simple recipes, there are a multitude of fermented foods out there that take more time, effort, and precision. Homemade yogurt may lead you to cheesemaking. Cured and fermented meats can be marvelous, but also require precise temperature and humidity controls. There are also many things that can be made by fermenting soy beans (e.g., soy sauce, and tofu). Also worth investigating are low-alcohol fermented beverages like ginger beer plant, kombucha, and kvass. Whatever you ferment, take good notes, and learn from both your mistakes and your successes.
 Malt Vinegar
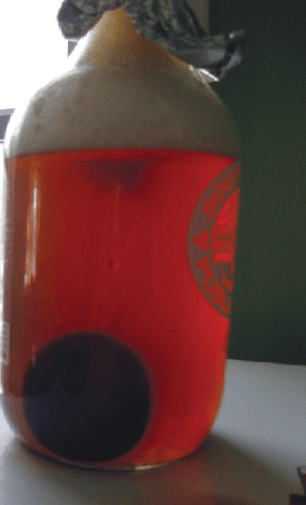 Malt Vinegar
Ingredients
1.5 qts. (1.4 L) of 5% ABV beer
Not all beer styles work well as a vinegar base. The flavor of highly bitter beers, like IPA, can clash with acetic acid. English brown ale results in vinegar closest to the most common malt vinegars on the market, but that is not the only option. Any moderately hopped blonde to dark brown beer will work quite satisfactorily. As a caution if you use a strong beer, water it down to about 5% ABV to avoid having an overly acidic or boozy result.
Step by Step
Pour your beer into a clean growler. Acetobacter (the primary bacteria responsible for acetic acid production) is commonly airborne, so making vinegar can be as simple as leaving a three-quarters-full growler of the beer of your choice sitting open in a warm spot for several months. You can speed up the conversion of alcohol to acetic acid by pitching a vinegar “mother.” This gelatinous disc is a colony of Acetobacter cells that have clumped together by secreting cellulose. A mother can be obtained either from a bottle of unpasteurized vinegar or as a culture sold by some homebrewing stores. Cover the mouth of the growler with cheesecloth secured with a rubber-band to prevent insects from being lured into the aromatic liquid. (Despite the old saying, you can catch quite a few flies with vinegar).Acetobacter produces acetic acid rapidly at warm temperatures (85–90 °F, 29–32 °C), but low humidity combined with heat will also lead to faster evaporation. This same evaporation concentrates residual sugars in the alcoholic base and is responsible for the sweetness of traditional Balsamic vinegar.
When the malt vinegar is acidic enough for your tastes (usually after several months), move it to a bottle and spritz onto fish and chips, flavor sauerbraten, make mustard, or mix with oil for a vinaigrette. When you harvest the vinegar, you can either top-off with more beer or transfer the mother to another alcoholic beverage to create a different type of vinegar.
No-Knead To Worry Sourdough
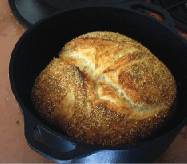 No-Knead To Worry Sourdough
Ingredients
15 oz. (425 g) bread flour (about 3 cups measured with the scoop and sweep method)
1.5 tsp. (7 mL) kosher salt
11 oz. (0.325 L) filtered/bottled water at 95 °F (35 °C)
4.0 oz. (113 g) sourdough starter
Step by Step
Mix the salt with the flour in one bowl and the sourdough starter with the warm water in another. Combine the contents of the two bowls and mix vigorously for 20 seconds or until all of the flour is moistened. The longer you work the dough at this stage, the more even the crumb structure of the finished loaf will be. If you want a rustic loaf with some big air pockets (like I do), work it as little as possible.Cover your bowl first with plastic wrap and then a clean kitchen hand towel, then leave the dough to rise at cool room temperature overnight (about 18 hours). The expanding bubbles of carbon dioxide will do the work of kneading for you. The long rise also allows the acid-producing bacteria time to create the sourness that defines sourdough.
The next day, dust the dough with a bit more flour and fold the sides into the middle to form a round loaf. At this point the dough should be soft and slightly sticky, but it should hold its shape without sagging. Sprinkle half of a clean tea towel with stone ground cornmeal (other options include wheat bran, seeds and coarse salt) and place the loaf onto the towel seam-side-down. Dust more cornmeal on top of the loaf before folding the towel to cover. The cornmeal prevents the dough from sticking to the towel and helps to enhance the flavor and appearance of the crust.Let the loaf rise until doubled in size again (about three hours for my culture). When your target size is about a half hour away, put a cast iron Dutch oven with its lid into your cold oven and set for 425 °F (218 °C). An enamel coated Dutch oven will transfer heat more slowly, so set the oven to 450 °F (232 °C) if you are using one. When the Dutch oven is rocket hot, place (or toss as gently as possible) the dough, seam-side-up, into the Dutch oven and replace the lid. Bake for 25 minutes. During this time, the lid will trap steam evaporating from the dough. The increased humidity allows the crust to stay pliable as the heat causes trapped gas bubbles to expand and the yeast to go hyper (“oven spring”). After this initial period, remove the lid and increase the oven temperature by 50 °F (10 °C). Take the loaf out of the oven once it is brown and crusty, usually 15 to 20 minutes (or until the internal temperature reaches 206–210 °F/97–99 °C). Don’t worry if your bread doesn’t get incredibly brown; the lower pH of sourdough slows the Maillard reactions responsible for color development. Place the loaf on a cooling rack for at least 30 minutes before cutting into it. The crust on this bread is better than on any other bread I have baked, crunchy and flavorful. The acid in the dough helps the interior of the loaf to stay relatively soft for 48 hours or longer if wrapped tightly. Sadly, wrapping tightly also causes the crust to lose its crunch after a day.
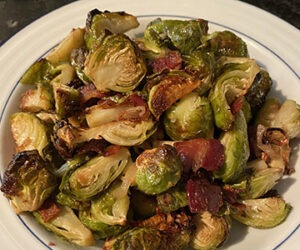
Sauerkraut
 Sauerkraut
Ingredients
4.0 lbs. (1.8 kg) sliced green cabbage
1.6 oz. (45 g) kosher salt
Sauerkraut was produced successfully for centuries before there was an understanding of sanitary procedures. However, it is safest to limit the microbes to those living on the cabbage itself. I use Star-San to sanitize anything that touches the cabbage, including the knife, v-slicer, container, cutting board, and weight.
Step by Step
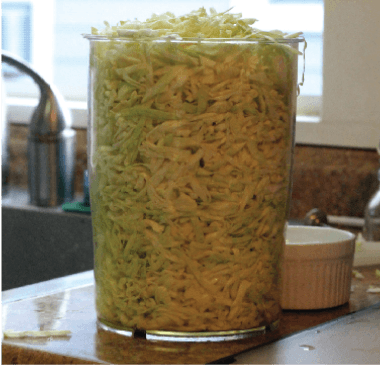
Discard any ugly/dirty outer leaves and then quarter the cabbage through the root end. Slice each quarter into whatever thickness you desire, usually between an eighth and a quarter of an inch (3–6 mm). Using a v-slicer, mandolin or food processor slicing blade makes quick work of the task and ensures a consistent texture compared to chopping with a knife. Two medium heads of green cabbage yield three to four pounds once shredded. Mix the cabbage with 2.5% of its own weight in kosher salt (measuring by weight removes inaccuracies associated with volumetric measures). Press the salted cabbage into a large non-reactive (plastic, glass, stainless steel, or ceramic) container.
Earthenware crocks are traditional, but not necessary. Initially, the vessel can be filled to the brim with cabbage, which will compact as it releases water. Over the next few hours the salt will draw out moisture. When the cabbage looks wilted, press on it and place a lid from another container that is small enough to sit on the surface of the cabbage. Position a one pound (0.45 kg) weight, such as a water-filled mason jar, on the lid to press the cabbage. Alternatively, fill a sturdy, sanitized Ziploc bag with water to use in place of both the lid and weight. Leave your souring kraut at cellar temperature, around 60 °F (16 °C), to ferment. After 24 hours the liquid coaxed out by the salt and weight should be enough to cover the surface of the cabbage. Drier cabbage or an inadequate weight may prevent enough liquid from being exuded. If the liquid does not cover the cabbage, top-off with brine made by mixing chlorine-free water with 2.5% salt by weight.
By 72 hours the cabbage should start emitting gas bubbles and a light sulfur aroma, which is why many people store their fermenting kraut in a basement or spare bathroom. I actually enjoy young salted cabbage that has just started to ferment as a side-dish for grilled meat and on sausage sandwiches. As the fermentation continues, you may notice colonies of (non-dangerous) mold floating on the surface of the brine. If you do, scoop them off, clean and sanitize the lid and weight before returning. After two to three weeks, the distinct tart smell of sauerkraut should be apparent. Taste the sauerkraut once a week until the flavor and texture are at your desired level. At this point, move the sauerkraut and brine to a mason jar or other airtight container and refrigerate until consumed. Spices (juniper, caraway), fruits (apples), or vegetables (onions) can be mixed into the cabbage along with the salt for added flavor or texture.
 Yogurt
Ingredients
½ gallon (2 L) milk
1 oz. (16 mL) yogurt (with live cultures)
You can use milk from any animal and with any percentage of fat you want.
Step by Step
Stirring constantly, heat the milk to 185 °F (85 °C). The longer you hold the milk at this temperature (up to 30 minutes), the firmer the texture will be. Allow the milk to cool to 115 °F (46 °C); a cold water bath will speed up the process. Pour all of the milk, except about a cup (250 mL), into clean non-reactive containers (old quart/liter yogurt containers are perfect). Stir the reserved cup of warm milk with the room temperature store bought yogurt. Mix the thinned yogurt into the rest of the warm milk, and then adjust the thermostat to the required setting. Fermentation by Lactobacillus in their ideal temperature range is rapid. About eight hours will usually result in a mostly firm, thick, tangy yogurt. The longer you leave the yogurt before putting it into the refrigerator the more acid will be produced, and the firmer the resulting yogurt will be. Commercial yogurts often contain stabilizers (such as pectin) which firm the texture and preserve the consistency when stirred. If you like firm yogurt, add a few tablespoons of powdered milk before heating to increase the protein content. If you prefer Greek-style yogurt, then place your fermented yogurt in a strainer lined with cheesecloth to drain some of the whey.