Home Malting
 Before I became a homebrewer back in 1992, I’d been involved in agriculture for a couple of decades. I began my journey in agriculture by working on a dairy farm in Wisconsin (which included an introduction to beer). But, it was not until I began learning how to make beer that I actually understood what malt and hops were and how they were used in making my favorite fermented beverage. I knew that barley was the basis for making malt and knew how barley was grown, but knew little of the mysterious process of turning barley into malt and malt into beer. Being trained as a scientist, I dove into the technical aspects of transforming barley into malt and learned of the complex bio-chemical progression that occurs as barley sprouts. I also began to understand how the malting process is managed to produce high-quality malt. It was then that I asked myself, “Why couldn’t I make malt at home?”
After realizing that I already had most of the equipment I would need to make malt, I began my hands-on learning by making my first batch of barley malt in 1999. This learning process naturally included a few mistakes along the way, but I eventually became proficient at making barley and wheat malt and have been doing so ever since.
Benefits of home malting
There are a number of reasons why you might wish to invest the time and effort in making your own malt. For me, it is a combination of the personal satisfaction of taking my homebrewing hobby to the next level by making the main ingredient myself, as well as the lower cash cost of homemade malt vs. commercial malt. Since I can get locally-grown barley or wheat by bartering or purchasing it for the cash-grain price at a small fraction of the price of malt, I can make malt very inexpensively. This is especially true when you factor in the cost of shipping if the malt isn’t purchased locally. Another reason to make your own malt is to be able to source ingredients locally, rather than having them made and shipped in from afar. So whether you want to take more pride in the beer you brew, save a few bucks, or just reduce your carbon footprint, making your own malt can bring more fulfillment to your efforts as a homebrewer.
Acquiring barley or wheat
The first step in making barley or wheat malt is securing the grain in its natural condition that has not been processed in any way that would affect the ability of the kernels to sprout. Where I live in western North Dakota, there are thousands of acres of barley and wheat grown every year. Whenever I need some of either grain, I simply talk to some of my farmer friends and trade them a few bottles of homebrewed beer for the grain that I wish to make into malt. These farmers are particularly excited to later get some beer back that is made from their own grain. In the United States, Idaho, Montana, and North Dakota are the top three barley producers. Colorado, Wyoming, Minnesota, Washington, Pennsylvania, Oregon, and Arizona also grow appreciable amounts of barley. If you live in one of these states, you may be able to track down a grower and offer them some homebrewed beer or cash for barley. Your local county extension agent or conservation district may be able to help you locate farmers that grow barley or wheat in your area (the USDA and American Malting Barley Association also publish malting barley acreage statistics).
Regardless of where you live in the world, it is worth exploring the possibility of sourcing locally-grown barley or wheat. If finding a local grower isn’t feasible, there are retail seed or feed dealers that may be able to supply you with what you need. A third option for those with space for a garden or field is to grow your own grain (see sidebar at end of this story).
If you are unable to find a local grower, then a local farm supply, livestock feed, or agricultural seed supplier may be able to provide you with a bag of barley for roughly half the price of a similar amount of malt. Make sure that the barley or wheat seed is whole (not milled, flaked, or otherwise processed) and is not treated with fungicide (as is sometimes the case with grain destined for planting as seed) unless you plan to plant the grain to grow your own crop. If you live in a big city that does not have any local farm suppliers, an organic or natural foods retailer may be able to supply you with some whole barley or wheat (sometimes referred to as “berries”) that are still in their natural state. And, of course, there is always the Internet and online retailers to turn to, however shipping costs may make this less appealing. Johnny’s Selected Seeds of Winslow, Maine, sells small quantities of spring wheat and spring barley varieties suitable for malting.
Making barley or wheat malt
Malt is simply any grain that has been sprouted to the point where enzymes become available within the seed to prepare to convert stored starch into sugar, and kilned to stop germination and preserve enzymes. When that kernel of grain is planted in the soil, the sugars produced from the stored starch are used to feed the growing plant until it can conduct photosynthesis. During malting, the growth process of the sprouting seed is halted by drying to preserve the starch and enzymes so we can store the resulting malt until we are ready to re-activate the enzymes in a warm water mash to gelatinize the malts’ starches, then convert the starch to sugar to produce sweet wort.
There are three basic steps to making malt: Steeping, germination, and drying (kilning). Making malt at home only requires small increments of time spread out over several days, and very little specialized equipment. I make malt 9 lbs. (4 kg) at a time because that’s how much grain fits on two big roasting pans that I use for sprouting the grain, and that amount will also fill all the racks of my food dehydrator that I use for the drying process. The method and equipment that you use for controlling air movement and temperature during the drying process is typically the limiting factor of the amount of grain you will be able to malt at a time. I have found that a food dehydrator is the best way to do this at home.
The first step of malting grain (in this case, barley) is to allow the seed to soak up enough water to come to life and begin to grow. In order for barley seeds to begin to sprout, they must first absorb a considerable amount of water — the goal is for the seeds to be about 45–50% moisture. The seeds need to be steeped in cool (approximately 50 °F/ 10 °C), hard (or at least not softened) water for about eight hours, then drained and allowed to rest for eight to ten hours in a cool (50–70 °F/10–21 °C) place, and then steeped in water again for another eight hours. Since the seeds you are sprouting are little living embryos, they also should not be deprived of oxygen for very long. Oxygenating the water that the grain is steeped in is beneficial to the sprouting grain, so splashing the cold water into the bucket of grain will help dissolve some oxygen into the water. If possible, it is even better to bubble air into the water during the steeping process with an aquarium pump and tubing suited for that purpose.
After the second steeping period, the water is again drained away and the grain spread out in shallow pans or other flat surface. In order to continue sprouting, the grain must be kept cool and moist and turned twice daily prevent the sprouts from getting too warm as that can increase the potential for mold to develop.
After the water has been drained away from the now sprouting grain for the second time, I immediately spread the moist grain about 3⁄4-inch (2-cm) deep on shallow roasting pans or baking sheets and then loosely cover the pans with plastic food wrap to help hold in moisture. When the grain needs to be turned, the pan can be uncovered, the grain disentangled and sifted between your fingers, moistened by misting or sprinkling water on it, and the pan of grain covered with plastic wrap again to continue sprouting.
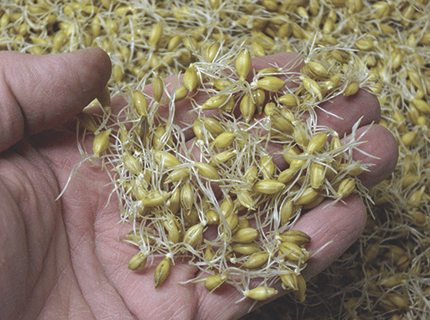
The tiny white rootlets (acrospires) will emerge from the embryo end of the seed and the shoot will grow starting from that same end of each grain. It’s important to keep turning over the grain twice daily during germination to untangle the rootlets. The shoot of barley will grow under the husk of the seed while the roots will grow out away from the seed. In order to track the growth of the shoot of barley, you will need to carefully cut the husk open on sample kernels and observe how long the shoot is relative to the kernel itself. The barley or wheat is fully “modified” when the shoot is very nearly the full length of the kernel of grain. Proper modification will usually take 3–5 days from the time that the grain was removed from the final steeping water and spread on the pans. The “smear test” is a simple way to determine if modification is complete. To perform the smear test, simply start at the end of the kernel where the roots are protruding and attempt to smear the kernel between your thumb and index finger. Any unmodified part of the kernel will not be soft enough to smear into a starchy paste and indicate that the grain should be allowed to sprout for a bit more time.
Once the malt has shoots that are as long as, or longer than, the kernel and/or passes the smear test, it needs to be carefully dried to stop the sprouting process and preserve the starch and enzymes at their best.
To make standard pale malt, “green” (still moist) fully modified sprouts must be dried with care at temperatures less than 125 °F (52 °C) until the raw malt has dried down to 10% moisture or less (at which point the malt will be hard and crunchy). I dry my malt in a food dehydrator at 100–125 °F (38– 52 °C) for 10 hours, then raise the temperature to 140–160 °F (60–71 °C) for eight hours. This staged drying process preserves the enzymes while driving off the grassy flavors and excess moisture from the malt. At this point I rub the malt over a sieve (a wire mesh strainer works well) to remove the dried rootlets. This cleaned and dried malt now requires a final toasting or “curing” to develop bready/toasty flavors desired in the finished malt and resulting beer.
Curing (a part of the kiln cycle — where the term “kilning” refers to all of the heating steps that happen on the malt kiln) can be accomplished in a standard kitchen oven. I spread my dried malt about a 1⁄2-inch (1.3 cm) deep on baking sheets and place them in a 185 °F (85 °C) oven for six hours. After the malt has been kilned it should be allowed to cool to room temperature and then stored in a cool (room temperature or cooler), dry place in a sealed container that prevents the malt from absorbing moisture from the air and excluding pests.
Making specialty malts
Once you master making standard pale malt you may want to explore the world of specialty malts. Many specialty malts are “special” because they are kilned at different temperatures and lengths of time than standard pale malt, roasted in a heated drum to achieve darker colors and stronger flavors, or they are mashed to convert starch to sugar with the kernels intact and then roasted to form caramel or “crystal” malt.
The lighter non-caramelized specialty malts can be made by taking kiln-dried malt and kilning them for a different amount of time and at different temperatures than you would for pale malt. Pilsner malt differs from pale malt in that the malt is kilned for three hours at 158–176 °F (70–80 °C) to produce a malt that is lighter in color and flavor than pale malt. Munich malt is kilned at 183 °F (84 °C) for three hours, Aromatic malt is kilned at 195 °F (90.5 °C) for three hours.
A darker non-caramelized specialty malt, such as chocolate malt, can be made by taking kiln-dried malt and roasting it on pans in the oven at 400 °F (204 °C) for 40 to 50 minutes. Roasting malt above a temperature of 300 °F (149 °C) should be done with care and frequent monitoring. At higher temperatures, the malt can change from toasted to burned in minutes. By experimenting with different time and temperature profiles, you can create your own “house” dark specialty malt that may be a bit lighter or darker than standard chocolate malt.
Caramelized specialty malts are made by converting starch to sugar (as would typically be done in a standard mash) with the kernels intact instead of crushed. There are a couple approaches for home maltsters to make caramelized malts. The first method involves placing raw, undried malt in a dish with a well-fitting lid and holding it at a temperature between 140–160 °F (60–71 °C) for two hours to allow the enzymes to convert starch to sugar. The “stewed” malt is then spread out on an open cake pan or baking sheet and toasted at 250 °F (121 °C) until it is browned to the color desired. The second method of making caramelized malt is to mix uncrushed standard pale malt (homemade or purchased) at a rate of one quart (1 L) water to one pound (0.45 kg) malt and follow the same procedure described above.
The longer the malt is kilned, the darker and more caramelized the sugars will become. Cara-Pils, Cara-Vienne, Cara-Munich, Special-B, and crystal malt are, from lightest to darkest, the various types of caramelized malts typically used by brewers. The flavor of these caramelized malts range from sweet to nutty as the malt is toasted from lighter to darker in color.
Summary
Whether you are interested in simply making some of your own caramel malt from commercial pale malt, or feel the need to make a variety of malts from grain you grew yourself, becoming a home maltster will give you a better understanding of what it takes to brew beer. I have a certain fascination with doing things in my brewing process from scratch, the way folks had to be able to do so in the early history of brewing beer. Growing my own grain and making my own malt gives me a connection with the brewers of old and a satisfaction that I did it all myself from the ground up.
Growing and Harvesting Barley or Wheat (sidebar)
Growing your own barley or wheat to use to make malt is no more difficult than growing anything else in your garden. Since the majority of readily available malting barley varieties are sown in the spring, I suggest that is the best way to go if you want to grow your own for most of North America.
While malt could be made from practically any variety of barley, there are several varieties that have been bred for making quality brewing malt. According to the American Malting Barley Association, major malting varieties of barley grown in the US and Canada include six-row types of; Celebration, Innovation, Lacey, Legacy, Quest, Thoroughbred, and Tradition. Two-row types recommended are AAC Synergy, ABI Voyager, AC Metcalfe, CDC Copeland, Charles, Conlon, Conrad, Endeavor, Expedition, Explorer, Harrington, Hockett, Merit 57, Moravian 37, Moravian 69, ND Genesis, Newdale, Pinnacle, Propino, Scarlett, and Wintmalt. The designation of six-row and two-row comes from the habit of how the florets are arranged on the pedicel (the head of grain at the top of the stalk), creating the appearance of six-rows or two-rows of seeds in each head. Charles, Endeavor, Wintmalt, and Thoroughbred are varieties of winter barley that are sown in the fall, then resume growth in the spring. All other varieties are sown in the spring and harvested that same fall in the Northern Hemisphere. Most homebrewers use two-row varieties of barley malt. Two-row malt has larger kernels and a bit less “husky” flavor than six-row malt.
In my experience growing barley or wheat in my garden, I usually harvest between 0.05–0.08 pounds (0.023–0.036 kg) of wheat or barley grain per square foot (0.1 m2) of area planted. Therefore, if you’d like at least 10 pounds (4.5 kg) of barley or wheat to malt, you would need to plant an area between 125– 200 square feet (11.6–18.5 m2) in size. You will need at least 0.002 pounds (0.9 grams) of seed per square foot (0.1 m2) of area planted. Therefore, a 200-square-foot (18.5-m2) plot would require a minimum of 0.4 pounds (0.18 kg) of seed. This planting rate is based on placing the seed in rows approximately seven inches (18 cm) apart and an inch (2.5 cm) deep to achieve a stand of 30 plants per square foot (0.1 m2). If you simply broadcast (or broadly scatter) the seed, you should double the seed rate to 0.004 pounds (1.8 grams) of seed per square foot (0.1 m2) planted, as some of the seed will not germinate or it will be eaten by wildlife. If broadcasting seeds, follow up by lightly raking the area to allow dirt to cover the seeds. This will help protect the seeds from wildlife and from blowing away in strong winds.
If you plant your barley or wheat in rows it will be easier to control weeds that may grow along with your grain. If you plant an adequate amount of seed as soon as the soil temperature at a 2-inch (5-cm) depth is above 40 °F (4.4 °C) in the spring, the barley or wheat will usually grow faster than most weeds and keep them at bay. There are typically not many insect pests or diseases that will impact your barley or wheat crop except for birds that may also become interested in harvesting your grain when it is ripe.
Barley or wheat are typically ready for harvest about 90 days after planting. Signals that they are ready to harvest includes when they no longer have any green color to them, the kernels have become harder and less pliable due to the natural drying and dehydration, and the row of kernels slump over to around a 45 degree angle. To harvest a small garden plot, I usually put on a pair of gloves (to protect my hands from the stiff, sharp awns) and snap or clip the heads off of the plants and drop them in a bucket. By collecting only the heads of grain, it makes it a bit easier to thresh the grain from them instead of dealing with all of the straw if you cut down the whole plant.
Once the heads containing the grain are harvested and dry, the grain needs to be separated from the head. The simplest way I have found to accomplish the threshing process is to spread the heads on a clean concrete floor or on a tarp or canvas on a hard surface and walk on them while wearing sturdy shoes or boots. After the individual kernels have been separated from the heads of grain the kernels need to be winnowed from the chaff.
I have winnowed grain in a couple different ways. One method is to take the threshed grain/chaff mixture placed in a bucket and stand on some stairs or a step ladder outdoors on a breezy day and pour the contents of the bucket slowly so the grain falls onto a tarp or sheet and the chaff blows away (or at least to the far end of the tarp or sheet). If the breeze is sufficient, you should have a concentrated pile of grain closest to the stairs or ladder that you can collect as your cleaned grain. If you do not have a place outdoors to perform the winnowing operation you can slowly pour the grain/chaff mixture in front of a fan and the chaff will hopefully blow further away from the fan than the grain, allowing you to collect the grain separately. This method can make a significant mess, so it is best to do so on a hard floor where the mess is easier to clean up afterward.
Once you have your grain cleaned and dry, store it in a sealed container in a warm (77–86 °F/25–30 °C) dry place for a few weeks before placing it in longer-term storage at 60–65°F (15.5–18.3 °C) for a few more weeks to allow the kernels to go dormant. After this resting period, the barley should sprout uniformly with very few non-sprouting kernels to make the best quality malt.


