IPA: A Tale of Two Beer Styles
 We’ve all heard the story of IPA before. Originally it was an export beer, a strong pale ale brewed with extra hops to act as preservatives during the long journey from England to the British troops in India. Fast forward to the 1980’s in the United States. Here, craft brewers picked up on English pale ales and started brewing their own versions with American hops.
In the two articles in this package — “IPA UK,” by Terry Foster and “IPA USA,” by Chris Colby — we present the classic English style and its younger American cousin. Both brews share a lot of similarities and overlap in many style parameters, to the extent that some commercial examples may be hard to categorize (even if they are easy to drink). However, clear-cut examples of both sub-styles exist, too.
Differences between the two beers can be summarized this way: Although both kinds of IPA are malty, English IPAs generally show more biscuity or nutty malt character and are less highly attenuated. American IPAs are usually stronger and hoppier, but many classic American examples are lighter in color and are better attenuated than median British examples. English IPAs show a more estery yeast profile than their American counterparts, which are usually fermented with “clean” ale yeasts. In both cases, the hops are the star of the show. Classic English hops such as Kent Goldings may be showcased in an English-style IPA, while citrusy Amercian hops — especially Cascade — are frequently on center stage in an American IPA.
Whichever style you decide to brew, English or American — or a hybrid, taking your favorite elements from each — get ready for a flavorful and-richly rewarding pint.
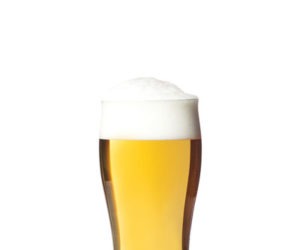
U.S.A. India Pale Ale
Here in the Unites States, there is a longstanding practice of borrowing ideas from other countries and putting an American spin on them. American-style pizza, for example, can trace its ancestry back to a flat, baked-bread dish called pizza in Naples, Italy. American India pale ale (IPA) is likewise a descendent of India pale ale, a once-popular beer brewed in Britain. American IPA is generally stronger and hoppier than its English progenitors, but frequently has a lighter color and malt profile.
The Wide World of Water
You can make a great American IPA from water with a variety of mineral compositions. Some are brewed from soft water — water with very few dissolved minerals. Others are brewed from harder waters, with abundant calcium and sulfate ions.
One ion that should not be present in large quantities is bicarbonate. Bicarbonate raises mash pH and dulls the hop character in beer. For pale versions of IPA, the level of bicarbonate should be under 50 parts per million (ppm); for amber versions, it can be as high as 100 ppm. If your water has more bicarbonate than this, add distilled water to dilute the level to an acceptable point. In contrast, calcium ions lower mash pH (through their reaction with phosphates). For an IPA, your level of calcium should — at a minimum — exceed the level of bicarbonate. Beyond that constraint, levels anywhere in the 50–250 ppm range will work well.
Sulfate levels can likewise vary over a wide range — anywhere from 0 to 350 ppm. Sulfate ions accentuate the hop character in beer, and if you really want them to bring out the hops, make sure they exceed 150 ppm.
Calcium and sulfate can be added to your brewing liquor by adding calcium sulfate (in the form of gypsum). If you need to add calcium, but don’t wish to boost your sulfate levels, use calcium chloride instead. Dilute the bicarbonate with distilled water first, if needed, then add back any calcium or sulfates you require. As with any beer, treating your brewing liquor overnight with one Campden tablet per 20 gallons (76 L) will eliminate any chlorine or chloramines.
If mucking with water chemistry calculations isn’t your thing, don’t worry. Try brewing a batch with your local water. If it turns out fine, then you don’t need to worry about it. If, however, your hop bitterness seems coarse and the beer seems blah (or even soapy), altering your water will be required. A good plan for extract brewers is to use soft or distilled water when making their American IPA, supplemented by 0–2 tsp. gypsum per 5 gallons (19 L) of brewing liquor. The extract itself will have minerals dissolved in it, so there is no need to make elaborate plans to alter your water’s chemistry.
Make Mine Malty
The focus in an American IPA is on hops, but malt plays an important supporting role. When making an American IPA, it’s important to understand what the word “malty” means — and some confusion exists among homebrewers.
Malt flavor comes from malt — specifically from the husks of malted grains. At the end of malting, malted grains are kilned (heated) and this develops colors and flavors that dissolve into the wort during mashing and end up in your beer. The more malt you use in a recipe, the maltier the beer. Likewise, up to a point, the more highly-kilned a malt is, the maltier it will be. Vienna and Munich malts are frequently cited as exhibiting the classic malty flavor, whereas less highly-kilned malts (such as Pilsner malt) show less malt character. Dark malts, including most specialty malts, are kilned to the point where they show more roast character than malt.
However, adding more malt usually correlates with another variable — a higher final gravity (FG). If all other variables are held to be the same, a beer with more malt will also have a higher FG. And here’s where the confusion comes in. Some homebrewers confuse malty (the character that comes from malt) with sweet or viscous (the characters that increase with higher FG). But, the two are theoretically independent. You can brew a malty beer that is dry if you use a lot of malt, but achieve a high level of attenuation. Converse-ly, if you brew a beer with less malt and achieve a low level of attenuation, you could brew a thicker beer with relatively little malt character. This distinction is important when brewing an American IPA.
Malt Choices
When making an American IPA, the most straightforward choice of base malt is a domestic 2-row barley malt. But, you have other options. English pale malt (~2 °L) or pale ale malt (~3 °L) will also work well. German Pilsner malt (~1.8 °L) can also work. Blending two or more base malts can add a bit of complexity.
Most American IPAs contain between 2.5–10% crystal malt with a color rating of 20–60 °L. Darker crystal malts yield a more raisin-like, plum-like or roasty character, which is more often found in English-style ales. Many American IPAs also contain up to 20% Munich malt, to boost the malt character of the beer. You could also use Vienna malt to achieve the same thing. Other malts — including biscuit malts and amber malts — can be used in small amounts and still yield a distinctly American IPA. Too much of these, however, will give an overly biscuity or nutty flavor which is more appropriate to an English-style IPA.
Although American IPAs are often bigger than English IPAs, they are not always darker or that much heavier. The focus really is on the hops in this style and plenty of classic American IPAs are fairly light in color and well-attenuated. See, for example, Stone IPA or Full Sail IPA. Of course, it’s a big country — with a correspondingly large number of interpretations of the style — and some American IPAs show a solid amber color and a fair amount of sweetness. Sierra Nevada’s Celebration Ale is one example here, although this beer also doubles as a holiday beer. And, of course, there are plenty of beers in the middle. Anchor’s Liberty Ale is a light amber — about the same color as their steam beer — with a fairly dry finish for an all-malt beer. If you’re going to brew an American IPA, I recommend plenty of “research” with these beers and other great American IPAs.
Hops Yield Happiness
Hops are, without question, the focus of any IPA. Good IPAs have a nice balance between hop bitterness and hop flavor and aroma. When you taste a well-brewed IPA, you taste hops up front, through the “mid-palate” and into the aftertaste.
Brewers often divide hops into bittering hops and aroma hops. The idea is that bittering hops are added early in the boil, boiled for a relatively long time and give the beer most of its bitterness. Aroma hops are added later in the boil and, while they yield some bitterness, they are mainly supposed to add flavor and aroma that would boil away if the hops were boiled longer.
In an American IPA, there are many approaches to hopping. Some are brewed with a big dose of bittering hops added early and some late hops added to round out the flavor and aroma. Others are brewed with enough hops added near the end of the boil that most of the IBUs are actually obtained from the “aroma” hops. Still others are brewed with numerous hop additions, making any attempt to conceptually divide the hops into a bittering portion and a flavor/aroma portion futile. Each method of hopping has its pros and cons.
“Traditional” Hopping vs. Other Types of Hopping
“Traditional” hopping — with bittering hops added early, then flavor aroma hops added near the end — is widely practiced because it gives the biggest “bang for your buck” and results in the fewest problems in the brewhouse. If you pick a nice, high-alpha variety to add for your bittering hops and then throw in some aroma hops at the end, you’ll need fewer hops overall to reach your target bitterness. This saves money in terms of how much you pay for the hops and, for commercial brewers, how much wort is lost due to being absorbed into the hops. Also, with less hop “gunk” in your kettle, getting the wort from the kettle to your fermenter can be easier. And finally, alpha acids and the essential oils that convey flavor and aroma aren’t the only compounds in hops. As with most plant material, they also contain tannins. Methods of hopping that involve using more hops to obtain less bitterness run the risk of being overly grassy or — in extreme circumstances — excessively tannic or vegetal.
Proponents of adding hops throughout the boil claim that this method gives a hop character you can’t achieve with a “bookend” approach of adding some early and late, but none in the middle. In practice, great commercial examples of IPAs made using both approaches exist. Homebrewers interested in IPA will most likely try both approaches and decide for themselves which is more suited to their tastes.
The Wide Variety of, uh, Varieties
When choosing your hops for an American IPA, you have numerous options. Most of these beers show a citrusy, “American” character found in the “C hops” — Centennial, Chinook, Columbus and, especially, Cascade. In most, more than one hop variety is chosen and, for this reason, almost every hop imaginable has shown up somewhere in an American IPA. American brewers are also quick to try new hops and recently-released varieties such as Amarillo and Simcoe are finding favor at many breweries. In addition, there are always new varieties being released. (Summit, a new high-alpha variety, is generating some interest. One new hop I have tried and liked is Nelson Sauvin, a hop from New Zealand.)
Clean Ale Yeast
American IPAs typically show a clean fermentation profile and any of the American ale yeast strains available to homebrewers — including Wyeast 1056 (American Ale), Wyeast 1272 (American Ale II), White Labs WLP001 (California Ale), White Labs WLP051 (California V Ale) and Fermentis US-05 (formerly US-56) yeast — are a good choice. You can also use English ale strains that are only moderately estery.
For 5 gallons (19 L) of beer, a 2–3 qt. (~2–3 L) yeast starter should do the trick. Make your starter wort at SG 1.030–1.040 and aerate the starter well. Adding a pinch of yeast nutrients to the starter is also a good idea.
Wort Production
American IPAs range from fairly dry to full-bodied. The level of attenuation that all-grain brewers achieve in their beer will depend both on the grain bill and the mash procedures. Almost all American IPAs are brewed using a single infusion mash.
If you are shooting for a fairly dry IPA, formulate your recipe with domestic 2-row pale malt, fewer specialty grains and mash at the low end of the saccharification range. Domestic 2-row malts are enzyme rich and a 60 minute mash at around 150–152 °F (66–67 °C) will yield a wort with the right amount of fermentability for a well-attenuated version of the style. You should not need to use adjuncts or step mashes to achieve more fermentability for a “fairly dry” IPA. These beers are drier than many full-bodied ales, but not as dry as “lawnmower” beers such as cream ale or American Pilsner.
If you are aiming for a less attenuated version of the beer, include more specialty malts in your recipe and mash at a higher temperature. Mash temperatures around 154–156 °F (68 –69 °C) will lead to more viscous beer. Using English pale malts, which have less diastatic power, and opting for a shorter mash rest can also decrease your fermentability. You can mash for as little as 20 minutes, but you should use an iodine test if you do. A negative result (no color change to purple or black) will mean there are not enough starches in the wort to be a problem.
The fermentability of the wort made by extract brewers will depend mostly on the malt extract they choose. For a sweeter version, most English-style malt extracts will work well. American light or pale malt extracts are usually a bit more fermentable.
For a more highly-attenuated extract IPA, extract brewers have a couple options. One option is to perform a partial mash at around 150–152 °F (66–67 °C). The combined wort from the partial mash and dissolved malt extract will exhibit a fermentability in between the two. You can also use the enzymes from the partial mash to work on any available carbohydrates in the extract wort. To do this, just make a partial mash as you normally would. While the partial mash is resting, dissolve your malt extract and heat it to 150–152 °F (66–67 °C). Run off the partial mash wort and combine it with the malt extract solution. Hold this combined wort at 150–152 °F (66–67 °C) for about 15 minutes. If there are degradable carbohydrates in the malt extract, the enzymes from the partial mash will work on them, yielding a more fermentable combined wort. Extract brewers can also use prepared amylase enzyme, available at many homebrew shops, for this purpose. Extract brewers should not increase their fermentability by adding corn sugar. This works, but yields a less malty wort than is desired for this style.
Boiling
The biggest difference between boiling an IPA wort and boiling a wort for a “regular” ale is that there are more hops in an IPA wort. Once the boil is over, the wort will need to be separated from the hop “sludge” at the bottom of the kettle.
All-grain brewers will likely want to boil their wort for 90 minutes. This will allow enough time to reduce the wort volume such that the proper original gravity is reached. It will also be long enough to develop a nice hot break and provide enough time to boil the hops. During the boil, hops will cling to the kettle above the liquid line. Take a spoon and knock these back into the kettle periodically — they aren’t doing you any good if they aren’t being boiled in the wort.
The pH of your finished beer will have an effect on the hop character. At higher pH values, the beer will be more bitter, but the bitterness with have a harsh edge to it. During the boil, you can “prime” your beer to reach a final pH that is conducive to a pleasing hop bitterness by adding a little calcium to your boil — around 0.5–1 tsp. of gypsum or calcium chloride per 5 gallons (19 L) will help if you have been brewing IPAs with a coarse edge to the hop bitterness.
At the end of the boil, most all-grain brewers will empty their kettle by opening a ball valve near the bottom of the vessel. Hop screens installed inside the kettle will hold the break material and hop sludge back and let the wort through. For brewers without hop screens, there are a couple options.
One option is to take a stainless steel “chore boy” and place it around the inlet end of your racking cane. Another option is to cool the wort and let the hop debris settle for an extended period of time. If you cool with an immersion chiller, simply let the cool wort sit (with the cover on the brewpot) for an hour or two, then siphon the wort off the top into a fermenter. Or, you can run chilled wort from a counter-flow chiller into a sanitized bucket and let it settle there before racking to a fermenter. Yet another option is use a funnel fitted with a screen. To do this, cool your wort first with an immersion chiller, then transfer the beer through the (sanitized) funnel into your fermenter. The screen should catch most of the hop debris. Use a sanitized spoon to keep the screen from getting plugged. (If you’re brewing alone, you can rack the beer and clamp the outlet end of the racking cane to the funnel.)
For extract brewers, there two other considerations when boiling — wort thickness and volume. The more dense your wort is, the fewer iso-alpha acids will be extracted. In addition, there is a maximum amount of iso-alpha acids that can be extracted by boiling hops in wort. So, if you’re boiling a doubly-thick wort on your stovetop, and then diluting it, you are limiting your bittering potential in two ways — first by boiling in a thick wort and second by dilution. There are a couple ways to overcome, or at least partially overcome, this obstacle.
The best solution is to perform a full-wort boil, even if have to make your wort in shifts — for example, by boiling two separate 2.5-gallon (9.5-L) worts and combining them. A partial solution to the problem is to use the “extract late” method, in which your wort is boiled at working strength, followed by a late addition of extract to hit your target gravity. (See the October 2004 and December 2005 issue for more.)
Fermentation and the Finish Line
American IPAs are fermented and dry-hopped just as English-style IPAs are. An American twist on serving American IPA, developed by Dogfish Head, is to push it through a filter of hops (called a Randall).
This hoppy beer, favored by American beer geeks, arrived in our glasses via a circuitous route. Originally, IPA was an English beer, brewed for export to India. Now, thanks to adventurous brewers in the USA, it’s as American as apple pie — or, at least, as American as pizza.
Roswell IPA
(5 gallons/19 L, all-grain)
OG = 1.070 FG = 1.014
IBU = 60 SRM = 8 ABV = 7.2%
Golden colored and highly-attenuated, with just enough malt to serve as a framework for the hops. Solid, clean hop bitterness fades into a moderate amount of hop flavor and aroma.
Ingredients
13 lbs. 9 oz. (6.15 kg) US 2-row pale malt
11 oz. (0.31 kg) Vienna malt
5.0 oz. (0.14 kg) crystal malt (30 °L)
14 AAU Magnum hops (60 mins) (1.0 oz./28 g of 14% alpha acids)
3.75 AUU Centennial hops (15 mins) (0.38 oz./11 g of 10% alpha acids)
0.75 oz. (21 g) Cascade hops (5 mins)
0.75 oz. (21 g) Cascade hops (dry hops)
0.5 oz. (14 g) Amarillo hops (dry hops)
1 tsp. Irish moss (15 mins)
0.5 tsp. calcium chloride (optional)
Wyeast 1056 (American Ale), White Labs WLP001 (California Ale) or SAFALE US-05 (formerly US-56) yeast (3 qt./~3 L yeast starter)
0.75 cups corn sugar (for priming)
Step by Step
Prepare 12 gallons (45 L) of brewing liquor with bicarbonate below 50 ppm and calcium around 75 ppm. (Adding 3.5 tsp. of gypsum to 12 gallons (45 L) of soft water will get you there.) Add a Campden tablet the night before you brew to get rid of chlorine compounds. Mash grains at 152 °F (67 °C) in 18 qts. (17 L) of water. Rest for 60 minutes, then mash out to 168 °F (76 °C). Recirculate wort for 20 minutes, then collect around 7.0 gallons (26 L) of wort in your kettle. Keep your sparge water hot enough that the grain bed temperature remains at 168 °F (76 °C). Boil wort vigorously for 90 minutes, adding hops at times indicated. (As an option, add 0.5 tsp. calcium chloride at the beginning of the boil.) Knock any hops that cling to the side of your kettle back into the boiling wort. Cool wort and transfer to fermenter. Aerate thoroughly and pitch sediment from yeast starter. Ferment at 68 °F (20 °C) until primary fermentation ends. (This should take about a week.) Rack to secondary fermenter. If you are going to bottle your beer, let it sit for 3–4 days, add the dry hops and let the beer sit for another 3-4 days, then bottle it. If you are going to keg your beer, let the beer sit in secondary until it clears substantially (7–10 days), then keg and dry hop.
Lots of things can affect the level of hop bitterness, hop flavor and hop aroma in an IPA. When your beer is finished, taste it critically and make note of the level of bitterness, hop flavor and hop aroma in your brewing notebook. The next time you brew this beer, or any hoppy beer, use your observations as a guide to making any needed adjustments in recipe or procedures.
Extract option:
Reduce the amount of 2-row malt to 3.0 lbs. (1.4 kg) and add 5 lb. 10 oz. (2.6 kg) Briess light dried malt extract. “Steep” (actually partial mash) grains at 152 °F (67 °C) in 6.0 qts. (5.7 L) of water. In your brewpot, combine “grain tea” and hot water to make at least 4.0 gallons (15 L) of wort, stir in malt extract and hold at 152 °F (67 °C) for 20 minutes. Boil wort for 60 minutes. Cool wort, transfer to fermenter, top up to 5 gallons (19 L) with water, aerate, pitch yeast and follow remaining all-grain instructions.
-Chris Colby
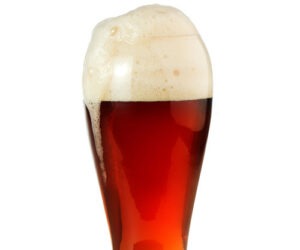
U.K. India Pale Ale
Many people think that India Pale Ale (IPA) originated in Burton-on-Trent in England, but it didn’t! It was first brewed by George Hodgson in London in the eighteenth century, and only began to be brewed in Burton almost twenty years into the nineteenth century. It is true, however, that it was the Burton Brewers — notably Bass and Worthington — who brought it to perfection and brewed it on a grand scale. Now the great British Empire no longer exists, India is its own master and very few Englishmen have any concept of the style. A handful of English microbreweries do produce creditable versions, but these are hard to find. Much more widely available are “IPAs” from certain regional brewers that are no closer to real IPA than mainstream American lagers are to Pilsner!
In fact, these days I think of IPA as more of an American brew. The craft brewing movement in the United States took pale ale and IPA to its heart right from its early days in the 1980’s. However, they nearly always tried to brew IPA in the spirit of the original and to the standards by which it was first produced. And interestingly, some of the “innovations” of US craft brewers aren’t really that new — Bass was using American hops in the Burton IPA heyday of the second half of the nineteenth century! In this article, I’ll explore how to brew the classic English India Pale Ale.
Brewing and Breadth
IPA is sometimes seen as a one-dimensional brew, because it is above all else a hoppy beer. However, other flavors from both yeast and malts play a part in its palate. Given this — and the wide range of hops available to us — it is possible to achieve quite wide variations in flavor.
Water
There were several reasons why IPA took off as soon as the Burton Brewers got into the act. One of the major reasons is that the water in Burton was particularly suited to the brewing of this style of beer. It didn’t come from the Trent, of course, but from deep wells. This water is very high in total dissolved solids, containing mainly calcium, magnesium, and sulfate ions, as well as bicarbonate and chloride ions. The bad news is that it is just about impossible to take another water with differing salt contents, and adjust it so that it matches Burton water exactly. The good news is that you don’t have to!
Originally, the reason why Burton water was so good for brewing IPA was that it was perfect for mashing a brew made from only 2-row pale malt. In those days, such malts would have been somewhat undermodified, and it was essential to control the mash pH in order to get good conversion of the malt during mashing. The very high levels of calcium and sulfate ions in the water would have done just that. Modern 2-row pale malts are of much better quality, and are more uniformly well-modified. Yet they contain plenty of enzymes to do the conversion job, so brewers have less to worry about when it comes to mash pH.
It is all too easy to get lost in the maze of deciding what is a suitable water treatment program for your water, in order to make it suitable for mashing a particular malt. In fact, the only problem you are likely to have is if your water is alkaline — that is, it is high in bicarbonate ions. If that is the case, the best approach is to check your mash; if it is above pH 5.5, add gypsum (calcium sulfate), 1 tsp (5 g) at a time until you get down to the desired pH 5.2–5.5 range. Boiling your water before mashing will also help, by precipitating calcium carbonate.
In extract brewing, you do not need to worry about water treatment. This has already been done for you by the manufacturer during the mashing stage of the malt extract production process. It is, however, just as well if you boil the water first to remove carbonate, as this ion can “cloud” hop flavor, making it flabby and not clean.
Whether you are an all-grain or extract only brewer, there is another argument for adding gypsum to your brewing water. This is that the sulfate ion helps to ensure that you get clean, sharp hop bitterness in the final beer. This is the approach I take myself, since I have a water supply low in dissolved solids. But, with similar water, Jeff Browning at Bru Rm@Bar in New Haven, here in Connecticut, produces excellent IPA (and pale ale) with no water treatment whatever. For 5 gallons (19 L) of extract beer, add no more than 1 tsp (5 g) of gypsum.
Malt
For all-grain brewing the selection of malt should be obvious — it’s ale, it’s pale, so we need only one base malt. And given its origin, that should be English 2-row pale malt, surely. Indeed, I like to use Maris Otter pale malt even though it gives a slightly lower extract yield than other pale malts, as it gives a good background nuttiness to the beer. Other English 2-row pale malts still work pretty well, though.
Mashing is fairly straightforward; you should go for a slightly high temperature to give the beer a little body. I like 153–155 °F (67–68 °C), but a degree or two lower is not crucial.
When it comes to extract brewing, several manufacturers offer pre-hopped IPA extracts, which offer a quick and easy route to a quite decent IPA. But most of the fun of this beer comes from playing with the hops, so I prefer to use a plain, unhopped pale extract, made from 2-row malt. Use one designed for pale ale or IPA, or just the palest ale malt extract you can get, avoiding those with adjuncts if possible. A few shops sell malt extract made from Maris Otter and that is perfect for this beer.
It is well to remember the old saying about IPA, namely that it is only pale in comparison to the very dark porters and stouts that were popular when IPA was first produced. That means that you can in fact use a little colored malt in this beer, with crystal malt being the best option. It isn’t really traditional, since it wasn’t available until around a hundred years after George Hodgson first started shipping pale ale to India. However, I think it adds a hint of extra complexity to IPA.
Use only one of the paler crystal malts (20 to 40 °L), at around 5% of the malt total. That means a maximum of a half-pound (0.23 kg) in a 5-gallon (19-L) brew, added with the pale malt if you are working with all grain. In the case of extract, pre-steep the crystal malt in hot water at 160–170 °F (71–77 °C).
Hops
The heart and soul of IPA! The original brews were very highly hopped; in the nineteenth century, with no refrigeration available, and a 6-month voyage to India from England, it was the preservative powers of hops that were most important to the brewer. High addition rates were used — up to as much as 10–12 oz. (280–340 g) per 5 gallons (19 L)! There were no high alpha-acid hops then, and the hops would often deteriorate during storage without refrigeration. This makes it difficult to know what bitterness levels were in terms of IBU, but calculations would suggest something around the 100 IBU maximum. This bitterness would have decreased somewhat during long storage and shipping before drinking, which is why we nowadays go for a target of 60 IBU maximum.
When making an English-style IPA, you should not concentrate on bitterness alone, for the originals surely had significant hop flavor and aroma, as late hopping, and dry hopping were regular practice in the nineteenth century. Both are also practiced with IPA by modern craft brewers (some with multiple additions throughout the boil), and I recommend that you do the same. Late hopping, that is, addition within the last twenty minutes and perhaps after the heating is turned off, should be fairly generous (1– 3 oz./28–85 g), as late hopping does not always work consistently on a small scale.
Dry hopping is easy to do if you are going to keg the beer. If not, it can be done in the fermenter; as we do at Bru Rm@Bar (although the dry hops are only added after the kräusen has subsided). This is fine if you use an open fermenter, but can be dangerous if you use a glass carboy, especially if your fermentation lock or blow-off tube is so narrow that it can easily become blocked with the hops. In fact, with a carboy, dry hopping is best done in the secondary. Whether during fermentation or in the keg, use a sterilized, tightly tied hop bag, with a sterilized weight attached to it.
But what hops? Classically, of course, it should be English Goldings throughout, as that was the finest hop available in England 200 hundred years ago. I have certainly used it to advantage in my IPAs. But there is no reason to limit yourself, English Fuggles, Target, Challenger or the new dwarf hop, First Gold, all work very well. Many American-grown varieties — notably Cascades, Columbus, Chinook, Northern Brewer, Amarillo and Willamette — work well in IPAs and are not unheard of in English brews. I know of one commercial brewer who likes German Hallertauer, and also from Europe, Styrian Goldings are excellent as a finishing hop. Just be very careful of very high alpha-acid hops (above 10% alpha), as these can sometimes give quite a harsh bitterness in the beer.
A good plan is to use a moderate high alpha, such as Target or Northern Brewer for bittering (90-minute boil), and one of the lower-alpha aroma hops for finishing and dry-hopping. There is also a lot to be said for using several different aroma hops, especially if you want to make additions at more than one time during the boil. For dry hopping, East Kent Goldings work very well, and remains my favorite.
With the possibility of using so many different varieties at several different points in the brewing process, there is good potential for experimentation, and for producing a whole range of interesting IPAs, none of which will be one-dimensional!
Yeast and Fermentation
Burton IPA was brewed in the famous Burton Unions. Many homebrewers practice a blow-off system in fermentation, and many of them think that this is similar to a Union system. It most definitely is not. In Burton, the fermentation was carried out in regular open vats for the first 2–3 days. The fermenting wort was then transferred (“cleansed”) into a battery of large casks, which were water-cooled by means of internal pipes. As fermentation continued, the beer overflowed, by means of swan neck pipes into a common shallow trough where it was separated from the yeast and returned to the casks. This whole system was called a Union and it permitted the Burton brewers to use a powdery, non-flocculent yeast. This meant that they could achieve high attenuation, which was important for a beer that was to travel long distances in warm conditions. They didn’t want vigorous in-cask fermentation occurring in a ship’s hold anywhere between Liverpool and Calcutta!
Such a system is not practical for the homebrewer, and can easily lead to contamination of the beer. Besides, as far as I know, the original yeast strain (which might well have been a mixture of strains) is not available to us. White Labs WLP023 (Burton Ale) yeast, however, gives an excellent IPA, with good attenuation and some estery character. Their WLP005 (British Ale) also works well, as does Wyeast 1098 (British Ale) and 1028 (London Ale), both of which attenuate well, with only a hint of fruitiness.
IPA worts should be fermented at moderate temperatures. Try to keep them at 65–70 °F (18–21 °C). Higher temperatures can lead to loss of bitterness and hop aroma, as well as ester production, which can dull the hop character at high levels. If you are bottling, dry hopping is best carried out in a secondary stage, after the first racking. It may take up to three weeks to get the full hop flavor from the dry hops.
The IPAs from Burton brewers were conditioned warm, in the hold of a ship. However, as a modern homebrewer, do not be tempted to use a hot conditioning stage. The temperature program that historical IPAs endured was a constraint, not anything the brewer planned or desired. One to three weeks of conditioning — at or slightly below fermentation temperatures, while dry hopping — should be all the conditioning your IPA requires.
Burton-on-Housatonic IPA
(5 gallons/19 L, all-grain)
OG = 1.070 FG = 1.014
IBU = 60 SRM = 9 ABV = 7.3%
Ingredients
14 lb. 2 oz. (6.4 kg) 2-row pale malt (made from Maris Otter)
0.5 lb. (0.28 g) crystal malt (40 °L)
16.1 AAU Northern Brewer hops (90 mins) (2.3 oz./65 g at 7.0 % alpha acid)
1.0 oz (28g) East Kent Goldings hops (10 mins)
1.0 oz (28g) East Kent Goldings hops (0 mins)
1.0 oz (28g) East Kent Goldings hops (dry hops)
White Labs WLP023 (Burton Ale) yeast
1 cup corn sugar (for priming)
Step by Step
Use a single-step infusion mash at 153–155 °F (67–68 °C) for 1–1.5 hours. Sparge one hour, with water no hotter than 175 °F (79 °C), until run-off reaches SG 1.010–1.012. Boil 90 minutes, with bittering hops added after the first foamy head subsides. Adjust wort volume with cold water, and cool to about 70 °F (21 °C). Pitch with yeast starter, and allow to ferment. By 5–7 days, final gravity should have been reached; rack into a secondary fermenter. If you will be bottling, add dry hops at this stage. One to two weeks later, rack again, prime with corn sugar, and rack into keg or bottles. If you keg your beer, add dry hops at this stage.
The beer should be ready to drink after conditioning for a week or so. It will keep for months if kept cool, and you have been careful to avoid aeration during racking.
Burton-on-Housatonic IPA
(5 gallons/19 L, extract with grains)
OG = 1.070 FG = 1.014
IBU = 50+ SRM = 12 ABV = 7.3%
Ingredients
1.5 lb. (6.4 kg) Maris Otter pale malt
0.5 lb. (0.28 g) crystal malt (40 °L)
1 lb. 14 oz. (0.85 kg) Muntons Light dried malt extract
6.6 lb. (3.0 kg) Muntons Gold India Pale Ale liquid malt extract kit
16.1 AAU Northern Brewer hops (60 mins) (2.3 oz./65 g at 7.0 % alpha acid)
1.0 oz (28g) East Kent Goldings hops (10 mins)
1.0 oz (28g) East Kent Goldings hops (0 mins)
1.0 oz (28g) East Kent Goldings hops (dry hops)
White Labs WLP023 (Burton Ale) yeast
1 cup corn sugar (for priming)
Step by Step
In a large kitchen pot, heat 3.0 qts. (2.8 L) of water to 165 °F (74 °C). Place the crushed grains in a steeping bag and steep in this water for 60 mins. Hold steeping temperature around 154 °F (68 °C). Heat 1.5 gallons (5.8 L) of water to a boil in your brewpot. Add “grain tea” from steep to your brewpot. Hold grain bag over brewpot with a large colander and rinse grain bag with 1.5 qts. (~1.5 L) of hot water (at 170 °F/77 °C). Add dried malt extract and bring to a boil. Boil 60 minutes, adding hops at times indicated. Stir in liquid malt extract at end of boil and let steep for 15 minutes with the brewpot lid closed. (If the liquid extract is hopped, it will give you more bitterness.) Cool wort, top up to 5 gallons (19 L), aerate and pitch yeast. Follow the instructions for fermentation and dry hopping in the all-grain recipe.
Haldane’s Select IPA
by Chris Colby
(5 gallons/19 L, all-grain)
OG = 1.062 FG = 1.011
IBU = 51 SRM = 12 ABV = 6.5%
Light copper colored, fairly dry and nicely balanced with “earthy” English hops. An English-style IPA with a couple eccentricities.
Ingredients
8.25 lbs. (3.7 kg) pale ale malt (3 °L) (preferably malted from Maris Otter barley)
5.25 oz. (0.15 kg) crystal malt (60 °L)
3.0 oz. (85 g) biscuit malt
0.33 oz. (9.3 g) chocolate malt
2.0 lbs. (0.91 kg) cane sugar
12.5 AAU Kent Goldings hops (60 mins) (2.5 oz./71 g of 5% alpha acids)
0.75 oz. (21 g) Fuggles hops (15 mins)
1.5 oz. (43 g) Fuggles hops (dry hop)
Wyeast 1028 (London Ale) or White Labs WLP026 (Premium Bitter) yeast
0.75 cups corn sugar (for priming)
Step by Step
Mash at 153 °F (67 °C) in 11 qts. (10.4 L) of brewing liquor (with 150–200 ppm calcium ions and less than 100 ppm bicarbonate.) Collect about 4.5 gallons (17 L) of wort, add 2.0 gallons (7.6 L) of water and boil wort for 90 minutes. Add hops at times indicated in ingredient list. Add cane sugar with 15 minutes left in the boil. Ferment at 70 °F (21 °C). Add dry hops in the secondary fermenter or in your keg.
-Terry Foster