More Gear for Beer
Adding equipment to your home brewery does more than just boost the economy and provide topics for articles: new gear allows more control over your brew, saves time, can reduce stress, and can allow you to try new variations or larger batches. Often, equipment can help you narrow down onto a specific flavor and then duplicate it with confidence in future batches. In order of the brewing process, here’s the general range of goodies and upgrades without too much discussion of techniques. Milling and mashing are specific for all-grain brewers, but a mill could certainly be used for specialty grains in an extract batch.
Grain Milling

Many of us are content to let the homebrew supplier mill our grain, and usually suppliers have an adequate mill. However, barleycorns that have been milled will absorb some moisture from the atmosphere, and the quality of pre-milled grain does degrade over time. Grist that has been exposed to air for weeks tastes stale, but if a brewer waited a day or two between bringing milled grain home and using it in a brew, any quality drop would probably not be noticed in the final product – even by tasters with great palettes and experience.
However, the brewer would know. Many choose to mill grain at home, right before the mash, for ultimate freshness to the grist. Other brewers who must mail order supplies that will take days to arrive should consider a mill, because we don’t always brew the exact moment the shipment arrives.
Generic “cereal-grain” mills do offer the option of freshly-cracked grist, but the milling pace is slow and the grist comes out with a wide variation of sizes – some of the grains sneak past without being adequately cracked, and others get pulverized too fine.
A roller mill – most models are under $200 – produces a more even, regular grist by passing all the kernels between two rollers that are just a little closer together than the size of a kernel. The regularity of the crack from these mills will provide better extraction to the brewer, and mashes will also be easier to lauter because there won’t be tiny shattered pieces that can get gooey. In most models the gap between rollers can be adjusted to crack different grains – rye, for example, has a much smaller kernel than barley. Roller mills can also be permanently motorized with a belt and an electric motor by the fully obsessive – just look for a quarter-horse electric motor at your local industrial supply or glean the blower motor when your neighbor replaces the home furnace. A good compromise requiring less work is to tighten the chuck of your electric drill to the mill.
Mashing
For most all-grain brewers, their first mash pot (or mash tun) is their brewkettle. First all-grain batches tend to be on the small side – 5 gallons yield or even smaller – and a smaller mash tun will cool quickly due to its smaller mass. A brewkettle makes a great starter mash tun – when the heat drops, it can go right on the heat source to be brought back up into the correct range. Stir continually with a big wooden spoon as you heat. When the kettle is off the heat, a lid is vital to help keep the temperature from dropping too rapidly. After the mash period, the brewer transfers the mash into a separate lauter tun, the vessel that strains the wort away from the grain husks.
An accurate thermometer makes mashing possible – the thermometer is popped into the mash frequently for readings. Glass “dairy style” thermometers are accurate and less than a ten-spot in cost, but take up to two minutes to display the reading and can also break if dropped. Dial thermometers show a reading very quickly and break less easily – if you have a choice go for a larger dial that you can read through wort-splattered, steamed-up eyeglasses. Some dial thermometers come with a clip for the edge of the kettle, so the thermometer can stay in the mash while the brewer uses both hands to stir or move the kettle. dial thermometers can also be calibrated (or un-calibrated by accident)
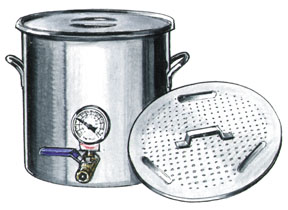
A 4- gallon kettle, like the classic 16-qt. enamel “canner,” seems to be a common size for a first kettle, and brewers can yield 5 gallons from this size by boiling a concentrated wort. This size will be adequate to mash the grains for a 5 gallon batch of even a high gravity beer. When the time comes for the first kettle upgrade, get one of at least 7.5 gallons to do a full-wort boil of a five gallon batch, and this kettle could someday become your dedicated mash tun even if you go up to a 12- or 15- gallon brewkettle. Stainless steel remains a great choice for toughness and ability to be welded: someday you will be likely to add a spigot through the wall.
Larger mashes hold their heat better. Brewers who reach the 10-gallon batch size, with a 15-gallon kettle, can usually get the mash to the proper temperature, then leave it alone for 90 minutes and get an acceptably small temperature drop at room temperature. Mashes for 5-gallon batches or smaller usually require some kind of insulation, and sometimes brewers drop their entire kettle right into a Styrofoam insulated box like seafood is sometimes shipped in, or devise their own insulated box. Others buy a ready-made mash jacket that covers the entire kettle.
But with good insulation, there will be no need to add heat to a single infusion mash . . . and brewers often already own one: a beverage or picnic cooler works as a great ready-made solution. Add water and grain in a cylindrical or rectangular cooler, check the temperature and adjust, and close the lid. As you check the mash temperature over a typical 90-minute mash, you’ll find that a 5-gallon batch will typically only lose three or four degrees F., even outside on a cool day. At the end of the mash period, transfer the mash to a separate lauter tun, like the bag or bucket lauter described below.
Lautering
This process, where wort is gently drawn off the barley husks, requires a grain vessel with some kind of false bottom. The false bottom is not really a filter – the grain itself acts as a filter – but it does allow wort to be drawn out the bottom as water is sprinkled on the top. The simplest lauter tun is a mesh bag in a bucket, with a drain hole in the bucket; similar is a pair of buckets, nested, with lots of hole drilled in the top bucket and a drain hole on the side of the lower bucket – the famous “Zapap” lauter tun popularized by Charlie Papazian. In each case, the brewer installs a hose with a shut off clamp to control the outflow.

To use a bag-in-a-bucket or double-bucket lauter, the brewer must transfer the mash to the lauter vessel. Apart from the mess of dripping mash all over during the transfer there are the real risks of aerating the mash, which risks hot side aeration; and, of dropping the mash temperature and adding another undesirable variable. Wouldn’t it be nice to lauter right out of the mashing vessel, with no transfer?
This is all fine, but when you lauter in the mash vessel you are limited to single-temperature mashing. Multi-temp mashes require mash transfer. The previous paragraph gives the reader the impression that mash transfer is sure to ruin the batch via hot-side aeration.
Mashers can do this easily: the mash vessel is insulated to retain heat during the mash, and the false bottom is built right in to the mash vessel. Then we call it a mash/lauter tun.
While obsessive mashers could build a double walled mash/lauter vessel, they probably already have one at home. An insulated cooler, whether a cylindrical beverage cooler or a rectangular ice chest, is perfect.

But for someone who wants to build it all from scratch, a very efficient false bottom for a rectangular cooler can be made from plastic piping: get enough one-half-inch CPVC pipe or copper tubing, elbows, end caps and tees to build a four-arm “fork shape” in the bottom of the rectangular cooler. Make saw cuts are every half-inch of the “fork arms,” about halfway through the CPVC pipe, and the “handle” of the fork will lead out the drain hole. As with the round beverage cooler, some mashers remove the valve completely, insert a rubber stopper, and run the CPVC right through the stopper and out. Which way to aim the saw cuts – up towards the mash or down towards the bottom of the cooler? The debate continues, so try it each way and make your choice.
Brewing: Kettles and Heat Source
For the brewer looking to make only minimal equipment upgrades, a large kettle and a high-powered heat source are great choices.
The brewer making five-gallon batches with the largest kettle they already had, like the four-gallon enamel canning kettle, has to make a concentrated wort – two to three gallons total boiled, with water added later after the boil. Some memorable beers can be brewed this way, but a brewer who steps up to a 7.5 or 8 gallon kettle (which leaves enough room to start with five and a half or six gallons of wort and boil down to five) will reap several benefits: in a thinner, lower-gravity wort hops are utilized more efficiently; the wort will tend to clear better due to a better protein coagulation called the”hot break”; there is reduced hassle of pre-boiling and cooling the makeup water (or worrying about infection if you don’t pre-boil). Also, brewers who use a minimal-sized kettle just seem driven to fill them right to the brim, where the boilover incidence rises. Nothing like chiseling burned-on wort off your range top . . .
Another enhancement to a large kettle is a spigot and ball valve, placed on one side right at the bottom. Spigots allow brewer to use gravity to empty their kettle, a huge plus for somebody using a counterflow chiller and nearly a requirement for somebody using a hopback.
If you do move to a 7.5 gallon kettle or larger, your kitchen range will probably not have the horsepower to bring a boil in a reasonable time period. Heat sources are sometimes measured in British Thermal Units per hour, which can help offer some scale: one BTU is roughly the heat required to raise one pound of water one degree Fahrenheit; an electric range may have a 10,000 BTU burner; a gas-ring type propane or natural gas burner like the classic Superb may produce 45,000 BTU; and a venturi-type propane or gas burner (the kind with a rocket-ship roar, like a Cajun Cooker) might produce 100,000 BTU or even more.
Propane cookers are relatively inexpensive, and once you own one you will probably wonder how you survived without it before. After heating dinner on it via candlelight during your next power outage you might even begin to consider owning a backup, and as mentioned earlier the ideal three-vessel system has three burners. But do remember to treat propane with respect: it is heavier than air, and a leak could lead to a dangerous pool of gas in your home if you bring it inside. Tanks should always be stored outside. Burners are recommended for outside use only, too, and that means that even if you use it in to your garage you leave the garage door open. Even in the winter.
While many brewers don’t ever feel a need to move on beyond the picnic cooler system and the single kettle, the classic three-vessel system is a delight to use and does allow more control and options over the process. Briefly, the three-vessel system is:
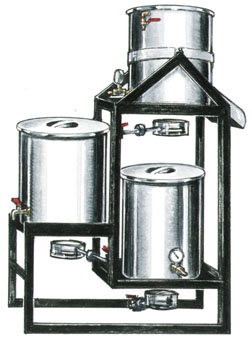
- A kettle, with heat source under it that it used to heat sparge water and backup mash water. Only water will go in this tank – never grain or wort – and it is known as the hot liquor tank or HLT. (Liquor in this sense roughly translates as “water to be used in the brewing process”). On the side a dial thermometer with a probe leading into the kettle shows water temperature; right at the bottom 90* away from the thermometer is a spigot and valve that leads to some kind of sprinkler – it can be a copper coil with holes, or a rotating arm, or a big old shower head – anything that keeps the stream of sparge water from disrupting the grain bed below. In the ideal three-vessel system, the HLT also has piping that allows fresh water in to the vessel with the turn of a handle. It may also have a sight tube, which is an external glass tube mounted via an elbow that goes through the kettle near the bottom. The level of water in the sight tube indicates the level of water in the kettle, helpful because the HLT is often up so high that the brewer can’t see into the top.
- The mash/lauter tun is the second kettle, positioned with the top edge lower than the bottom of the HLT and also with a burner underneath. Here’s where the grist and hot liquor are combined to make a mash. This vessel will have a false bottom, in this scenario usually perforated stainless steel; it will also have a spigot and valve; and ideally it will have a permanently-mounted dial thermometer to keep close track of the mash temperature. Brewers who wish to use step mashing can do so with this system by applying heat and stirring with a mash paddle, which looks like a small wooden canoe paddle. Careful you don’t hit the thermometer probe as you stir! I agree that some brewers do heat the mash in the mash/lauter, but this is not ideal since the false bottom makes uniform heating below the screen impossible and stirring the mash above the screen can clog the screen with grain. Very, very few commercial brewers do this.
- Below the mash/lauter is the brewkettle, with a spigot. Brewkettles generally don’t have a thermometer mounted on them but they may have a false bottom or a hopback mounted right upstream from the outlet. Ideally, the brewkettle output is still high enough above the ground to use gravity to get the wort through the chiller and in to the fermenter.
The three vessels are all mounted on a framework strong enough to hold all the heavy liquids, sometimes with permanent gas and water piping attached. 15-gallon kettles are about right for 10-gallon batches; a “half-barrel” system (15.5 gallons) will require kettles of at least 20 gallon size. Stainless kettles of this size are not pocket change, especially after added spigots, false bottoms, and thermometers, but the brewer will own a tool that will provide great beer in party volumes for many years.
A quick word about a term that has entered the homebrewing world over the last few years: RIMS. A recirculating infusion mash system is a closed mash vessel system that pumps the mash wort is pumped, not the mash past a heater and a thermometer. It is not exposed to air, so the risk of hot-side aeration is low, and the temperature can be kept very precise throughout the mash.
Hopbacks
A hopback offers a great way to add real fresh-hop character – you know that great smell of late addition hops? Did it occur to you that every whiff you get is hops that are leaving your wort?
A hopback is a way to run newly boiled wort right through fresh finishing hops, usually right between the kettle and the chiller. The simplest – take a handful of hops and wrap it in a stainless steel “choreboy” made of coarse steel wool. Hold this down at the bottom of you kettle with the tip of your siphon when you siphon hot wort out, or put it right upstream of your spigot in the bottom of your kettle. The wort will flow through the choreboy and the fresh hops, then right out to the chiller. A hopback can also be made from a square box of perforated steel, or can be made from a mason jar and put outside the kettle before the chiller. Hopbacks also serve to help strain some spent boiling hops and protein out of the wort.
Wort Cooling
The first way many brewers cool their wort is just . . . waiting for it to cool down. A sink full or bathtub full of icewater helps, too, and a snowbank is pretty good. But a real chiller provides regular control and some time savings to boot. There are two basic kinds, either of which can be bought or made.

An immersion chiller is a coil of copper tubing, usually 25 feet or more in length and commonly 3/8″ diameter, that has a hose fitting on the “input” end and a loop that aims out of the kettle at the “output” end. The brewer attaches a garden hose upstream and throws the coil into the wort at the end of the boil for a couple of minutes (to sanitize it) then turns the heat off and turns the cold water on. The cold water flowing through the tubing will cool the wort fairly quickly – maybe from boiling to pitching in 15-20 minutes; a little faster if the brewer swirls it around in the wort. Then, when the wort is cool, the brewer transfers it to the fermenter via siphon or via funnel. As a side benefit to the immersion chiller, the water coming out of the output side of the chiller is preheated so you can clean up your mash/lauter tun! Copper tubing is easy to find, and the only other parts needed are a female garden hose fitting with a barbed 3/8″ end; some 3/8″ vinyl tubing; and two small hose clamps to hold them together.

A counterflow chiller takes an additional step: instead of running cold water through a tube immersed in wort, which in an immersion chiller provides pretty good heat transfer, the wort runs through a copper coil that is jacketed by a larger flexible hose that has cool water flowing in the opposite direction. The heat transfer is dramatic and efficient – by adjusting the speed of the water flow, the wort can be cooled to pitching temperature in the time it takes to run the whole kettle through.
Aerating Wort
After years of shaking carboys to mix vital air into the cooled wort, brewers now can actually purchase pure oxygen to bubble through their wort.

Fermenters and Fermetation
Covered plastic buckets have surely fermented some of the world’s great beers, but glass carboys do offer the option of seeing the process and many brewers feel more confident about their ability to clean and sanitize glass. Move to a 6.8 gallon “acid carboy” for better yield and less volume loss due to blowoff. These 25-liter carboys originated with chemical suppliers, but homebrew shops often do carry them.
The next step up in fermentation, the cylindro-conical fermenter, offers fantastic options at a cost, at least in commitment to sanitation and maybe to dollars as well. They are a flat-topped, cylindrical vessel with a 60 degree conical base, and some kind of legs or stand. They are filled with cooled wort through a port in the top, and they have at least one valve on the bottom to run the finished beer out. They also have a port used to harvest yeast for storage or for the next batch. Brewers can aerate by running air or oxygen through the drain port, they can harvest yeast at the perfect moment during fermentation, and can transfer finished beer into packaging with ease, because cylindro-conical fermenters stand on legs. These fermenters are available in plastic for a couple hundred dollars, or in stainless for much more. Before you buy a stainless fermenter, educate yourself to what a “sanitary weld” looks like: all welds should be absolutely smooth and finished, so no micro-organisms or rogue yeasts can hide out in the crack and avoid your sanitizing solution.
And every fermenter should have a liquid crystal thermometer attached. These are flexible adhesive strips that will show the vessel’s temperature within a couple of degrees Farenheit and cost a couple bucks. Mount it low on your fermenter so you can get a reading before the fermenter fills very far – that way you have an opportunity to change the temperature of the wort by lowering or raising the temp of the incoming wort. With a counterflow chiller, this just means turning the cooling water pressure up or down.
Some brewers cherish a dedicated fridge for lagering beer, and Johnson Controls makes a tricky device that will allow the brewer to set temperatures different than the typical range on a fridge or freezer – if a particular lager yeast wants 56 deg. F, a standard fridge will be unable to run at that high. The item is called the Controller, less than $100, and consists of a temperature probe that goes in the fridge; a control box with a setting dial; and a plug. The brewer just sets the desired temperature, puts the probe inside the fridge or freezer, closes the door over the wire, and hangs the box out side the fridge. Then the fridge is plugged into the controller and the controller is plugged into the wall. When the compressor in the fridge brings the temp down to the desired spot, the Controller shuts off the fridge’s compressor. It works equally well on freezers or fridges and keeps within a three or four degree range.
Tools and Gadgets
While a mash tends to land in the correct pH range naturally, a digital pH meters are available. Because mashing and brewing water from different classic regions does vary, some brewers alter the pH of their brewing liquor and of their mash to brew different beer styles. Disposable test strips are available too, and the cost of a digital meter might be equal to a multi-year supply of them, but they just aren’t as cool as the electronic meter and the range they measure is not usually as wide.
A hydrometer is pretty much a necessity to fine-tune your technique and reproduce great beers, but consider the professional set that comes as a pair: one might read up to 1.060, and the other from 1.060 to 1.130 or so. They are a delight to use because the demarcations are so wide that you can really tell 1.048 from 1.049.
A steel or copper racking cane brings some nice options to brewers: they can be used to rack (siphon) right out of a hot brewkettle, for those who want to use a counterflow chiller but don’t have a spigot in their kettle, but they also can be sanitized with heat, unlike a plastic racking cane. And don’t forget to replace your vinyl racking hose frequently, because it’s cheap and can harbor microorganisms that could lead to nasty flavors.
Microscopes may the one tool that brings yeast and the brewer to final intimacy. You may know your favorite yeast’s habits, temperature range, smell, and taste . . . but you may have never actually seen a yeast cell. The treat of viewing a yeast cell may not be worth the price of a new, lab-quality microsope to all brewers, but keep an eye peeled at garage sales. Will a ‘scope make your beer better? Not necessarily, but you fell better … Sure, because you will feel better knowing that your ale yeast cells are cute little ovals, living their lives, fermenting your beer.
Packaging
 For bottling, brewers can choose from the inexpensive wing capper (easy to store, and less than $20 sometimes) or a bench capper. The bench-style capper has a time tested design that allows one-handed operation – the other hand can move the bottle right into the case and reach for the next capping candidate. For the brewer who bottles many bottles, the bench capper will save time. A bottle-drying rack will also help with speed, because the brewer can reach more empty bottles easily when the beer is flowing and is less likely to knock bottles over. Many brewers also like to use a bottling bucket with a spigot, because they don’t have to start a siphon that way. To use a bottling bucket, install a plastic spigot through a hole at the bottom of a bucket, slip a bottle-long length of tubing over the outside of the spout, and sanitize. Then fill the bucket with finished, primed beer and pull the first sanitized bottle of your rack, running it up the tubing until the bottom of the tube reaches the bottom of the bottle. Open the spigot, fill, close the spigot, and go on to the next bottle. The piece of tubing is necessary – if the beer were just to run down the side of the bottle, it would be exposed to so much air that oxidation would become a great risk and shelf life would be shortened.
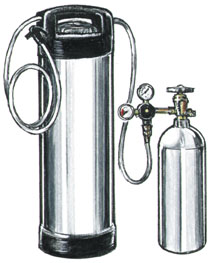 For the brewer who decides to go draft, Cornelius kegs are a popular option due to ease and availability. Kegging systems require a CO2 reserve tank; a regulator with at least one gauge to show keg pressure; at least one keg; beer line, gas line, a “cobra head” to dispense from, miscellaneous disconnects, and hose clamps. As you look at kegging systems, keep an awareness of several things: one, that there are two basic styles of keg connecting systems (ball-lock and pin-lock) and that they are most definitely NOT interchangeable; two, replacement parts for kegs are not cheap and a super cheap dented keg is no bargain if all the parts need replacing; and three, you may not have a way to cool down the keg before drinking it unless you have a dedicated beer fridge. The setup cost could rise to hundreds of dollars, but over the years the time saved pays the investment back dramatically.
Bottles and kegs both work well as storing and serving vessels, and counterpressure bottling right from the keg is great as long as the brewer is doing enough bottles to make the setup worthwhile. A counterpressure filler can range from $70 to a couple hundred dollars and requires some practice to use properly.
Whether served from a bottle or a keg, remember the final important brewer’s tool: the beer glass. After all the money you’ve just spent, you deserve a well-poured pint.


