Sparge Water & Yeast Viability: Mr. Wizard
Q
So much fuss has been made about mashing in grains with the correct ratio of water to grains for the initial mash. So if I’m doing a batch sparge, can I just dump the remainder of my needed sparge water into my mash tun all at once? Is there a certain water-to-grain ratio needed for sparging? Let’s say I have 10 pounds (4.5 kg) of grain and I mash them with 1.25 quarts/liters of water per pound of grain. If I’m trying to achieve a pre-boil amount of 6.5 gallons (25 L), can I simply sparge with the remaining water all at once or do I need to split it into two sparges? And how much water do I really need to add during sparging to end up with 5 gallons
(19 L) of wort in my fermenter?
Pete Soroka
Windsor, Connecticut
A
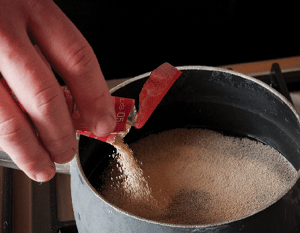
When batch sparging you can certainly add all of your sparge water at one time. This practice simplifies sparging and eliminates the need for special equipment required for continuous sparging. The primary argument against doing this is the potential for reduced brewhouse yield. Many brewers who use batch sparging for their normal method typically add the water in two to three batches. Although there are references to batch sparging describing the draining of the bed between sparges, this practice is generally avoided because allowing air to enter the grain bed can cause problems and allowing the bed to drain often requires a vorlauf cycle after the sparge to restore wort clarity. So if you want to batch sparge, add the water when there is about half an inch (1.3 cm) of water above the grain bed and your subsequent sparge(s) when the water above the grain bed drops to about half an inch (1.3 cm).
Mash thickness is fussed about because it does affect the mash. Generally speaking, infusion mashes contain between 1.25 to 1.5 quarts of water per pound malt (2.6 liters/kg to 3.1 liters/kg), and stirred mashes contain between 1.5 quarts to 2 quarts of water per pound malt (3.1 liters/kg to 4.2 liters/kg).
There are two common methods used to determine how much sparge water needs to be added. One method is to use as much as needed to reach your target pre-boil, kettle-full volume. The other method is to continue wort collection until the wort gravity drops to about 1.008/2 °Plato; if more water is needed to achieve the desired wort volume/wort gravity it is either added before or after the boiling. Unless you have a refractometer it is not practical to use a hydrometer to measure wort density during collection because it takes too much time to cool the sample to be able to quickly respond to changes in gravity. This makes the first method the most common.
Getting too carried away with calculations is something I like to avoid if possible and developing rules of thumb for things like your total water requirement for mashing and sparging makes things flow more smoothly on brew days. A really good rule of thumb is that 1.5 to 1.7 volumes of brewing water is required
to produce 1 volume of wort. So if you want to yield 5 gallons (19 L) of wort in your fermenter, you need 7.5 to 8.5 gallons (28 to 32 L) of water total. If you use 3 gallons (11 L) in your mash, then 4.5 to 5.5 gallons (17 to 21 L) are added during sparging. This seems like a lot of water, so why is so much needed?
This calculation starts from the fermenter and moves backwards through the process. When hot wort is cooled
it contracts; 1 volume of hot wort shrinks to 0.94 volumes due to temperature change. Before this happens, there is loss in trub and 5% trub loss is not uncommon for all-malt beers with a decent amount of hops added. Then there is evaporation losses. In your example you state that your pre-boil volume is 6.5 gallons (24.5 L). If you apply a 14% total evaporation to this volume then that means that the post-boil volume is 5.5 gallons (21 L), giving you enough wort for trub loss and contraction to yield 5 gallons (19 L) in the fermenter.
But you need more than 6.5 gallons (24.5 L) of water because there is liquid left in the mash tun after wort collection that drains from the grain (often times about 10% of the kettle full volume, so in this example 0.65 gallons/2.5 L), and then there is the water that is trapped in the grain that does not freely flow out of the mash tun when you drain the bed after wort collection is complete (about 1.2 gallons per 10 pounds of malt/4.5 L per 4.5 kg). This all adds up to about 8.5 gallons (32 L) needed for your brew. Note that if your evaporation rate is reduced from 14% to 10% the water requirement drops to 7.5 gallons (28 L) or (1.5 volumes water per volume of wort).
The take home message here is to have plenty of sparge water ready when needed, and to batch sparge without allowing the bed to be exposed between sparges or, alternatively, use continuous sparging if that method is more to your liking!

Q
When growing up a starter from a slant, based on a reply I found from a technician at Wyeast, he seemed to indicate that worrying about cell count really is no issue. Just build up a starter of the appropriate size for the original gravity (OG), volume, and type of beer (ale, lager, hybrid). My question is if I am using a brewing calculator like the one at mrmalty.com can I just assume high viability since I am stepping up the starter by the rule of 10? (Slant -> 10ml -> 100ml -> 1000ml, etc.). I’m obviously not looking for an exact figure, but just wondering if there is a rough estimate I need to be using for starting cell count and/or viability depending on age of the slant.
Brian Jameson, Poughkeepsie, New York
A
This is an interesting question about yeast storage in laboratories. Yeast cultures stored on plates and slants can lose viability over time, but there are some old school microbiological methods that really do an excellent job of extending the life of cultures, thereby preserving genetic material. One such method is streaking a colony from a plate onto a slant and allowing the cells streaked on the slant to form a “lawn.” After this step, the slant is covered with sterile glycerin (autoclaved and cooled prior to use), pluggedwith a cotton plug and placed in a refrigerator for medium-term storage.
Slants stored in a refrigerated environment are usually re-streaked once or twice per year. As long as you are starting with a slant that has viable yeast cells starting your propagation cycle in a 10 mL Erlenmeyer flask should work just fine. The key is knowing something about the history of the slant; this usually means preparing your own slants and maintaining your library.
You ask about the cell density when a sample is removed from the slant and mixed in with 10 mL of wort. This step of the propagation cycle results in a much lower cell density than subsequent steps. Instead of transferring 10 mL into 100 mL, you may find things to work better if the 10 mL starter is moved up to 20 mL as the second step. Then you can step up to 200 mL and then to 2,000 mL. Depending on how you grow your culture — for example left still, placed on a shaker table, or stirred using a magnetic stir plate — the cell density in the culture will vary. The Mr. Malty calculator assumes that shaken and stirred cultures have a higher density than cultures that are simply left to grow without any special process. This is completely consistent with what one would expect since shaken and stirred cultures are aerated (assuming a cotton plug is on the flask) and higher cell densities are normally seen with aerated propagations.
Q
I have been brewing with extract kits and am making the jump to all-grain brewing. I have a recipe that calls for mashing at 148 °F (64 °C) using 15 quarts (14 L) of water for 90 minutes and then raising the mash temperature to 168 °F (76 °C) by adding boiling water for a 10 minute mash-out.
I am using an insulated cooler as a mash tun. I have found calculators that tell me how much water to add to ensure I hit the target temperature of the mash-out (add 7.7 quarts/7.3 L of boiling water to raise the temperature from 148 °F/64 °C to 168 °F/76 °C) but they don’t adjust the initial water volume to account for the additional water to raise the temperature.
Q
How do I know how to adjust the initial water volume so I don’t end up with too much/diluted wort? Do I just take the amount of water listed in the recipe (15 quarts/14 L for example) and deduct the amount I will need to add for mash out? This doesn’t sound right. I’m afraid if I do this the mash will be too thick and get stuck.
Should I just skip the mash-out? I’m not sure how important that step is.
David Corr
Centerville, Ohio
A
As tempting as it is to simply answer your question by jumping right into energy balances by whipping out the old Q = MCpΔt equation and grinding through a math problem that very few homebrewers will actually want to use, this question has a much more pragmatic solution.
To sum up your question, you want to begin all-grain brewing and first want to know if you should be worried or concerned about mashing out. This is certainly a step worth keeping. Increasing your mash temperature after enzymatic conversion does a few pretty handy things for brewers.
When the mash is heated to 168 °F (76 °C), enzymatic reactions cease to occur at any appreciable rate and this “fixes” wort composition. If you don’t mash out, enzymatic conversion continues during wort collection and you may have a challenge if you want to brew beers with residual extract. The other reason to mash out is a bit more economical; mashing out reduces wort viscosity, improves your raw material yield and reduces the cost of grain required for your all-malt brewing endeavors. And in the process of increasing yield, the reduction in viscosity makes wort separation easier.
The ratio of water to malt is fairly important when mashing. For the sake of discussion, let’s assume that your ratio of water to malt is 3 parts water to 1 part malt (by weight). If you are using the metric system this translates to 3 liters of water per kg of malt, and if using English units it translates to about 1.5 quarts of water per pound of malt.
When you begin your infusion mash you need to know your hot water requirements to hit your target mash temperature. A good rule of thumb and sanity check is that your water temperature needs to be about 12 °F (7 °C) hotter than your target mash temperature assuming a mash thickness of 3:1 and a malt temperature of 68 °F (20 °C). If you use a calculator that indicates something very different than this, then something does not pass the sniff test. That’s why this is a good sanity check. In your scenario, you should add the entire 15 quarts (14 L) of water to the mash; not split it between mash water and hot water for mash out.
Mash temperature needs to be increased after mashing when a mash-out step is used, and there are three general ways to do this. One is to simply heat your mash pot (not your Igloo cooler) by using a direct heat source like a flame. Another way is to add hot water (the method you are asking about). And the third method is by removing a portion of the mash, boiling, and returning (decoction mashing). The good thing to know is that all three methods work when there is only one heating step in the mash. If you are doing multi-step mashing, the hot water addition can become problematic in that it excessively thins the mash. We are staying focused on adding hot water, and the reason for mentioning these other methods of heating is to acknowledge their use.
When you want to bump the temperature of your infusion mash held at 148 °F (64 °C) to 168 °F (76 °C) you can do so by adding boiling water and simply not worrying about thinning the mash too much. The easiest way to do this is by boiling an excessive volume of water, adding the water in measured portions, checking your mash temperature with each addition and repeating until you hit your target temperature. The volume required does depend on mash thickness because you are heating malt and water with the boiling water, and with thinner mashes you will need more boiling water to heat the water component. The reasons not to worry about the volume added are that you are going to be adding this water for sparging regardless of the mash out step, and because enzymatic conversion is no longer desired, you don’t need to worry much about mash thickness.
Without elaborating much on your estimated water addition volume of 7.7 quarts (7.3 L), just know that this volume does pass the sanity check. A calculation based on a mash thickness of 3:1 indicates that about 8.5 quarts(8 L) are required for mash out, but these differences are likely due to mash thickness differences, and you did not define mash thickness in your question. The point to remember here is that you have used about 15 quarts (14 L) for mashing, about 8 quarts (7.6 L) for mash out and will add about 10 more quarts (9.5 L) when sparging for a total of about 33 quarts (31 L) of water for your 5-gallon (19-L) batch of wort. In your question you were considering taking the total mash water and splitting this between mash water
and water needed to increase the temperature for mash out. Just to reiterate, that this is not what you want to do because as you question, the mash would indeed be too thick.
When the mash is heated to 168 °F (76 °C), enzymatic reactions cease to occur at any appreciable rate and this “fixes” wort composition.
Q
My husband and I have inherited a large copper pot (Pictured below).
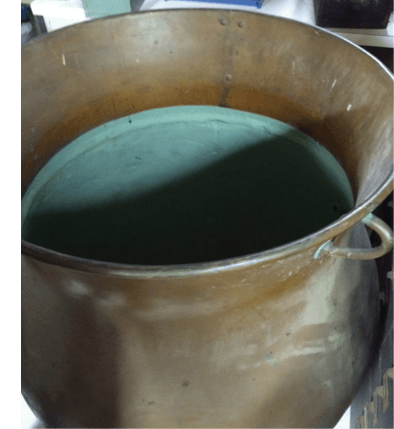
It measures almost 30 inches/76 cm across the top and has an asbestos lining, a spigot on the side and an open top. It appears to be very old. We were told that it was a gift from Howard and Sue Lawton, who were friends of Harry Houdini, and that it was used in a magic act. However, we have been unable to determine a use for it, if indeed it was intended for something. We’re wondering if by chance if it could have been part of a brewing setup?
Carla Khouri
Gainesboro, Tennessee
A
This is an interesting story and is the sort of thing that I enjoy watching on Pawn Stars. Looks like this pot really could have been used in Houdini’s shows! We do get questions like this and about whether something can be used for brewing every so often and it’s important to revisit the subject because there are several red flags about these big, old copper pots.
The first issue with old copper pots is that the owners, like you, do not know the purpose the pot was initially built to serve. Some of these things are actually not very old and were built to be decorative. Assuming your pot is about 100 years old, chances are pretty high that it was joined together with a combination of rivets, folded joints and perhaps lead-containing solder. The lead component is the thing that you need to be cautious about because lead from solder can and does end up in wort and potentially beer.
The other component about your antique pot is the asbestos. Chances are pretty good that this copper pot was originally intended to hold hot beverages and keep them hot during storage. Brew kettles of this era had onion-dome tops (an example of one that is now on display at Siebel Institute in Chicago, Illinois is shown below).

Since your copper pot has an open top, chances are that it was used for another purpose. Old copper pots can certainly be re-purposed for brewing provided that you verify the compatibility of the components with brewing and food. For starters, you really would want to remove the asbestos insulation, but you DO NOT want to have a DIY asbestos abatement project. This is the type of thing that needs to be done by a professional who is trained in proper methods to safely remove and dispose of asbestos. The other very important thing to verify is that your pot is lead-free. Copper pots have great thermal conductivity and do very well when heated with a direct flame.
Thanks for the fun question and interesting history. My best guess is that this pot may have originally been crafted specifically for a prop in a show, not for brewing.