Pantry Brew

Food security has been playing on my mind a lot in recent months. I don’t know about your local area, but stores here in the UK temporarily ran out of a number of key supplies before and during COVID-19 lockdowns, which meant that on occasion I had to get a bit creative when cooking dinner. And this got me thinking; what if the same thing happened with brewing ingredients? Even though there were a few issues with delivering homebrew supplies during lockdown, I’m glad to say that they never actually ran out. But could you replace some of the key components of beer if there was nothing else or you were running low on your usual supplies, and what could you use?
This is a dilemma that has been faced by people across the world and throughout time, and we can learn a lot from them. Whether it’s because Viking raiders burned down your barn, the latest supply ship to your New World colony is late, or 20th century wartime rationing, brewers have had to make do with what they have. And, to a lesser extent, it’s a problem any one of us could face at any time. Even when there isn’t a global pandemic to contend with, we may simply wake up on brew day to find out we have less malt than we thought we had, or the yeast we were planning to use is long past its expiration date. Thankfully, this needn’t put a stop to your brewing pleasure. Through this article I’ll go into detail about a whole bunch of things you might consider, depending on what you have available to you.
Before getting into ingredients to substitute, my first recommendation if you are short on ingredients would be to get in touch with your local microbrewery. Especially during the pandemic, many are still struggling due to restrictions and have had to scale back brewing, so they may have surplus ingredients. Give them a call or drop them a message, I’m sure they’d be happy to help if they can. Even when it isn’t a pandemic, if you visit your local establishment enough that they recognize you, they may be happy to sell you a bit of grain in a pinch. But what if they can’t . . .
Kitchen and Grocery Store
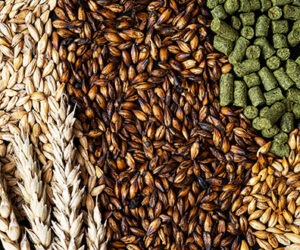
For beer to be, well, beer, malt should certainly be featured in the process. The enzymes malt contains are hard to replace, but there are ingredients you can find in any grocery store that can help to spread malt a little further when supplies are low. You may even have some of these at home right now. Those unmalted grains like rice, oats, and corn, well it’s their time to shine, and other pseudo-grains like quinoa and buckwheat can also work. These will, of course, impart a different character to your beer — oats add body, for example, and buckwheat can add a nutty note. But when the chips are down, they are worth considering. Regular rolled oats for oatmeal can generally be used straight in the mash as they have been pre-gelatinized, but unprocessed grains will need to be cooked. One simple way to do this is boil them up in your mash water, allow the whole lot to cool to your strike temperature and then pour it into your mash tun with the rest of your malt, then mash as normal.
Another less obvious source of starch to eke out your precious malt is bread. Once dried at a low temperature in the oven (around 195 °F/90 °C for an hour) and broken into little chunks, it can be added directly to the mash, up to about 25% of your grist. Short on toasted malts? Cook it at a higher temperature to add a little color and flavor; it’s highly versatile. One word of warning, however, is that due to the high wheat content, it can make the mash a little gummy, so it works best with brew-in-a-bag (BIAB) or with the addition of some oat husks or rice hulls if you are going above 10–15%.
Of course the whole point of mashing and malt is to make sugars for the yeast to devour, so why not cut out the middleman and just add some sugar? Sugar has been used to supplement limited malt supplies for centuries, so much so that in some beer styles it has become almost an essential component. So there is no reason why you couldn’t use it to boost your original gravity (OG) in the event of a malt shortage. And yes I do mean ordinary, white sugar; for most beers, a 10% addition of this should have little or no noticeable impact on flavor and body. Other kinds (brown sugar, maple syrup, molasses, etc.) will do the same job, but may have a bigger impact on flavor, especially on pale beers. Because it also doesn’t require mashing, this works just as well for all you extract brewers out there. Keep in mind that about 1.7 oz./gallon (13 g/L) will raise your gravity by five points (i.e. from 1.050 to 1.055).
What about yeast? Bread yeast will do if you have nothing else. In parts of Northern and Eastern Europe, bread yeast is used routinely to produce excellent farmhouse beers such as Sahti and Koduõlu, usually imparting banana and clove flavors similar to wheat beers. However, these yeasts often have a much higher bacterial content than brewing yeasts, which can result in souring. But those clever Finns and Estonians have deduced that by chilling their beer as soon as it has finished fermenting — essentially lagering it — they can prevent this from happening.
When you consider that hops are essentially a flavoring, even a seasoning, it isn’t hard to find alternatives around your home. Your first stop should be your spice rack. I have made some fantastic beers with rosemary, cinnamon, nutmeg, and bay leaves, and I’m sure many of you have used coriander in Belgian-style beers. But what if you like the big, fruity flavors of IPAs? Well, you can take inspiration from the flavors and aromas used to describe your favorite hops. Does it give you grapefruit notes? Add some grapefruit zest at the end of your boil. Looking for a hint of mango? Add some puree to your fermenter. Lemongrass more your thing? Make a tea from it and add at racking.
Some herbs, such as sage and thyme, can provide a certain degree of bitterness, and you can even use the green, leafy parts of carrot tops for this purpose at a push, but they may not provide the “clean” bitterness you’re used to from hops. Therefore, it might be best to prioritize whatever hops you do have for providing IBUs, or check out the “Going Wild” section later.
Your home can even be a source of sanitizer. If you’ve run out of Star San, or whatever chemical sanitizer you normally use, go and find some household bleach. The best kind is unscented and does not contain sodium laureth sulfate, but really any will do. Add 1 tablespoon to 5 gallons (19 L) of water and soak your equipment in this for at least 20 minutes before rinsing thoroughly (do not use bleach on stainless steel, as it may cause the metal to corrode or pit).
Make Your Own
If you have a bit more time on your hands, making your own brewing ingredients from scratch can be a fun and rewarding project that you can do with ingredients found in most grocery stores.
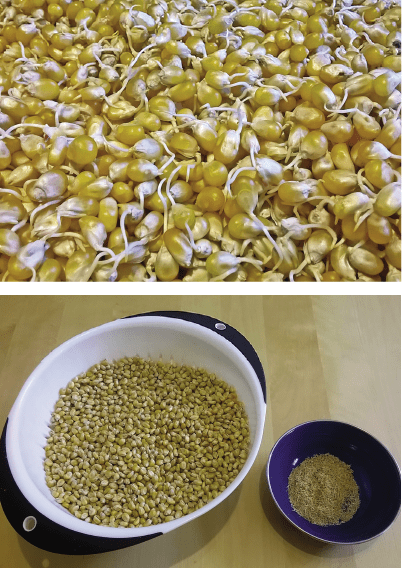
One of the easiest ways to make your own brewing malt is with regular popping corn from the store. Simply soak some corn in a bucket of water for 8–10 hours at room temperature, then drain the corn and let it sit for 3–8 hours. Repeat this process four times, then after the final draining, spread the corn on trays and cover them with a damp cloth. Leave it like this for several days, but be sure to gently turn the corn several times a day and remove any that have gone moldy. Once they have sprouted and the sprouts on most are twice the length of the corn kernels, you will need to dry them. The easiest way to do this is with a food dehydrator, but failing that you can put them at the bottom of your oven on the lowest setting with the door slightly propped open. You do not want to cook them or you will destroy the enzymes you need for mashing. Once your corn is nice and dry and the shoots are all withered, put it in a pillowcase, tightly tie the top, and thrash it around. This will knock off all the shoots, which you can then sift out with a colander. All you need to do then is crush your malted corn and you’re ready to brew! It even has the added bonus of being gluten-free. You can mash malted corn as you would any other malt, but because it is likely to be less well modified than professionally-made malt, you might want to consider a decoction mash, doing a temperature-step mash, or even a longer single infusion mash to get the best out of it.
You can malt other types of grain and pseudo-grain too, including millet, buckwheat, quinoa, and sorghum, as well as barley, wheat, and rye. However, the exact conditions they need for malting will depend on the grain you are using, so have a look online. You’ll also need to find wholegrain that hasn’t been de-husked or heat treated, which can be tricky, but whole food stores can often help.
If you have any bottle-conditioned beer (that is, bottled beer with a live yeast sediment at the bottom) you can cultivate this yeast to ferment your own beer with. The beer can be homebrewed or professionally made, either is fine, but the fresher it is, the more likely you are to find live yeast in it. Obviously filtered beer will not work. First, take your selected bottle and let it warm up to room temperature. Sanitize the entire outside surface of the bottle and the bottle opener. Open the bottle, sanitize the mouth of the bottle, then pour out the beer, leaving the yeasty dregs at the bottom. Make a small batch of weak wort (about 1.020) and pour one tablespoon into the bottle. Cover the mouth with a piece of sanitized kitchen foil. Leave for three days at room temperature (about 68–77 °F/20–25 °C) and, if all goes well, you should see some foam forming on the top. Next step is to make 5 oz. (150 mL) of a slightly stronger wort (about 1.030 or with 0.4 oz./11 g dried malt extract), pour this into a sanitized jar and then, when cool, add the contents of the bottle and cover with sanitized foil again. Leave for three days at room temperature, swirling the jar occasionally. Finally, make a 1.5-qt. (1500-mL) batch of wort at about 1.040 (with 5.5 oz./156 g DME), pour this into a sanitized glass container, such as a carboy, and add the contents of the jar. Cover the mouth with sanitized foil, keep at room temperature for three days, and then you should be ready to add it to a 5-gallon (19-L) batch of homebrew.
Happily, you won’t need to do this each time you brew. When your full-size batch of beer has finished fermenting and you’ve racked it, boil a mason jar in water, allow it to cool and then pour some of the yeasty sludge from the bottom of your fermenter into it, seal it up tight and store it in the fridge. It should keep for at least a few weeks if not longer. When you are ready to use it, allow it to warm back up to room temperature and pour it into your next brew. I’ve done this with liquid and dry yeasts and it works well, as long as you follow good sanitation.
Going Wild
When it comes to using wild ingredients in your beers, it is really important to get yourself a good quality guidebook to plants in your local area. Even plants that are edible in one part of the world may have look-a-like cousins in another that are toxic. Always make sure that what you are foraging is definitely what you think it is, and ditch it if there is any doubt. Beer isn’t worth poisoning yourself for. And be sure to check what local laws are regarding foraging.
That said, people all over the world have been using wild plants to flavor and ferment beers for thousands of years. Some of these grow all over North America and Europe and can be used as a direct substitute for hops. For example, the wild herbs mugwort, horehound, yarrow, and ground ivy (also known as creeping Charlie or alehoof) were all used to add bitterness to beers in England and Belgium before hops became more commonly used. As recently as the 1800s, ground ivy was used in the making of Pennsylvania swankey. Even easy-to-identify plants like dandelion and stinging nettle can be used. If you’re looking for something to add aroma in place of hops, you could try elderflowers, pine needles, juniper berries, or the young branches and tips of spruce and fir trees. There’s also a multitude of wild fruits and berries that can add unique and interesting flavors to beers when hops are in short supply.
When you think of wild beers, you probably think of sour, spontaneously-fermented beers like lambics. If you have run out of yeast, leaving your brew kettle outside to cool down overnight and become inoculated with wild yeast and bacteria is certainly one way to deal with your problem, but it’s not the only way to gather wild yeast. Another approach, which gives you much more control over the process, is to capture it from fruits and flowers. This method is very similar to the way we build up yeast from bottle dregs, as described earlier. First, find some edible flowers or berries (I’ve used dandelion and clover flowers, as well as wild plums). Drop these into a small, sanitized jar of weak wort, cover and keep at room temperature for a few days. If you start to see signs of fermentation (bubbles, suspended yeast, etc.), then remove the fruit or flowers and follow the same process as with the beer dregs, moving the yeast into successively larger amounts of stronger wort until you have enough to pitch into a full batch. However, if you get mold or bad smells (vinegar, baby diaper, vomit, etc.), then ditch it and start again.
When all else fails
My mom grew up in a tough neighborhood and if she taught me anything, it’s this — cut your cloth to suit your means. Sure, you might have had your heart set on making a double IPA or imperial stout, but if you have no prospect of getting fresh supplies anytime soon, maybe you could use those ingredients to make a couple of batches of something more sessionable, rather than just one strong one. This approach basically kept Britain brewing through two World Wars. Whilst things like meat and butter were rationed, beer never was because national leaders feared it would impact morale too much. But with grain supplies critically low, brewers were repeatedly forced to cut the strength of beer. It is no coincidence that ordinary bitter and dark mild were popular at the time; judicious use of crystal and chocolate malts allowed brewers to make tasty beers with less grain and hops.
If you are determined to make something stronger then you should consider a parti-gyle approach; whereby you make another weaker beer with the second runnings from your mash. Once you’ve collected all the wort you need for your strong beer, you just continue sparging your mash, but collect this wort in a separate vessel. You may only collect a gallon or two (4–8 L) before it starts getting too weak, but you can make a nice table beer with it. I’ve done this when making an imperial stout and got an additional 2.5 gallons (9.5 L) of amber ale that was just lovely.
It can be easy to view a shortage of ingredients as a disaster, but a different way to look at it is as an opportunity for experimentation. Remember that necessity is the mother of invention, and necessity has created some of our most beloved beer styles. If refrigeration had been available in the 1800s, for example, California common would never have been invented. For centuries saison and other farmhouse ales were brewed with whatever was available. By trying out some new or unusual ingredients and techniques to make your limited supplies go further, you might just find a fantastic new beer.
To Better Times (Farmhouse Table Beer)
(5 gallons/19 L, all-grain)
OG = 1.035 FG = 1.007
IBU = 10 SRM = 3 ABV = 3.7%
This recipe was created with one purpose in mind — to make a refreshing, tasty beer out of very little. The hops used are an illustration, but really any will do — the first time I made it, I just used a handful of wild hops.
Ingredients
2.5 lbs. (1.13 kg) 2-row pale ale malt
2.5 lbs. (1.13 kg) Pilsner malt
1.9 lbs. (860 g) rolled oats/oatmeal
10 oz. (283 g) dried bread (made from about 1 lb./0.45 kg fresh bread)
3.3 AAU East Kent Golding hops (30 min.) (0.6 oz./17 g at 5.7% alpha acids)
25–30 bay leaves (30 min.)
Omega Yeast Labs OYL-033 (Jovaru Lithuanian Farmhouse), Lallemand Belle Saison, or bread yeast
3⁄4 cup corn sugar (if priming)
Step by step
Before brewing, dry the bread in the oven at 195 °F (90 °C), turning occasionally, for an hour or until completely dry, then break into small chunks. Mash all the grains and bread at around 149 °F (65 °C) for one hour. Collect 5.5 gallons (21 L) of wort in the kettle and boil for 30 minutes, adding the hops and bay leaves as soon as the boil begins.
At the end of the boil, remove the hops and bay leaves, then chill the wort to around 86 °F (30 °C) and aerate well before pitching the yeast. Ferment at 86 °F (30 °C) for five days, then chill to around 39 °F (4 °C), if possible, for two days. Rack to keg or bottles and either prime with the sugar or keg and force carbonate to around 2.0–2.5 volumes.
Crooked Nail Rustic Ale
(5 gallons/19 L, all-grain)
OG = 1.045 FG = 1.010
IBU = No hops SRM = 9 ABV = 4.6%
With no hops, homemade base malt, and recycled yeast, this beer is pretty rustic, but the wild herbs perfectly complement the grain bill to give a rich, earthy flavor. This brew uses a hybrid temperature step mash and cereal mash to get the most out of the home-malted corn.
Ingredients
6.3 lbs. (2.86 kg) popping corn
2 lbs. (0.91 kg) Munich malt
13 oz. (370 g) rye malt
10 oz. (285 g) medium crystal malt (60 °L)
0.6 oz. (17 g) dried ground ivy (60 min.)
1.3 oz. (37 g) dried mugwort (60 min.)
1–1.5 cups of SafAle S-04 yeast trub from a previous batch (or other yeast trub)
3⁄4 cup corn sugar (if priming)
Step by step
You will need to malt the popping corn 8–10 days before brewing according to the instructions outlined earlier in this article, making about 5.7 lbs. (2.56 kg) of corn malt.
On brew day, heat 1.75 gallons (6.7 L) of water to around 109–111 °F (43–44 °C) and stir in the crushed corn malt to achieve an initial mash temperature of around 104 °F (40 °C). Hold it at this temperature for 30 minutes. Then add 2 quarts (1.9 L) of boiling water to raise the mash temperature to around 122 °F (50 °C) and hold at this temperature for 30 minutes. Then drain off 1.5 gallons (5.7 L) of the mash liquid and store this in the fridge (you will need this later). Add 0.8 gallons (3 L) of boiling water to the mash to raise the temperature to around 152–154 °F (67–68 °C) and hold it at this temperature for 30 minutes. Add another gallon (3.8 L) of water and heat the mash to around 194 °F (90 °C), holding at this temperature for 30 minutes. Cool to 169 °F (76 °C), then add the other malts and the 1.5 gallons (5.7 L) of liquid from the fridge and reheat the mash to 151 °F (66 °C) and hold at this temperature for 2 hours. Sparge with 170 °F (77 °C) water to collect 6 gallons (23 L) of wort.
Boil the wort for 60 minutes, add-ing the mugwort and ground ivy at the start of the boil. At the end of the boil, remove the mugwort and ground ivy, then chill the wort to around 68 °F (20 °C) and aerate well before pitching the yeast. Ferment at 68 °F (20 °C) for 7 days, then chill to around 39 °F (4 °C), if possible, for two days. Rack to keg or bottles and either prime with the sugar or carbonate to around 2.0–2.5 volumes.