Pumped Up!
Most homebrewers start out small. A pot and Igloo cooler, some ball valves, basic hoses and barb fittings, a torpedo mesh for their mash, and an immersion chiller are the totality of the homebrewing equipment many all-grain brewers start the hobby off with. Once you become more comfortable brewing, you start to consider other, bigger toys for your brewing arsenal. What about bigger pots or converted kegs? Maybe some quick disconnects or tri-clamp fittings? Maybe a plate or counterflow chiller instead? But one of first things on most brewers’ minds is usually, “Wow, I have got to get a pump.” The reasons are varied and it can depend greatly on what equipment you currently use and what you hope to accomplish.
Pumps are a great addition to any homebrewery. They can be timesaving and extremely versatile. In many cases, brewers use a gravity-feed system, letting liquid naturally flow downward to the next vessel in the process. This is fine for smaller batches, but can be difficult with larger quantities of liquid that needs to be moved. A pump will allow you to keep vessels on the ground or on a low platform and do the same job without the back strain or safety concerns of possibly spilling hot liquids. Generally, one pump is all that is needed, as it can be used at many different steps in the brewing process. Let’s take a quick look at some of the common steps where a pump can come in handy:
Hot liquor tank
A pump can be used to send water to your mash tun while doughing in your grain, and with a valve the speed at which you dough in can be adjusted. It can also be used to fly-sparge during transfer to the kettle if you are using a gravity-feed mash/lauter tun to kettle set-up.
Mash/lauter tun
Use a pump for vorlaufing and recirculating to sift out the fine sediment and create a solid grain bed for clearer beer. You can use the pump for transferring into the kettle as well. There are a variety of recirculating infusion mash systems (RIMS) and heat exchange recirculating mash systems (HERMS) that use pumps in different ways as well for mash tun-specific use.
Kettle
Use a pump to recirculate the wort during whirlpooling for a better hop utilization. Let the pump do the work for you, but always cut off the pump and allow proper settling time! Finally, you can use it to knockout easier and faster. In cases with a whirlpool port and immersion chiller, you can do the whirlpool and chilling steps together for more surface contact time along the coils. You can use the pump to directly transfer your wort through a plate or counterflow chiller and into your fermenter in cases where either are used.
Post-fermentation
Once lines are purged with CO2, you can use a pump to transfer beer from one vessel to another, be that carboys, kegs, or barrels. You also have the ability to filter beer using a pump, instead of pushing it with CO2. In cases where you have the ability to isolate and slightly pressurize your “brite” vessel, you can use a pump to recirculate finished beer with hops, decreasing dry hop time from days to 30–90 minutes. The only thing to keep in mind with this technique is the pump will break up the hops much faster and finer and will create a solid hop haze that does not easily drop out with
cold temperatures.
These are just some of the examples of ways I’ve seen homebrewers using pumps, and there are many others depending on your setup, both on brew day and once the beer is finished fermenting.
Types of Pumps
There are three primary types of pumps that homebrewers can choose from. Centrifugal pumps are most commonly the designs homebrewers use, but I’ll briefly cover the other two in interest of educating you,
the consumer.
Centrifugal pumps
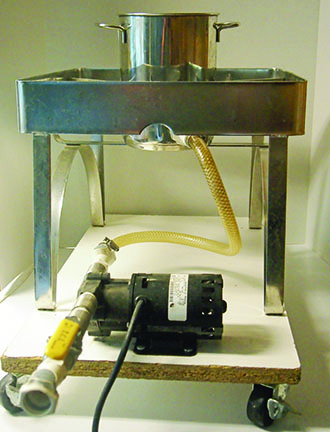
Centrifugal pumps are by far the most common for homebrewers as they are rigid designs that are made from stainless steel or high-temperature plastics. These pumps rely on centrifugal force, a force that acts outwardly from a center point, made possible from a spinning impeller, forcing liquid to be pushed out of the pump head with a fairly constant flow rate. Centrifugal pumps must be primed before use, meaning liquid must fill up the pump head and all air must be pushed out. This is most easily accomplished if the pump is placed below the liquid level so gravity will naturally prime the pump.
Peristaltic pump
Peristaltic pumps use a flexible tube that is pinched by rollers. As the rollers pinch the tube, the liquid is sucked into the pump head, squeezed through the tubing inside the pump head, and then ejected through the outlet of the pump. The advantage of this type of pump is that it is self-priming, but you should be concerned about temperature and chemical ratings for the tubing material. These are more recommended for cold-side processes such as transferring from carboy, keg, or barrel. Peristaltic pumps can be found from online retailers, but are not commonly sold by homebrew-specific retailers.
Diaphragm pumps
Less common in regards to finding these in smaller sizes, these pumps use a diaphragm that opens and closes to move liquid in and out of the diaphragm, which can prevent backflow, to move the liquid. In many cases these are self-priming, but not always. Due to the nature of the diaphragms, there are similar difficulties finding diaphragm materials suitable for higher temperatures in a size that is relevant to homebrewing, again making them better for cold-side use. In many cases the ones that can be found will be air actuated and require an air compressor and air filtration, raising the price far beyond many of the pumps we will
discuss here.
What to Know About Centrifugal Pumps
All in all, the most versatile and readily available pumps for homebrewers are centrifugal pumps with a magnetic impeller head. There are centrifugal pumps on the market that have pump seals that can leak and suck air into the product, but the magnetic types designed for homebrewers do not have that potential problem because there is no shaft seal.
There are many versions you will find when researching them for homebrewing, from brand names like Blichmann and Chugger to Chinese off-brand pumps available on eBay. Before we get into specific pumps available on the market, I’d like to share some factors to keep in mind prior to shopping for a pump.
• All centrifugal pumps need to be primed, they cannot be placed above the liquid level line or the pump will struggle to overcome the natural effects of gravity.
• Pumps are not always made with all stainless steel components. Be sure to find out if any pump you plan on purchasing is food-grade, especially if you plan to use it for hot-side pumping, as non-food-grade materials may leach out into your wort or finished beer.
• Will the pump be pre-wired? Does it have a watertight electrical connection or will you have to find adapters to convert it? Many homebrew-specific pumps from reputable vendors are pre-wired with watertight connections, but other pumps not created for brewing-specific purposes may not be.
• How long is the electrical cable and does it have an on/off switch? Cable length is always something to keep in mind in regards to where your power source is versus where your brewing equipment is. It is also recommended to have your power source on a GFCI (ground-fault circuit interrupter) for safety. Not every pump will have an on/off switch, and in some cases you will physically have to push in and pull out the plug to power on and off.
• Be sure to get the right type of power! Most houses run on 110-120V AC power — the same as standard home appliances — which will more than likely be the best power to run a homebrew pump on. But, some pumps use DC power, which is not the same and will need a converter to run in a standard home.
• Not every pump will have a direct way to prime it, so having a tee-fitting with an extra ball valve, pressure relief valve, or other way of letting air escape from the pump head while filling with liquid may be necessary.
• Not all pumps require it regularly, but keeping a food-grade silicone grease for lubricating moving parts may be good to keep on hand.
• If you are not getting a homebrew-
specific pump from a well-known vendor and are planning on using it on hot-side processes, be sure that the temperature rating is at least 220 °F (104 °C).
Deciding on the Pump That’s Right For You
Although there are too many pumps available on the internet to review each individually, it is worth discussing some of the better-known pumps and some of the features that differentiate them.
Which pump is right for you is a matter of preference and what you plan to use it for, but each pump will have different features that it brings to the table. The amount of liquid they can pump per minute as well as the maximum height or lift (a measure of a pump’s discharge pressure expressed in feet of water column, where 1 foot is equal to 0.43 psi) they are rated for are two of the more important features as these will determine a pump’s limitations and if it will meet your needs. Be aware that the flow rate decreases as discharge pressure increases; if the discharge pressure is important for your application, keep this in mind when selecting a pump. Temperature, hop trub, and grain can also affect pump efficiency.
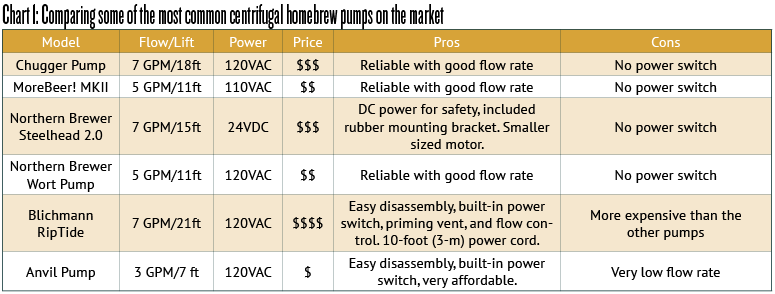
Chugger is the homebrew pump that is most commonly used by homebrewers, but it is not the only option. Chugger, MoreBeer! MKII, Northern Brewer Wort Pump, Anvil Pump, and Northern Brewer Steelhead 2.0 are all very similar in the way they are designed. All have a magnetic impeller, which means that the motor shaft won’t bind up, and there is no damage to the motor if the pump outlet is left closed. Flow rates vary on each of them, with Chugger and Steelhead coming in at a max of 7 gallons per minute (GPM)/15–18 feet of vertical lift, followed by the MKII and Northern Brewer’s Wort Pump at 5 GPM/11 feet, and finally the Anvil pump at 3 GPM/7 feet. Although the Anvil seems like the runt of the bunch, it does have some things the others do not, including a power switch and a no-tool-needed head disassembly feature. Again, which is best for you depends on how you plan to use it.
The other pump well-known in the hobby is the Blichmann RipTide, which was designed specifically for homebrewers. This pump has a magnetic head impeller but also features an air release vent, power switch, outlet flow control knob, and a tri-clamp sanitary pump head clamp for toolless disassembly. This does come with the higher price tag than the Chugger and Steelhead 2.0 despite having the same flowrate.
Operating & Troubleshooting
So, at this point let’s say you’ve picked out your pump. Now what? How is maintenance? What are possible issues you may come across? The first of which will always be priming your pump. To prime your pump, let the pump be “downstream” from where the liquid is coming from so that gravity will allow it to naturally fill the pump head and let air escape. Always be cautious if priming your pump with hot liquids, using a bucket or pitcher to try and catch liquid to reduce the chance of splashing.
The next common issue is a loud humming, but no liquid moving. This is usually a priming issue but can also indicate something blocking flow somewhere along the line. If this is the case, turn off the pump and shut off all valves in the process. Carefully detach hoses and check for clogs in hoses. Next check the pump for any clogs, and run water through the outlet of the pump to push out anything possibly caught.

If you hear a loud screeching or grinding type of noise, in many cases this is an indication the impeller and shaft should be lubricated using a food-grade silicone grease. Take off the pump head and use a pea-sized glob of the food-grade grease on the shaft and any other areas where the impeller touches. Try running with water first to take off any excess grease and see if you’ve found the fix.
To help prevent stuck mashes if you are going to use your pump to move liquids directly from your mash/lauter tun — which you are more prone to get with the added suction of the pump on the grain bed — use a ball-valve to restrict the flow coming out of your mash tun first before letting it go to your pump so there remains a small amount of back pressure on the grain bed. It is also a good idea after priming the pump to turn it on with the outlet of the pump shut off, then slowly open the outlet to allow the grain bed time to adjust to the added suction and not compress too fast, restricting flow between the grain husks. If the flow cuts off, turn off the pump. In some cases, you may have your pump clog due to excess grain debris. If this happens, follow the steps mentioned earlier, and cut back the flow once the pump is primed again, as this is usually caused by pulling wort too fast out of your mash tun. You will not have this problem if you are using a grant to gravity-feed your run-off into and pulling liquid from your grant.
Having a pump in your brewing process can greatly help during brew days and in most cases they are easy to use, disassemble, and maintain. As with any piece of equipment, there are always upsides and downsides, but doing your research and knowing what will improve your personal process will help you choose one suited for your needs.