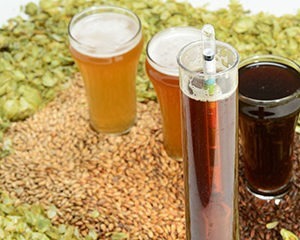
Ferment in a Cornelius Keg
Most local homebrew shops sell used Cornelius kegs at very reasonable prices. Five-gallon (19-L) kegs are most common and are also the cheapest. There are also 2.5-gallon (9.5-L), 3-gallon (11-L), and even 10- and 15-gallon (38- and 57-L) Cornelius kegs, but all of these are far less common and cost several times that of a standard 5-gallon (19-L) keg.
If you’re new to Cornelius kegs, the first thing you’ll want to do after buying a used keg is clean it thoroughly and also replace all of the rubber seals. These kegs were used almost exclusively to serve various types of soda and the only parts you cannot clean well enough to remove the residual soda taste are the rubber seals. A full complement of replacement seals costs about $5. It takes just a few minutes to swap out seals. This step in preparing a used keg is non-negotiable — do not skip it! I also replace the poppet valves on used kegs, but this is not necessary so long as the keg is holding pressure. I’m just paranoid.
Thoroughly rinse the inside of your keg to clear out whatever might have been in there (usually a small amount of sanitizing solution). Mix up 5 gallons (19 L) of a solution of B-Brite or other oxygen-based cleaner (like Oxi-Clean) in a bucket and pour off some of it in a small plastic container (Tupperware or similar). Use a 7⁄8-inch deep socket or crescent wrench to loosen and remove the gas-in and liquid-out posts. Remove and discard the rubber seals on the posts. Remove the poppet valves from the posts. Now remove and discard the large rubber seal around the keg lid, and also unscrew the relief valve from the lid. Also remove both dip tubes, and, again, discard the rubber o-rings (Figure 1 shows several of these parts).
Take all of that (posts, poppets, lid, dip tubes, and relief valve) and drop it in the small container of cleaning solution. While the keg parts are soaking, pour the bucket full of cleaning solution into the keg and let that sit as well. For cleaning purposes you may find it easier to reinsert the liquid side dip tube in the keg, as it is quite long. Letting everything have a good soak for 15 minutes or so loosens up any residual gunk that might be present.
After the soak, add the new rubber seals to the posts, lid, and dip tubes. Apply a very thin coat of “keg lube” to the new rubber parts before installing. This will help keep the rubber from drying out, as well as aid in keeping an airtight seal when the keg is under pressure. (Keg lube is a food-grade lubricant and is available from most homebrew shops that stock draft equipment.) With the keg still full of cleaning solution, reinsert the dip tubes and reattach and tighten down the posts (remember to reinsert the poppet valves into posts before screwing them onto the keg). Attach and lock the lid and reset the relief valve. Give the keg a good shake for 30 seconds to a minute to ensure full cleanser contact on all interior parts. On brew day, follow this same basic procedure to clean the keg. You’ll also need to sanitize the keg with your sanitizer of choice.
Get the gas out
 Kegs are airtight by design, and obviously we need a way to let out the CO2 created during fermentation. This can be accomplished in a very simple, straightforward manner with minimal expense and using existing keg components. Here’s a list of what you’ll need:
• a “Gas In” disconnect fitting with hose barb
• a metal hose clamp (this is optional)
• a short length of tubing
• a glass or plastic container (such as an old jar or growler)
• anti-foaming agent
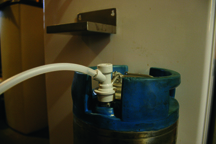
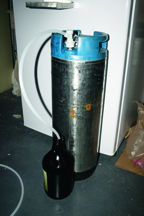
For fermentation, remove the gas side’s short dip tube. Attach the “Gas In” disconnect to the “in” post on the keg. Now slip the tubing onto the hose barb of the disconnect. Fill your jar or growler about half full with a solution of the sanitizer of your choice. Insert the other end of the tubing in the growler and you’re ready to go.
What about blowoff?
You probably noticed that this setup looks very similar to a typical “blowoff” arrangement used with a carboy. While it does look similar, the small diameter of the keg fittings and tubing will not work very well for the bits of hops and coagulated gunk common in the foam that is ejected during high kräusen. This is especially true of vigorous fermentations with top-cropping yeast strains, such as Wyeast’s 3333 German Wheat, for example. To avoid a big blowoff there are a few tricks we can use. Plus you can remove the “guts” of both the tank gas fitting and the gas in disconnect, which will allow the passage of kräusen and hop particles unless you’ve used whole flower hops, which can still clog the pipe and cause major problems.
The volume of the keg is 5 gallons (19 L), and that means to avoid problems we need to put a little less than that into it for fermentation. Shoot for about 4.5 gallons (17 L) into the keg. By using a lot less wort than that, we can avoid blowoff entirely. But that’s not a desirable option for 5-gallon (19-L) batches. So instead of fermenting a smaller volume of beer, use a food-grade anti-foaming agent called Fermcap-S to reduce the amount of kräusen present during the height of fermentation. Fermcap-S is widely available at many homebrew shops and mail-order suppliers. The active ingredient is dimethylpolysiloxane, which is also used to make the active ingredient in some over-the-counter drugs, like Gas-X (simethicone). Use three or four drops per gallon (3.8 L) of beer to help eliminate that big foamy head of kräusen and keep the gas disconnect clear of particulate matter. Add the Fermcap-S directly into the keg after you’ve transferred the cooled wort but before you pitch the yeast. The Fermcap-S will settle out after primary fermentation and will be left behind after racking.
If you already brew larger batches or would like to try going bigger, splitting the batch into two or more 5-gallon (19-L) Cornelius kegs is a great way to go. Start off with a batch size of between 8 and 9 gallons (30 and 34 L) and then split them into two kegs. This also lets you try the same recipe with multiple yeast strains for testing and comparison.
Racking with gas
One of the most convenient features of using a keg for fermenting is that you can use CO2 to transfer beer from primary to secondary. This process is closed and does not rely on gravity or siphoning. To do this, some brewers like to cut about 3⁄4 of an inch (2 cm) off the end of the liquid dip tube to avoid picking up yeast from the bottom of the keg. Others just bend the dip tube away from the center-bottom of the keg. I leave my dip tubes fully intact and just discard the first few ounces of cloudy, yeasty beer that comes out when the transfer starts. The choice is yours as all methods work fine.
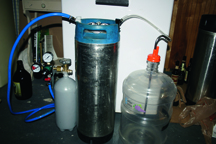
Whether you plan to transfer to a carboy or a keg, you’ll want to avoid transferring the trub at the bottom of the fermenter. To do that, hook up a CO2 cylinder to the “Gas in” disconnect and adjust the regulator to minimum pressure. Connect some tubing to the “Liquid out” disconnect and slip the other end into a jar or other container. Slowly turn on the gas and watch as the yeast and trub are ejected. Keep an eye on the discharge and turn the gas off as soon as the effluent clears up. And now on to racking.
If you secondary in a carboy, use a carboy cap with a racking cane through the center opening and remove the covering cap on the other stem. Connect the racking cane to the “Liquid out” disconnect on the keg with some beverage tubing. Depending on how snug the connections are (or aren’t), you may want to use hose clamps to secure the tubing. Connect a CO2 cylinder to the “Gas in” side of the keg, and you’re ready to transfer.
Set the CO2 regulator at the minimum PSI possible before opening the valve. Only a very small amount of pressure is needed to push the beer, and any more than just a little could make a big mess or unduly agitate the beer. You may not be able to hear any gas entering the keg, and it may take several seconds for the beer to begin to flow. You also may not see the pressure register on the regulator gauge, but that’s okay. Once enough pressure builds up in the keg, the beer will flow out into the carboy.
You can also use the same basic procedure above to transfer directly to another keg. Connect the “Liquid out” on one keg to the “Liquid out” on the other keg. Be sure to open the relief valve on the receiving keg to allow the displaced air in the keg to vent. When transferring to another keg, you can go a little higher on the CO2 pressure to speed up the transfer.
Racking with gravity
If you don’t have a kegerator setup up and running, you can use a simple siphon to transfer from the keg to a carboy or another keg for secondary fermentation (or directly to the bottling bucket if you do extended primary fermentations). Just use a racking cane in the keg and start a siphon. Nice and easy.
Kegs as secondary fermenters
Cornelius kegs also make excellent secondary fermenters. Just transfer the beer to a keg after primary, close the lid, and pressurize it with about 15 to 20 PSI to make sure the lid seal seats properly. Every few days, vent the keg via the pressure release valve. There will be some residual fermentation going on that will create a small amount of CO2, as well as some leftover CO2 that was dissolved during primary fermentation. Not venting this excess gas won’t be a huge problem because the keg is rated for pressure far beyond what will occur in secondary fermentation, but too much pressure may cause some yeast strains to prematurely flocculate. This is a bigger issue in primary fermentation, but could conceivably have a negative impact on bulk aging.