Build A Hop Trellis

I had been homebrewing for about a year when I first got the bug to try my hand at growing my own hops. A good friend and one of my homebrewing mentors, Dave Justice, was growing a few varieties in his backyard. I loved the bright fresh aroma that came from the fresh picked cones. As he showed off his plants to other homebrewers and aspiring hop growers he would pick a few cones and show us how to rub them in our hands to capture the fresh aroma. I was smitten; I too was going to grow my own hops. I quickly found a mail order supplier for hop rhizomes and had a few on their way.
Something you should consider when designing a hop trellis for your yard is that hops like to grow very tall and straight up. They can be trained to grow on things, but left to their own devices they want to grow up and they do so very quickly.
Commercial hop farms use rows of very tall unfinished poles — sometimes as much as 20 feet (~6 m) tall, with wire cable running along the tops of each. At the end of each row of poles they use guy wires to keep everything tight and secure. Along the row, at each planting site, they attach a piece of twine for the plant to grow straight up. Since hop trellises are typically tall structures, you should also make sure that the area you are considering for your hop yard is free of any overhead power cables.
I knew there was no point even bringing up the idea of building a commercial-style trellis in our front yard, and our back yard is completely shaded by large walnut trees. I had to come up with something more aesthetically pleasing that would be acceptable to both my wife and my neighbors. I settled on planting my rhizomes in an existing vegetable garden that the previous owners had cleared of rocks and enriched the soil with lots of organic compost, so it made the obvious spot for my hops. The space I was considering was approximately 12 x 24 feet (3.7 x 7.3 m) on the southeast edge of the property and would have full sun almost the whole day.
I wanted to plant a few different varieties of hops so I could have some fun experimenting with them during each fall harvest. I drew up several different designs trying to come up with a way to maximize the number of plants I could grow and still have a nice looking design. Some designs were based on rows, but I could only get a couple rows in my small space. The other thing I realized was with rows, spacing is very important. If the vines are too close together, the first row would shade the other row of plants.

After several designs I settled on a pair of hop towers that would support four plants each. I had seen a few other tower-style hop trellis designs on the Web as I did my research, but most of those designs involved placing a tall pole in the ground and planting the hops all around it. All the plants grow up their strings and converge at the top of the support pole. I was planning on growing different varieties and I didn’t want them to all grow together at the top of the tower and make separating them at harvest difficult. I figured that I would solve this problem by using arms at the top of each tower to hold the plants away from the main support pole. I considered building this trellis completely out of wood, but I’m not much of a carpenter. I elected to use galvanized pipe for the arms of the structure.
I used 1⁄2-inch pipe and pipe fittings found at a local hardware store. Each of the upper arms is constructed of a pipe flange that attaches the pipes to the wood, a 2-foot (61 cm) section of pipe, a galvanized T and two 6-inch (15.2 cm) pieces of pipe. The lower arm is exactly the same, except that it does not include the additional 6-inch (15.2 cm) sections; it’s just an arm with a T at the end.
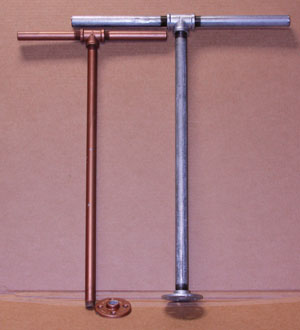
Hurricane Ike stopped by for a visit this summer and showed me that I should have used 3⁄4″ pipe for the top arms instead. One of the upper 1⁄2 inch arms broke where the pipe attaches to the flange during the peak of Ike’s wrath. Living in northwestern Arkansas I didn’t think I needed to hurricane-proof my design, but this year I’m upgrading to 3⁄4 inch pipe.
I decided to build the main center support from 16-foot-long (~5 m) pressure treated 4×4 posts.
One of my other big considerations was that I wanted a way to raise and lower the towers for maintenance and harvest. Each spring you will need to run new twine for the bines to grow up, and each fall you will need to harvest the hops that will grow to the very top of your twine. I have never enjoyed being up on ladders, and leaning out to grab the last couple of choice hop cones is just asking for a trip to the emergency room.

I found that you can buy something called a “fence post sleeve” which is a PVC square plastic tube that slides right over a 4×4 post. My idea was to sink a couple of these PVC sleeves down in the center of each growing area and secure it with cement, creating a socket in the ground for the post to slide into.

I left about 1.5 feet (46 cm) of the sleeve exposed, and then near the top I drilled a hole from one side to the other and notched the other side. I also drilled the same size hole through the base of each 4×4 post.
By doing this I was able to create a kind of hinge at the base of each tower. I lay the tower down with its foot lying in the notch on the base and slide a dowel trough the holes on the base and the holes at the base of each tower. It’s a simple matter of walking the tower up into its vertical position, removing the dowel and letting it slide into its socket.
To lower the towers you just reverse the process. This can be a bit trickier because you must lift the tower straight up and have someone else insert the dowel, but once the dowel is inserted it is easy to walk it back down to a horizontal position. Being able to lower your hop trellis down to waist level really makes harvest super easy and makes restringing your twine each year a snap.
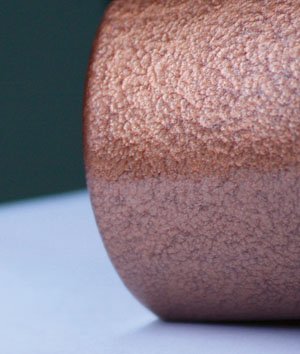
In an effort to make the towers as aesthetically pleasing as possible, I stained the 4×4 posts with a color that matched the color of some of the other wooden structures in the area. For all the galvanized metal parts I found some great paint that leaves the look of hand-hammered copper. I started by thoroughly cleaning each part to remove any grease or grime. Then I primed each one with a primer made for covering bare metal, followed by the copper paint. This really made the galvanized pipes and fittings look nice and added a classy touch.

One of my neighbors had installed solar-powered fence post caps on the stairs leading to his deck, and I thought these would look good at the top of each tower. It would also further tie my design in with the rest of the neighborhood. The lights are copper on top with a little solar panel to keep their batteries charged, and they glow with a gentle white light every night after sunset. My wife jokes that the FAA requires the lights on the towers to keep low flying aircraft from hitting them.
The last piece of the puzzle was the installation of a drip irrigation system to keep the hops from getting thirsty during the long hot summer months. Each plant has a pair of drippers for redundancy, and the whole system is on a timer that keeps my plants watered — even if I forget.
Parts List:
(1) 16 ft. (~5 m) pressure treated 4X4 post
(1) 4 foot (1.2 m) PVC 4X4 Fence post sleeve
(4) 2-foot-long (61 cm) 3⁄4 inch Galvanized pipes for the upper arms
(4) 3⁄4 inch galvanized pipe flanges for attaching the upper arms
(4) 3⁄4 inch galvanized Ts for the upper arms.
8 6- to-10-inch-long (15-to-25 cm) galvanized pipe, all eight will be attached to the upper Ts to create lateral arms. Since these arms only need to be threaded on one end I have found that it is cheaper to buy a pipe 12 to 20 inches (30 to 51 cm) long and cut it in half. My original ones were 6 inches (15 cm) long but I’m making them a little longer, 9 inches (23 cm) as an upgrade this year.
(4) 2-foot-long (61 cm) 1⁄2 inch galvanized pipes for the lower arms
(4) 1⁄2 inch galvanized pipe flanges for attaching the lower arms.
(4) 1⁄2 inch galvanized Ts for the lower arms, these will be only used as a place to attach bottom of the growing twine.
1 Solar powered fence post cap
1 or 2 Bags of concrete
100 ft Strong twine or thin rope. Each arm support two growing strings, each about 12.5 (~4 m) tall so 100 feet (~30 m) is just enough to use for one tower.
1 can spray primer for metal
1 can hand hammered copper spray paint
1 can wood stain