Build a simple RIMS: Projects

More than two years ago BYO ran one of my first do-it-yourself stories, “Build a $50 Mash Tun” (September 1999). That device has since brewed dozens of batches of all-grain beer with great success. Now it’s time to take it to the next level and add an internal heater and external pump. In other words, it’s time for us to make our inexpensive mash tun into an inexpensive RIMS (Recirculating Infusion Mash System).
Fair warning: This project involves electricity. If you’re not comfortable playing with potentially lethal voltages, don’t. Or get help from an electrician.
_________________________________________________________
Parts List
You can buy a suitable RIMS pump from many homebrew outlets
Parts for the Chromalox RIMS can be found at most home-repair and service stores.
Chromalox Water Wizard $30 (Model SGW 2207)
Lutron Centurion dimmer $35
Brass union $4
Heavy duty (20 amp) outlet $4
Power cords (12 gauge) $3
Cordon Brew parts
Element $35
Thermostat $50
_________________________________________________________
What is RIMS? Why use it?
Some of you may be asking, “What the heck is RIMS?” If you were to remove a quart or two of wort during your mash and return it to the mash tun, that would be recirculation. Every all-grain brewer recirculates wort at the end of the mash to clarify the wort. Clarification removes all the particles of grain, large and small, from sweet wort before boiling. If you were to run off some wort during a mash, heat it to 158° F and then return it to the mash tun to bring up a low mash temperature, you’d be doing exactly what the RIMS concept proposes — recirculating an infusion mash, manually.
Why not stick to a single-infusion mash? There are several benefits of RIMS. First, constant circulation helps maintain a uniform temperature in the mash, which ensures mash efficiency and maximum enzyme utilization. Second, circulation clarifies the wort. Third, since you can add heat you can easily do a step mash (see “Homebrew 501” in September BYO), which adds complexity to your brewing. Fourth, once you own a pump you don’t have to rely on gravity to move water or wort any longer. Your brewhouse can be at one level — no more heavy lifting.
The RIMS concept was first proposed in 1992 by Rodney Morris. Morris used a pump, a heater and a precision controller to precisely vary the temperature of a mash tun. In essence, wort was pumped across an electric heater element, then returned to the mash tun. The system was closed; no air was admitted, nor splashing permitted.
In Morris’ system, a precise control system measured existing temperature and the temperature of wort after it passed the heater. This meant building or purchasing a complex electronic device. Our RIMS is less precise and much simpler. It’s based on an electric mash tun I saw at a friend’s house long before I’d heard of RIMS. My pal had installed a heating element inside a Rubbermaid cooler. His grain bed was suspended above the heater in a precisely fit mesh colander. A pump recirculated the wort and a rheostat controlled the heating element. The heating system was based on parts taken from a “Cordon Brew” system from Great Britain. These parts are available from several homebrew shops (see box at right). In Great Britain, most homebrewers heat their mash and boil in the same plastic kettle. Heat is provided by a 30 amp/240 volt element (British current is 240V, not 110). A controller provides temperature sensing and power control.
In the U.S., most electric RIMS systems use heating elements from electric water heaters. They are run on 120V current, which quarters the amount of heat the element can produce. This means that the element doesn’t get hot enough to scorch the sugars in your wort — if you choose the correct heating element.
I decided to build two versions of a simple RIMS system. One relies on parts from a Cordon Brew system. The other uses a Chromalox Water Wizard water heater element and home-built power control. Both versions need a pump, the heart and soul of any RIMS.
Picking out the pump
Any pump could move wort, right? Not really. A wort pump must be capable of moving boiling liquid. It needs to move it from very low to very high (if you have a typical multi-level brewing system) and be tough enough to handle the odd chunk of grain.
Several homebrew merchants sell heat-resistant pumps with a pump section that is magnetically coupled to the electric motor (the pump can stall or stop and not burn out the motor). I chose a non-magnetic pump from Beer, Beer and More Beer rated to 220° F. It uses a flexible impeller (pump) that resists clogging and heat and can pump wort 7.5 feet higher than its inlet (called the head). The SHURflo Brew Buddy self-priming pump comes with a mounting bracket, an on-off switch and a rebuild kit. It is threaded inside and outside the intake and discharge, which makes for easy hook-up.
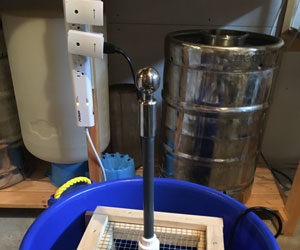
Modifying the mash tun
Our mash tun, a simple Gott or Rubbermaid cylindrical cooler, gets its filtration from two pizza screens (available at restaurant food supply stores everywhere) with two pieces of bronze screen sandwiched between them. To provide an exit, I constructed a bulkhead fitting to replace the original spigot. It is a pipe nipple going through the cooler with a rubber O-ring and ball valve on the outside, a union and large homemade backing plate on the inside.
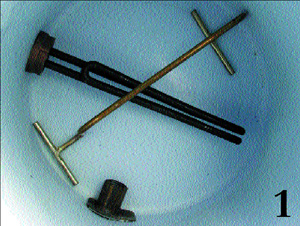
We need to put a hole into the inner cooler wall of sufficient size for the heating element. We need a larger hole on the outside to provide access for wiring and a large nut to secure the heating element. We need a large thin washer between the heater element and thin plastic wall to spread the stress. We must also provide some kind of vertical support for the pizza-screen filter to hold the weight of the grain bed away from the heating element (see photos 1 and 2). The heating element should have at least 1/2 inch of space above it, but not more than 1 inch. I built a standoff out of bent 1/4-inch brass welding rod.
Version One: Chromalox
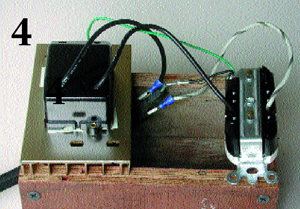
When making a Chromalox RIMS, you start by building a controller. I began by measuring the sizes of a Centurion C1000 incandescent light dimmer and a commercial quality electric outlet. Then I built a plywood box to house the controller (see photo 3).
Purchase a two-wire, heavy-duty electric power cord (at least 12-gauge wires). Drill a hole into the box to admit the cord. Then wire the outlet. The white wire from the power cord goes directly to the silver terminal on the power outlet. The black wire from the power cord connects to one black wire on the Lutron controller. The other black wire from the Lutron controller connects to the brass-colored screw on the power outlet. Green wires from the power cord and Lutron connect to the green screw terminal on the power outlet. Important: Connect the green ground wires from the power cord and controller to the green screw on the outlet (photos 4 and 5). Always use a grounded circuit. In fact, don’t use this controller on a circuit without a GFI (ground fault interrupter) to prevent any serious or fatal accidents.
Chromalox heater element
Installing a Chromalox heater element is easy. Selecting it is not. Heater elements vary in heat output (watts) and length. We selected a Chromalox 2000 watt SGW 2207 based on these criteria. It was the correct length to fit the diameter of our mash tun (9-3/32 inches in a 10-inch diameter cooler) and it had sufficient wattage to produce enough heat. (Remember, using a 240V heater on 110V quarters the effective output: 2000/4 = 500 watts). And this element’s sheath material is nickel alloy for longer life.
Step One: Mark a vertical line on the mash tun 90° from the outlet (so wort will be drawn across the heater.)
Step Two: Measure the outer and inner height of the mash tun, subtracting inner height from outer. Mark the bottom of the inner vessel on the exterior of the mash tun.
Step Three: Measure the threaded size of the element — ours was 1 inch. Measure up 1/2 inch from the bottom of the inner vessel plus half the element’s diameter (one radius) — 1/2 inch + radius = 1 inch for us.
Step Four: Drill a 1/8-inch pilot hole through both walls, starting on your mark. Then drill a large, 1-1/2 to 2-inch hole through the outer wall and part of the insulation. You’ll need this aperture for wiring and a cover cap.
Step Five: Drill a 1-inch hole through the inner wall. Clean up any remaining insulation. Your Chromalox heater element will be installed outside-inside. Because the inner support wall is thin plastic, you’ll need to make a large metal or plastic washer to distribute torsional forces that would eventually crack the plastic wall.
Step Six: Using hole saws or a saber saw, cut a 2-inch diameter washer with 1-inch inner diameter hole. I made my washer out of aluminum but would have preferred brass or copper. I could have added a solder lug to the copper or brass and it is absolutely necessary to ground the heater element. Normally, a heater element is grounded to the water heater but our all-plastic installation requires us to create a ground.
Step Seven: Make a 1-inch circle out of scrap, 10- to 12- gauge stranded cable or Romex (ordinary solid house wiring cable), leaving a 1- to 2-inch pig tail (see photo 6). Once you’ve created your homemade grounding, you’re ready to assemble the parts.
Step Eight: Slip the ground wire over the heater element, followed by your metal washer.
Step Nine: Apply a thin bead of silicone seal (use black, red or gray so you can see it) to the washer-thread junction and push the heater through the mash tun walls (see photo 7).
Step Ten: Secure it with a homemade nut inside (maybe adding a little silicone seal on the inside for security). Since water heaters have built-in threaded ports you’ll have to make your own nut. I used a brass 1-inch coupling and cut it into two.
Step Eleven: Take another heavy-duty power cord and connect it to the heater element. The element has no color code, so connect black and white wires as you will. Be certain to connect and insulate the ground wire. I suggest crimp-on connectors for all connections; they’re cheap insurance.
Step Twelve: Take a PVC cap and run your power cord through a properly sized hole (see photo 8). After all the electrical connections are complete, seal the cap into the mash tun with a bit of silicone seal. You don’t want wort or water getting into the connections.
Cordon Brew Version
If you chose to purchase a Cordon Brew system, everything goes much the same. This version costs a bit more but it is easier to assemble.
Step One: Locate the correct placement of the larger-diameter Cordon Brew heater element (bottom thickness + 1/2-inch + 3/4-inch radius = X) before drilling your pilot hole (see photo 9).
Step Two: Drill an outer hole large enough (2 inches) to fit the large nut.

Step Three: Drill the inner wall hole (1-1/2 inch). Test-fit the securing nut from the outside.

Step Four (optional): Cut away additional outer wall and insulation if you choose to mount the controller to the inner wall as we have (see photo 10). Or secure your controller to the exterior with a hook-and-loop fastener.
Step Five: Wire the wall plug. The Cordon Brew system includes the controller, so you’ll just need to purchase a heavy-duty 120V wall plug.
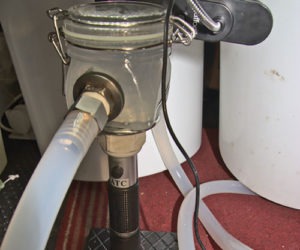
Hook up the pump and calibrate
Now that you’ve completed your simple RIMS mash tun, it’s time to connect the pump. First you’ll have to decide on hose hookups. Every pump will have different attachment methods. My pump will accept 3/8-inch male pipe thread fittings or garden-hose fittings. Plumbing the RIMS requires two hoses with matching fittings — I used 3/8-inch barbed fittings. One hose connects the mash tun output (your ball valve and barbed fitting) to the pump input. The other hose returns wort from your pump’s outlet to the mash tun. It is usually connected to a sparge arm. You also need to add a ball valve at the pump’s discharge — the best place to control flow volume. Open the mash tun discharge fully, keeping the pump inlet unrestricted. (If you were to use the mash-tun ball valve to control inflow to the pump, it might run dry and burn up.) Adjust flow volume by limiting the pump’s outlet flow to the mash tun. A flow of 25 to 50 percent should be correct to keep the pump running in liquid, yet prevent pumping the liquid so quickly that the mash bed gets tightly compacted. Be sure to only use specialty tubing or reinforced (woven) vinyl tubing, available at hardware stores and homebrew shops.
Once the pump is hooked up, you need connect the power and calibrate the system. Neither RIMS will be linear — that is, halfway on either controller will not produce 212.5° F. Running either heater at full power might produce enough heat density to scorch your wort. Heat density is the amount of heat per square inch of surface. Of the two systems we built, the Chromalox has the lower heat density.
To calibrate your system you’ll need to prime the pump and start circulating water. Then power up the heater and see how long it takes to heat five gallons to 158° F. Discover what mark (self-made or provided) will equate to 122°, 144°, 149°, 153°, 158° or 168° F. You may discover that you run the controller at 80 to 90 percent until you’re close to your target, then dial back to the set point, then to zero.
RIMS proponents say the heater should be able to raise wort temperature by 2° F per minute. In my first test of the Cordon Brew system it exceeded this when heating 2 gallons of water. Further tests will be necessary to calibrate my system.