Build an Electric Draft Jockey Box: Projects
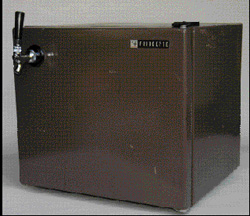
The TapAFridge is an electric jockey box. It allows you to serve one or two cold homebrews from a warm keg.

A stainless-steel plate chiller designed to rapidly cool warm beer from two different beer lines.
Now that I’ve built the ultimate DraftErator (Projects, September 2002), I’ve realized I have a greater need to keep one or two beers on tap, as opposed to the four or five the DraftErator holds. What I need is an electric “jockey box” that chills and dispenses one or two beers — not a whole party’s worth. Something that takes up so little space that even my spouse will say “Well done, oh fearless homebrewer,” or at least,
“OK, you can make this one. It will fit in our home.”
Dorm refrigerators are inexpensive and often found used for as little as $25. In my college-saturated neighborhood, chain stores sell them for $90 new. That’s the source of coldness. A stainless steel chill coil adds $75 to our project. It may not be cheap, but it will be effective.
Concept:
Let’s assume you’ve got a keg of warm beer and a thirst for cold homebrew. A cooling coil immersed in 45 °F (7 °C) water would really help out in this situation. A 50’ (15-1/4 m) chill coil of 3/8” inner diameter tube holds a volume of 36 ounces (1 L), so dispensing a normal evening’s pints is no problem. The third or fourth rapidly-dispensed beer will require the exchange of 25 °F (14° C) of heat (70° F/21° C keg to 45° F/7° C serving.) What we need is a place for the heat to go. My idea is to keep the coil immersed in a bucket of water inside the mini-fridge. This heat sink will be continually “recharged” by the refrigerator’s compressor.
Materials:
So the essential elements of our project are: mini-fridge, chill coil, bucket of water and — of course — the necessary tap handle or handles and keg connections.
Two suitable beer-cooling devices are available from leading mail-order homebrew suppliers. (I found mine at Beer, Beer & More Beer.) One is a 50-foot (15-1/4 m) coil of stainless steel tubing; the other is a cold plate. Cold plates are solid plates of aluminum with stainless steel tube woven inside. Their advantage is size — they’re flat — and their ability to rapidly cool beverages. If you look into a commercial jockey box, you’ll usually find a cold plate, not individual coils. It’s your choice, but if I were making a two-beer dispenser, I’d choose the chill plate.
For the single-beer version, a copper coil would not be advisable because the beer will remain inside the coil between servings.
Modifying the Fridge
Begin by acquiring a mini-fridge. Our ex-dorm budget-buy has a cavity that is polygonal, 16” (40.6 cm) across the front, 10” (25.4 cm) deep on the left and 7” (17.8 cm) deep on the right. It’s 10” (25 cm) tall below the combination ice tray and evaporator coil. (It’s the evaporator coil that provides cooling.)
Mini-fridge doors have molded plastic shelves to hold a couple of beverage bottles and a few eggs. For increased interior room, this molded plastic has to be removed.
Pulling straight out on the sealing gasket should reveal the screws used to hold the inner panel. The gasket should wrap around and over this panel. Removing the door makes this easier; look under any plastic cover plate for the hinge screws. You may also be able to make the door open opposite by removing both hinges and replacing them opposite.
Remove the screws and remove the gasket. If your fridge is used, you’ll likely need to clean the gasket. Now is the time to soak it overnight in some dilute cleaning solution (I use PBW). If the gasket is ultra-stiff or in soggy shape, now is the time to replace it. You’ll find these gaskets at local appliance repair shops. Cut a panel of thin masonite, plastic or aluminum sheet to the size of the just-removed molded panel and use the panel as a template for screw holes. (For this purpose, thinner is better as it’s easier to reinstall the gasket.) Cut the panel and drill screw holes. If you’re using a permeable material like wood or masonite, seal it with a penetrating sealer to prevent it from delaminating. Reinstall the gasket by wrapping it around the new panel and replacing the screws with longer #10 x 3/4” screws if you are using 1/8” masonite.
The Cooling Apparatus:
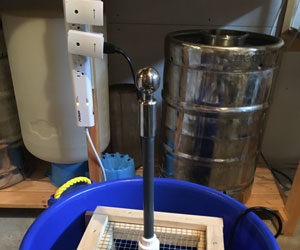
Once you’ve modified the door, you’ll need to fit a bucket. (Leave the door off for now, we have a tap handle to install.) I was lucky and had a salvaged stainless steel lab sink. I could have cut and silver brazed it to fit more precisely, but that was too much effort. Instead I cut the rolled lip off the portion to be modified and bashed it with a hammer. If you use a cold plate, you’ll want something that maximizes the size and depth of the heat sink. If you don’t have a lab sink, look in any restaurant supply store for a similar container. Some restaurant stores will offer used pans at a savings.
Once you have a bucket that will fit, determine where your tap handle and liquid line will be installed — front, top or side. This will depend on the tap handle or handles you buy. I put a single tap into the front of the fridge. A second will follow.
Hole drilling proved difficult. Most home drill motors — at least all of mine — have a maximum drill shank size of 3/8” and that is smaller than either a typical 1” drill bit or 1” hole saw. Unfortunately, I discovered this after purchasing a 1” hole saw! (Hole saw kits usually start at 1-1/4” and are meant for installing door hardware.)
I took a 1/4” drill and drilled through the steel door panel and the masonite. Then I inserted that drill into the hole saw (it serves as a pilot) and chucked the hole saw into an antique hand drill, a “brace.” It worked perfectly and I drilled the steel, then the masonite.
The next step is to drill a 1/2–5/8” hole for 3/8” inner diameter liquid beer line. I drilled those holes at the rear after careful inspection to ensure no power or coolant lines were in the area. Typically, the sides of a dorm fridge will be free of either as well.
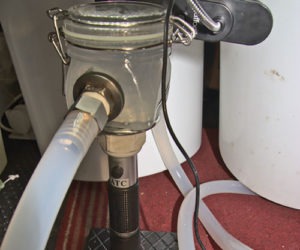
Our photos show both the stainless steel coil and chill plate. For a single beer, just connect a hose from your keg to the coil, then from the coil to the spigot nipple. (Shanks are available in various lengths. I’m going to return the 4” shank to my homebrew store and get 2” shanks.) Be certain to use Oetiker or other clamps unless you want to have a blow-off accident and end up with a keg of beer on the floor!
If you choose to use a two-product chill plate, take a look at the supplied connectors. You’ll want to use two wraps of Teflon sealing tape or food- grade pipe dope to plumb them in. Connect the fittings to the beer line and spigot. Ours came with flare fittings instead of barb fittings. Again, absolutely use clamps anyplace beer lines connect to the device.
The final phase is absolutely crucial. You have to clean the system. (See the “Cleaning Your Lines” sidebar for directions.) It is imperative that you clean your beer lines often, particularly when the beer in your keg is not refrigerated to 38° F (3.3° C). An infection in your tap will readily travel throughout the lines and coils and infect your keg. Or maybe you really wanted a tingly-tart Berliner Weisse IPA? I know it can happen; I was fortunate that my infected beer was a German-style wheat beer and the additional lemon flavor went well with Szechuan and Mexican food.