Build a Mash Paddle
If you are an all-grain brewer, or if you do larger partial-mash batches, a mash paddle (or some equivalent) is a critical piece of brewing equipment to ensure that any “dough balls” (dry spots in the mash) are busted apart, that the mash temp is evenly distributed throughout the mash tun, and to generally just keep things stirred up.
Commercially available mash paddles are made from a variety of materials, including plastic, metal and wood. While plastic and metal both have their advantages, there’s nothing quite like the look and feel of wood for a mash paddle, in my opinion. And while you can buy some very nice wooden mash paddles, you can make your own for about $20 worth of wood and materials, assuming you have a few basic tools in your garage or work area. And you don’t need to be a master craftsman to get the job done. I’m a rank novice when it comes to woodworking, and if I pulled it off, you can too.
Wood selection
Selecting the proper wood is a critical step in the process. You want to use a wood that has a relatively tight, closed grain, as these woods are generally less permeable by liquids and will impart little in the way of flavors from resins in the wood. Some good choices include maple, poplar, white oak (but not red oak) and cherry, although any wood with a tight grain and low resin content will probably make a good paddle. As pictured in this project, I chose a 1-inch by 6-inch piece of maple that I picked up at a major home center for about $4 per linear foot.
The tools you’ll need
Like most woodworking projects, you can do it with a few simple tools or with some nicer, more expensive tools. On the minimal end of the spectrum, you’ll need a decent jig saw, a hand drill, and a sanding block with sandpaper. On the more fancy side, you can use a router or scroll saw, a drill press, and a palm or orbital sander. Additionally, an assortment of files and rasps come in handy for shaping and smoothing. Other common tools are also helpful, such as a framing square, clamps, a tape measure, and torpedo level.
I made two mash paddles, one using a jig saw and the other with a scroll saw as the primary cutting tool. In my relatively inexperienced hands, the scroll saw made much cleaner, neater cuts with a higher degree of precision. However, with the jig saw, I was able to make a perfectly suitable mash paddle . . . it just wasn’t nearly as easy (or pretty). But as usual, good tools make work much easier.
A word about design
The shape and style of your paddle is a very personal thing, so I won’t spend a lot of time trying to dictate design. There are a few basic functional elements to the overall design, however, that should be considered.
First, the paddle should have at least a few holes or slots cut into it to help break up solid balls of grain and to facilitate easier stirring. Some paddles have many smaller holes, some have just a few larger slots, and still others have a combination of the two — it doesn’t much matter what you decide to do, so long as there are some cutouts in the paddle.
Second, you want to make sure that the shaft and handle part of the paddle are wide enough and thick enough to withstand the force exerted as you stir a thick mash. Therefore, for every 12 inches (30.5 cm) of total paddle length, you will want about a half-inch (1.3 cm) of shaft width, generally speaking.
Make your marks
If you’ve got a great eye for design and a steady hand, go ahead and sketch out your paddle on the wood. For the rest of us, we’ll be using measuring tools and a straight edge to mark the wood. There are many ways to approach measuring and marking the project, but I’m going to stick to the method I used. If you’re an experienced woodworker, you probably already have your own sound method to do this. If you’re not, like me, then read on for a crash course in quick-and-dirty project plotting.
I realized quickly that my piece of wood wasn’t square on any edge, and since I don’t have a jointer, I decided to just draw a center line down the wood and work outward from the middle. To find the center, measure the width of the board, divide that measurement by two, and then use the new figure to mark the board at the halfway-across point. Start at one end of the board and make several halfway marks all the way down. Line up a straight edge on these marks and draw a heavy line down the center. This method isn’t the prettiest in the world, but it works.
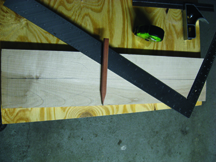
I decided to make my paddle four inches wide at the bottom (the business end of the paddle), and then become more streamlined as it approached the handle. So I made a mark two inches on both sides of the center line (for a total width of four inches) at the bottom of the board. Then further up the board (about seven inches/18 cm from the bottom) I made two more marks 1.5 inches (3.8 cm) on either side of the center line. To add one more contour, add two more marks about 1.5 inches (3.8 cm) further up and just half an inch (1.3 cm) on either side of the line. These last two marks also serve as the starting points for drawing the shaft and handle of the paddle Using a straight edge, draw lines between the marks on each side to complete the basic shape of the bottom half of the paddle.

Then draw lines connecting the shaft and handle to the bottom of the paddle.

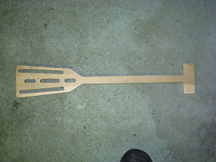
The shape of the handle itself is personal. I went with a “T” shape out of sheer expediency. Note: These measurements are just the ones that I used and work well assuming a total paddle length of approximately 24 inches. Feel free to experiment.
The final cuts
Now it’s time to put some holes in your paddle. Trust me, it’s much easier to mark, drill and/or cut the holes before you cut out the paddle itself. Here’s where you can let your creativity run wild. I opted for two long slots along the sides and three shorter slots down the center of the paddle. To keep things symmetric, use that trusty old center line as the base from which to measure and mark the positions of your holes.
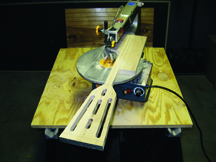
Use a hand drill or drill press to put holes in the paddle.
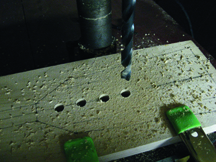
I used a 7⁄16-inch bit for my holes. To make slots instead of simple holes, drill a hole on either end of where you want the slot to be and then cut out the space between with a jig saw, scroll saw or router.

As an alternative, you can simply drill several holes very close together to form a slot, although this method will likely require a lot of sanding and filing to get a smooth hole.
Using your saw of choice, cut along the outside lines.
Your paddle could be used at this point, but sanding or filing will go a long way to make it more ergonomic and attractive. You can use various files and rasps to smooth the edges of the wood and to even out the slots and holes. A palm sander or sanding block will smooth out the finish and make your paddle comfortable to hold and handle.

To finish, or not to finish?
If you used a closed-grain wood like any of those listed at the beginning of the column, there is no need to apply any sort of finish to your paddle. After use, rinse it off with warm water and let it air dry before putting it away. If you really want a finish on your paddle, you can use a light coat of cutting board oil as it is food grade. I do not believe that this is necessary, however, and some homebrewers believe that even small amounts of this oil can be imparted during mashing and have a detrimental impact on head retention in the finished beer.
Now that you’ve completed the project, take your completed paddle and get to mashing!