Build a Portable Keg Cooler

My family and I go camping every summer with a group of friends in New Braunfels, Texas during Memorial and Labor Day weekends. A couple of years ago, one of my friends’ brothers found out that I homebrewed and he kept asking me when I was going to bring some of my beer so he could try it out. I told him that I don’t like to bottle but I would bring a keg on our next trip as long as he kept it iced down. I took a typical 5-gallon (19-L) Corny keg on Labor Day 2014 and we laid it horizontal in a 90-quart (85-L) ice chest packed with ice. The setup worked OK but when the keg was half empty we had to prop it up so it wouldn’t blow out CO2. Of course, standing it up meant that now the lid was half open on the ice chest so the ice was quickly melting.
I thought to myself, “There has to be a better way than this – something more portable that can hold a keg in a vertical position and be well insulated from the Texas heat.” I was also under a little bit of pressure to come up with something better because my buddy’s brother gave me $20 to go in halves for the next Memorial Day beer keg.
I searched online for a large, insulated cooler that would be able to hold a keg upright but I just couldn’t find what I was looking for. I thought maybe I could build a vertical, rectangular box that I could insulate with that spray foam insulation. No, that would be too heavy to lug around. The largest sized water cooler that I could find was 10 gallons (38-L), and that was too short for a regular sized
Corny keg – I needed another 12 inches (30 cm), or so. A 15-gallon(57-L) cooler would probably be just the right size but they just aren’t out there. That’s when I decided that I would try to build my own keg cooler using two separate 10-gallon (38-L) water coolers.
What I ended up with has worked out great for me – it’s portable, durable, looks good, the cooler is light (while empty, of course) and it’s well insulated. If you load a full keg into the cooler and add as much ice as you can the keg will stay cold at least 2–3 days if you aren’t removing the lid. That’s the perfect keg cooler for long weekend camping trips, and of course you can always replenish the ice easily enough if needed.
Given how well this project has worked out for me, I wanted to share the build with other homebrewers who may be looking for the same type of thing. Good luck!
PARTS & TOOLS
• (2) 10-gallon (38-L) water coolers with screw-on tops
• (1) 31⁄8-inch Beer shank with 90-degree tail piece
• (1) Beer faucet with handle
• (1) 27⁄8-inch Bulkhead adapter (1⁄4-inch male flare fitting)
• (1) Gas keg post adapter (1⁄4-inch female flare fitting) (optional if you want to use a quick connect for gas line)
• (2) 2.8 oz. tubes of 100% Silicone sealant
• (1) Angle grinder or other power saw capable of cutting a 2-inch (5-cm) depth
• (1) Power drill with 7⁄8-inch and 1/2-inch wood boring bits
• (1) Dremel with cutting blade
• (1) Tape measure
• (1) Sharpie marker
1. GATHER PARTS & CUT ONE COOLER IN HALF

Using a Sharpie, draw a mark all the way around one cooler 111⁄2 inches (29 cm) below the top (with the lid on). The cooler that I purchased had ridges along each side so I used a fishing line to tie around the cooler making sure that the fishing line was in the lower part of the same ridge all the way around. This enabled me to get a nice, straight mark all the way around the cooler. I then used an angle grinder and slowly cut the mark all the way around the cooler until it separated. Note that I had to cut right through the cup holder attachment on the side of the cooler. Be prepared for a small mess of orange, plastic shavings and insulation foam so you may want to do this on the back porch or the garage floor.
2. TRIM TO MAKE THE RIGHT FIT

Since the top of the full-sized cooler is not flat due to the threads for the screw-on lid, you will need to trim the inside white plastic of the top piece (with the handles) that you just cut in half. You will need to trim off 11⁄2 (3.8 cm) inches all the way around. One trick that I used to make a nice straight line with a Sharpie all the way around is to get a small piece of 2 x 4 (since they’re actually 11⁄2 x 31⁄2 inches/3.8 x 8.9 cm) and place it on the inside of the cooler up against the wall. Hold the Sharpie firmly on top of the wood with the point against the inside wall and then use your other hand to rotate the cooler all the way around – this will give you a mark 11⁄2 inches (3.8 cm) all the way around. I used a Dremel tool with a small cutting blade to make the cut since my angle grinder was too big to fit within the cooler. Pull the 11⁄2-inch (3.8-cm) white plastic piece out and discard. You will also need to trim away excess insulating foam. This is necessary so the seam on the outside and inside of the two coolers line up when you put the top on. Check for alignment by placing the 111⁄2-inch (29-cm) top on the full sized cooler – trim if needed to line up seams.
3. PREPARE TO MOUNT THE TOP

So now the top section that you cut in half is ready to be permanently mounted onto the top of the full sized cooler. When I got this far I started to wonder how I was going to mount the top to where it would be very strong and without any leaks. Well, that’s where the bottom section of the cooler that was cut in half comes in handy. Cut about 6 inches (15 cm) down and all the way around that bottom section. Pull the white piece away from the insulation and remove – this piece will seal the inside seam, prevent leaks, and make the mount extremely strong. You can unscrew the spigot and save as a spare if you’d like, then discard the remaining bottom piece.
4. SEAT THE INSIDE SEAM

Place the top onto the full sized cooler and align the handles with each other. The seal on this project actually fit the best when I turned it upside down (I knew this since there were gallon and liter graduation marks on the inside of these coolers, as shown in the picture). Prior to using any silicone sealant, experiment with yours to see which way makes the most flush seal. This seal is a very tight fit so I had to squeeze the sides together, lower it down and then release it. It may bow up on one side but just push it smooth – it will go all the way around smoothly. After you find the best orientation, remove the seal and then place a small Sharpie mark 3 inches (7.5 cm) above the inside seam. Do a second mark on the opposite side. These are the marks that you will match the top of the seal to, that way you will have 3 inches (7.5 cm) of seal above and below the seam. I ran a bead of sealant directly on the inside seam, then applied sealant all the way around the seal. Spread the sealant out to cover all dry areas. I also put a thin layer of sealant on the inside of the cooler where the seal will go. Now squeeze the sides of the seal together and lower it down to the marks. Release the seal, wipe off your hands and then smooth out the seal. I put a final bead of sealant around top and bottom edges of the seal. Allow to dry.
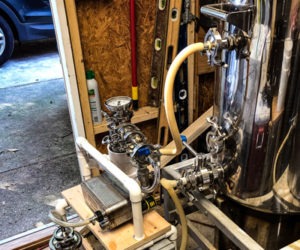
5. DRILL HOLES AND MOUNT HARDWARE

Using a power drill and a 7⁄8-inch wood boring bit, drill a hole through the cooler about 5٣⁄٤ inches (14.5 cm) below the lid and equidistant between the handles. Take into account the shank spacer so that it won’t lie over any ridges. Push the shank through the hole and tighten the locking nut. Now on the backside do the same for the bulkhead adapter except use a ١⁄٢-inch wood boring bit. I purchased a keg post adapter that screwed onto the bulkhead fitting. Then I removed a gas keg post off one of my spare kegs and screwed it onto the adapter. Now I have a quick connect for my CO2. Use 1⁄4-inch female flare to the inside bulkhead adapter for tubing up to your gas quick connect for the keg. Push one end of 6-foot (1.8 m) beer line tubing onto the end of the 90-degree shank elbow and add a quick connect to the other end for the outlet from the keg. Screw on your faucet and handle.
6. FINAL PRODUCT

What I ended up with is a portable, durable, lightweight, and well-insulated cooler tall enough to house a Corny keg. When I travel with this setup I take off the faucet and keep the quick connects disconnected. When I arrive at my destination I will put on the faucet, connect my CO2 to the outside of the cooler, then put on the quick connects to the keg. If you are transporting in the bed of a truck then I would use a small bungee cord over the top lid – once the lid loosens it is easy to unscrew and may blow off. As a note of caution, although the seal is extremely strong, I would use the lower handles when carrying a full keg.