Building a Weldless Boil Kettle or Mash Tun

Every week I get asked; “How do I modify a Sanke keg for use as a boil kettle, mash tun or hot liquor tank?” We tackled this question in 2002, but answered the question with welding. Since most of you do not have welders we decided to create a weldless kettle conversion. We also insisted that it require only common and widely used hand tools.
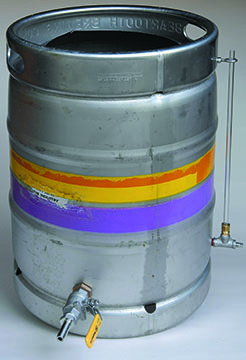
Obviously the first thing is to obtain a Sanke keg — legally. I bought our keg from a local microbrewery, it had frozen and split. Having a keg open solves a potentially dangerous problem. Normally a spring-loaded ball retains pressure in the keg; you need to release the pressure by pushing down on the metal ball. There is also a keg spear to be removed. Inside, you can see a thin internal snap ring: pry it out using a small screwdriver. Residual pressure can drive that metal tube upwards with strong force. It is crucial, for safety sake, to release pressure before prying the retaining ring loose. It’s simpler to leave the spear intact and remove the entire top, as I did. Removing a portion of the keg’s top begins with a lid, one you’ll use to retain heat as the boil starts, and to cover the vessel once the boil is over, or during the mash. Aluminum lids are available at any kitchen supply store — mine came from my kitchen.
Trace the lid onto a piece of cardboard. Draw a second circle with about 1/8” smaller radius on the same center and cut it out. (The radius will depend on the size of the lip of the lid.) Cut the cardboard template to this smaller diameter. Then cut out the template’s center so it can be laid atop the keg top. Tape the template to the surface as perfectly centered as you can. Then mark the keg lid with a marker. Now the fun begins — AFTER donning safety goggles and hearing protection!
Tool List: approximate prices
High speed rotary grinder, or small angle grinder, or reciprocating saw. Rental $20.00
Grinder discs or saw blades. $10
Hand drill motor and 1/8”–7/8” drill bits or step drill bit. $2-75
Cardboard, tape, ruler, scissors, marker. $2
Eye and hearing protection, gloves.
Round file, wet-or-dry sandpaper 120 and 240. $3-8

Parts List: prices approximate
Weld-B-Gone deluxe with 1/2” stainless barb $40
Bazooka T $20
Sankey Adapter $8
Weld-B-Gone Thermosight $25
Thermometer (not installed) $35
Sankey keg $30
Cut Up
Tool options for cutting the keg include three hand tools — a high-speed rotary cutter, a 4” angle grinder and a reciprocating saw with different kinds of blades.
I cut the first two inches with a rotary cutter. This common tool works more rapidly than expected. Due to the low weight of the tool, and delicacy of its cutoff discs, you should make a jig to hold the tool at the proper radius. Several pieces of plywood and a clamp or two should make something useful, though not elegant.

Next I tried an angle grinder. With a light touch, it is rather easy to cut the stainless steel sheet metal. But it’s also easy to wander off path. When using either of these grinders, do not try to cut all the way through the metal at once. Rather, stroke a path of at least 4” (100 mm) repeatedly until the metal is cut through. Why? The cutting discs are not flexible and the arc of the circle is too tight—the disc will bind and shatter. Heavy gloves are a good idea — but eye and ear protection is mandatory!
My brew-buddy told me that a reciprocating saw was also a strong cutting method. I rented one and purchased 24-tooth metal cutting blades and some carbide-edged blades. This tool proved the easiest to use. The grit edged blade cuts cleanly, as does the 24-tooth blade. The grit-edged blade is a bit wider and tends to bind, but lasts longer. One carbide bit or three metal cutting blades should get the keg cut. Note: If you don’t have an opening into the keg, drill a hole or cut a slit cut with a grinder. Unfortunately it’s darn hard to drill that hole — See “The Hole Story” below.
Once the keg is cut, check that your lid will fit. It’s better to be a bit small than have the lid fall in!
Assuming your lid fits perfectly, smooth the rough edges. Your fingers, wrists, and arms will be appreciative. I used the grinder, a round file, and sandpaper to progressively smooth the edges. Need a sanding drum for final polish? Wrap some 240 grit wet/dry sandpaper around a cylinder; I used 3” PVC pipe.

The Hole Story
With the lid accounted for, you’re ready to lay out the weldless fittings you’ve purchased from your local homebrew store. I used a Bazooka T and Sanke adapter, Weld-B-Gone and Weld-B-Gone Thermosight from Zymico. They’re sold by many homebrew stores, as are similar fittings. The stainless steel bulkhead fitting features a high temperature o-ring and exterior lock nut that is relieved to hold the o-ring (the second o-ring is a spare.) This kit’s stainless close nipple required a 7/8” hole in the vessel.
Before drilling any holes you need to know where it belongs — guessing won’t suffice. Assemble your siphon and bulkhead fitting plus any trub filter/lauter manifold you may choose. The siphon tube should be level or pointed downwards. I taped a torpedo level to the assembled siphon and manifold, placed it into the vessel and marked where it belonged. Then I taped a small ruler with its origin at the welded chine where the exterior support ring meets the cylindrical keg body (kegs are “beer cans” with welded-on
supports top and bottom.) I transferred that measurement (15/8” for my setup) to the exterior. This marks the center of the hole.
I then put a pointed grinding stone into the high-speed grinder and produced a pilot “dent.” This enabled a 1/8” drill bit to penetrate the stainless steel. Then I used a succession of step-drills to enlarge the hole to 3/4.” Lacking step drills, a succession of drill bits is equally effective, as is a small grinder or round files. I didn’t have a 7/8” bit, so I enlarged the hole from 3/4” with the high-speed grinder. After cleaning, everything was installed following manufacturer’s directions.
 That could be the end of conversion, but I chose to add a sight glass and thermometer. It’s the exact same procedure, measure, drill and install. What I’ve learned is this; converting a Sanke into a boil kettle/mash tun/hot liquor tank is not difficult, other than getting pilot holes drilled. Using common hand tools it should take a couple of hours before you’re ready to clean and sanitize your completed new vessel. Heck, you could probably brew the same afternoon.