Outdoor Ventilation Fan
Adequate and dependable ventilation is an essential part of an indoor brewery. Installing a ventilation system that takes the least amount of space, has quiet operation, and can be activated with the flip of a switch requires a manageable amount of planning and the proper materials. Any kind of operation requiring thousands of watts of power or tens of thousands BTUs of heat will need considerable ventilation to prevent moisture buildup. Industrial units used in professional kitchens are large and expensive. Residential under-the-cabinet units have tiny scroll type blowers that have trouble moving enough air to rid the brewery of the heat and steam created when doing larger batches. Snail-type blowers generally provide enough airflow but require considerable space. Industrial-type in-line blowers are a bit more compact and are easier to connect to round ductwork. However, the downside is they generate lots of noise because of the 3,600 rpm motor driving them. The sound is similar to a shop vac or a small jet engine. That is where this project comes into play.
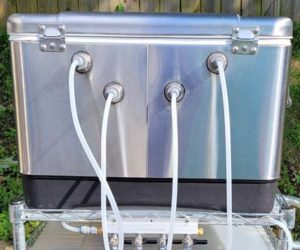
By locating my fan unit outside, this design saves space in my brewery, dampens the sound tremendously, and is aesthetically pleasing from outside. The material and the design have weathered storms with 70+ mph winds, heavy rain, and freezing temperatures. The 150 lbs. (68 kg) of concrete keep the box from blowing away in high winds. The batt insulation performs about 1⁄3 of the sound dampening while the divider greatly reduces the noise. There was a risk of choosing batt insulation due to moisture buildup, but that is not an issue because of the velocity of the air moving through the box, and I let the fan run for about an hour after the boil. This extra run time dries out the ducts, hood, and the insulation inside the box. It’s been well over a year with numerous batches and inside the box still smells like fresh cut wood.
Your ventilation requirements may vary depending on your brew house size, hood proximity, and power method. Refer to John Blichmann’s article here to determine what size works for you.
Materials
Vortex VTX1000 Power Fan (10-inch/25-cm duct, 750+ CFM)
12 x 12-inch (30 x 30-cm) Damper, Lloyd Industries
10-inch (25-cm) 90-degree round adjustable elbow duct
10-inch (25-cm) airtight duct collar
10-inch (25-cm) round start collar
Sheet metal screws #8 x 1⁄2
3-inch (7.5-cm) Gorilla Tape
(2) 4 x 8 treated plywood, 1⁄2-inch
(2) 2 x 2 treated lumber, 8-foot
(2) 2 x 4 treated stud, 8-foot
Seam sealant
Batt insulation
Deck screws 11⁄2-inch
Steel barn siding
Corner trim and J-Trim
1-inch pole barn screws
(2) door hinges (weather resistant)
Weather stripping
#4 x .047 wire mesh
120V 15A light switch, box, and cover
Nema 5-15 120V outlet, box, and cover
2-14 Romex outdoor wire
Concrete screws (Tapcon) #10 x 3-inch
(4) concrete blocks and small stone
Tools
Angle grinder and steel cut-off wheel
Drill and wood drill bits
Hammer drill, masonry bits
Jig saw and wood blades
Wire Cutters