Portable Draft System
 Adding a kegging system to your homebrew setup is often a welcome addition (and relief) to brewers. You can save time that would normally be spent bottling, precisely control and adjust carbonation levels, and you do not need to wait on the natural carbonation process.
The problem arises when you want to take your finely crafted draft beer on the road. You need to either use a counter-pressure filler to bottle from the kegs (see the previous project in this section), or you can simply fill a growler from the tap and then consume the beer quickly (the carbonation is hard to maintain for more than a few hours). While the counter-pressure filler is a great tool, it deprives you and those who consume your beer of the true draft experience and it requires the use (and subsequent cleaning) of glass bottles.
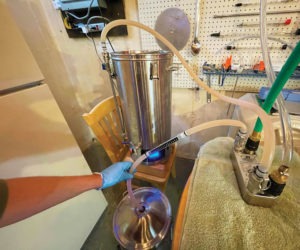
Instead of dealing with bottle fillers and irksome bottling tasks, a more straightforward approach to transporting draft beer is to simply make a miniature version of your kegerator and take it with you to picnics, camping trips, parties, etc.
I stayed with a single-keg setup, as this is simpler and less costly than a two-keg setup. The same principles apply, so just scale up if you want to go with multiple kegs.
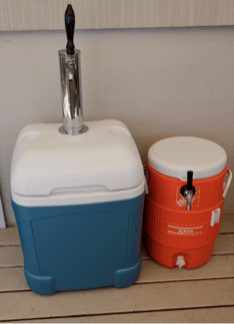
Also, I built this project in two different sizes — the first with a 70-qt (66-L) rolling picnic cooler, and the second with a 5-gallon (19-L) round cooler. The larger version includes a draft tower. Any big temperature differential between dispensing hardware and beer will cause foaming, and this can happen with this cooler build, especially if the tower is warm. This is not a huge deal if you are using under-carbonated beer. However, if you’re in a hot environment, the tower will heat up as it’s not in contact with the ice in the cooler and all the metal that the beer comes in contact with will change the beer temperature, causing the CO2 to come out of solution until the shank or faucet cools down. Therefore, it might take pouring up to two or three pints to settle down. Just keep that in mind.
Parts and Tools
- 3-gallon (11-L) keg
- Igloo Ice Cube Maxcold 70-qt. (66-L) roller picnic cooler or 5-gallon (19-L) round Gott or Igloo cooler
- 5-lb CO2 cylinder, or one Genuine Innovations CO2 charger
- Dispensing hardware (For the big cooler, I used a Perlick single-faucet draft tower. I used a 3-inch faucet shank from Northern Brewer and a cheap faucet for the round cooler. You can choose other hardware based on your needs and taste).
- 10 feet (3 m) food-safe beverage tubing
- Keg lube
- Power drill with a hole saw bit and a spade bit