Rebuild a Keg
 Used Cornelius style kegs are widely available at reasonable prices. A considerable amount of money can be saved if you buy kegs that have not been worked on in any way and rebuild them yourself. This keg reconditioning process requires nothing but a little time, a limited amount of mechanical skills and most of the tools you need should be in every kegger’s tool kit.
For those who either do not have the time, or do not want to go to the trouble, new Corny kegs are available. New kegs usually cost more than $100, but they are shiny, dent-free and their rubber gaskets and O-rings don’t carry any off flavors or odors. Also, their poppet valves will not need to be replaced for some time. Reconditioned used kegs are also available, with typical prices starting around $35. When comparing prices between vendors, be sure to check on what has been done to the keg to recondition it. At a bare minimum, kegs should be pressure tested. Some sellers will also replace the O-rings and clean the keg. Others will additionally disassemble the keg, clean the dip tube and inspect and replace faulty poppet valves. In practical use, a fully reconditioned keg will work as well as a brand new one.
Parts and Tools
- 5-gallon (19-L) used Cornelius keg
- Keg rebuilding kit that includes O-ring gaskets for Cornelius kegs
- 3⁄8-inch d rive ratchet wrench either an 11⁄16-inch or 7⁄8-inch- deep socket a small jeweler’s type screwdriver
- Pressure gauge
- Powdered Brewery Wash (PBW) and/or Bar Keeper’s Friend cleanser
- Small (about 1-inch) paintbrush, or a spray bottle
- Food grade lubricant
- Soft nylon cleaning pads or sponges (anything that will not scratch stainless steel)
- Star San, iodophor or similar sanitizer (no bleach)
1: Clean and disassemble the keg
Before you start, clean the exterior of the keg thoroughly with either Powdered Brewery Wash or Barkeeper’s Friend with a scrub pad that will not scratch. Before starting disassembly, relieve any pressure in the keg by either lifting the relief valve or depressing the poppet valve on the top of the post with a small tool that will not damage the poppet.
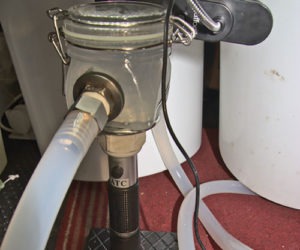
Once the pressure is relieved, remove the keg cover by lifting the latching lever then lowering the cover into the opening and turning it slightly to align it. Remove and discard the lid O-ring. You will need a 3⁄8-inch drive ratchet wrench and either an 11⁄16-inch or 7⁄8-inch-deep socket to remove the posts. Some posts are eight sided and others twelve sided, so I suggest buying twelve point sockets in both sizes. Unless you are certain what type of socket you need for your keg, it is a good idea to bring the posts (or the whole keg) with you when you go to the hardware store. On one side of each of the handles on top of the keg on the “gas in” side, it will have “in” markings. Take a look at that post so you are sure to install it in the right place during re-assembly as there is a small difference in size.
 2: Reassemble
 2: Reassemble
Once the posts have been removed, pry the O-rings high enough to be able to slip them off the posts and discard.
Next, remove the dip tubes. You will notice the gas-in dip tube is short, and the liquid-out is long. The liquid-out tube is either straight or curved. Stick your hand through the opening and push up on each tube. Once you have both tubes removed slip the O-rings off them and discard.
Next clean the inside of the keg with your cleanser and clean the cover, posts and dip tube. Then put the cover, posts and dip tubes in the keg. Turn the keg upside down and let it drain and dry. Now you will spread a small film of food-grade lubricant on each O-ring. First, lubricate and install the dip tube O-rings and insert the dip tubes in the proper holes. Next, install the posts and tighten. Lubricate the post O-rings, and install them in the post grooves. Lubricate the large O-ring and fit it onto the lid. Install the lid and latch it.
3: Test for Pressure
Connect the “gas in” disconnect to the “gas in” port and pressurize the keg to 12 PSI. Add a couple of teaspoons of dishwashing detergent to some tap water. Use a small (about 1-inch) paintbrush, or a spray bottle, and liberally apply the detergent mixture to all of the gas fittings, connections and around the keg cover. If there are any leaks, you will see bubbles. If leaks are found, check the connections to make sure they are tight. When there are no leaks, pressurize the keg again to 12 PSI, and let it sit for a day. Use a pressure gauge attached to the “gas in” connector to monitor the pressure. If the keg maintained pressure, you are ready to sanitize it (with a non-chlorine-based sanitizer. Chlorine can cause pitting on stainless steel).