Build A Tap Handle: Projects
Most of the homebrewers I know are very handy. They’re tinkerers. They like to build, fix and improve things. I enjoy homebrewing very much, but I have to admit that I’m not very handy. So it is with great irony that I find myself writing an article about how to build something.
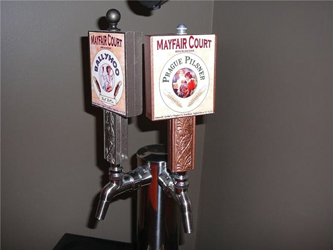
But even though I may not be handy, I also like the creativity that homebrewing allows. I like to formulate recipes, come up with catchy names for my beers (it helps me keep the various beers straight in my head) and create labels for my beers too. I don’t really bottle much anymore, so I had a dilemma: where am I going to put a label? On a tap handle of course!
There are already many tap handles available for homebrewers to buy that will incorporate a label, but they seemed pricey to me, and often don’t look terribly attractive. Therefore, I set out to find a way for an unhandy person to make some homemade tap handles.
Rather than draw out the plans and then amass the materials for the project, the design for these handles came to me just from browsing around my local hardware store. I knew that I wanted to make some handles, but I wasn’t sure exactly what I would need until I got there. Because they ended up being so simple to make, I think it’s possible that these handles can actually be made of anything that you have laying around the house or anything that you happen to find at your local hardware or building supply store. Be creative and make modifications to suit your own home bar.
I had this particular design in mind because I wanted to showcase my labels, which are rectangular. I found some oval-shaped pieces of wood that looked very cool, but the design would have made it tricky to fasten to a stem and it didn’t look like I would be able to place a label on each side. If you have a different shaped label, choose your materials accordingly. I’ve seen homebrewers use all kinds of things for tap handles. One of my local homebrewers used an old Microsoft mouse. Last year my son’s baseball team won a tournament. The kids and coaches both got trophies so there were two in our house. The trophy featured a nice, 7-inch (18 cm) wooden baseball bat. My son’s trophy was proudly displayed on a shelf in our basement, but mine got taken apart and used as a tap handle. Nothing like a Home Run Red Ale, baby!
The result for these handles came out better than I originally envisioned. They are very sturdy due to a wooden dowel inside the handle (as well as some sturdy glue) and they do not flex at all when I pull on a tap to pour a beer. Now, whenever someone comes down to my basement bar, they’ll know exactly what’s on tap!
Parts and Equipment List (to make eight 7-inch/18 cm-tall tap handles)
• 48 or more inches (122 cm) of 3.5-inch wide, 0.5-inch thick decorative wood trim
• 24 or more inches (61 cm) of 0.5-inch (1.25 cm) thick plain trim
• 64 inches (163 cm) of 3.5-inch (9 cm) wide, 0.5-inch thick plain wooden planks (for beer label mounting)
• 8 3/8-inch-16 faucet adapters
• 8 small drawer pulls (0.5-inch/1.25 cm across)
• Wooden dowels
• Wood glue
• Liquid Nails adhesive
• Mitre box
• Saw
• Drill with 15/64-inch drill bit
• Vice
• Metal snips
• Measuring tape
• Pencil
• Spray mount glue
• Spray paint

1. CHOOSE YOUR MATERIALS As I mentioned, before I started this project I took a trip to my local mega-hardware store for inspiration. As I stood in the “decorative trim piece” section, it occurred to me that I needed to make a “stem” piece that would accept the faucet adapter and then I would create a separate, larger piece (the “face”) which would display the label. I thought it would be nice to fashion the whole thing out of a single piece of wood, but this requires skills and tools that I do not possess. I had heard of people using staircase spindles, which I considered. But they are pricey and when the handle was finished, it would look like a staircase spindle. I found some pieces of trim that had a leafy design on them. I immediately concluded that the manufacturer had a hop vine in mind when they made them. You can use any type of decorative design you would like, of course.
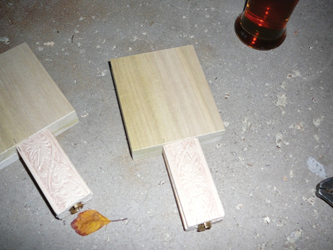
2. PLAN THE DESIGN The shape of the trim allowed me to place the pieces back to back to create a thick stem. The leafy pattern would show on both sides so that I could put a different label on each side of the handle so each handle I made could be used for two different beers. Just the two pieces of decorative trim together wasn’t thick enough to accept the drilled hole for the faucet adapter, so I found another flat trim piece that I could sandwich between the leafy trim pieces to make the whole stem thicker. Next, I found some plain poplar planks that were 3 1⁄2 inches (8.9 cm) wide, 1⁄2-inch (1.27 cm) thick and four feet (1.2 m) long. I cut these pieces in to 4-inch (10 cm) tall pieces to create the “face” of the handle. I envisioned the tap handle with the bottom of the stem drilled out to accept the faucet adapter, the top of the stem drilled out to accept a wooden dowel and the bottom of the face drilled out to accept the other end of the dowel.

3. FIND THE HARDWARE As I walked through the store, I found the kitchen hardware section and looked at the various drawer pulls. I was envisioning using them as a sort of finial that could be fastened to the top of the handle. The hardware came in a dizzying array of shapes and colors and I picked a few that looked good, so choose whatever you find appealing. I also found the faucet adapters in this department. The threads on the adapters are very coarse and there is usually a slot on one end so you can use a screwdriver to drive the adapter into the handle. The faucet adapters are readily available at many hardware stores and many homebrewers have screwed them into sawed-off table legs, antlers, lava rock and so on to serve as impromptu tap handles.

4. MAKE YOUR CUTS On the day I started on the handles, I got everything ready and set up a work area in the garage. I put some music on. I got a beer. It was a nice, sunny Saturday. I don’t have a lot of room above my faucets (there is a TV there), so I knew I wanted the entire handle to be about 7 inches (18 cm) tall. Since the poplar planks I bought were 3 1⁄2 inches (9 cm) wide, I printed out one my labels so it would be about 3 1⁄4 inches (9 cm) wide. If you want a larger label, be sure to get wider planks for the handle faces. Lay the label down on the plank and make a line with a pencil where the plank should be cut. The piece should be about 4 inches (10 cm) from top to bottom. Since the wood (I used poplar) is only 1⁄2-inch (1.27) thick and the stem was thicker, I cut two pieces of poplar and placed them back-to-back and glued them together. You can also use 1-inch-thick pieces. Next, cut the trim pieces into 3-inch (7.6) lengths. Place the pieces with the leaf pattern facing out and place a flat trim piece (which was the same width) between them and glue them together.
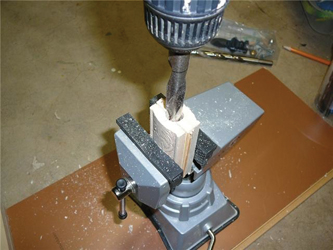
5. DRILL IT When the glue is dry, drill a hole in the bottom of one of the poplar pieces. The hole is drilled to accept the wooden dowel so it is important to make the hole as straight as possible. When I built my taps, this is the step where some skill would have been handy. I placed the poplar face into a vice and carefully drilled the hole and then another one in the top of one of the stems. I fitted the dowel in place and assembled the two pieces. To my surprise, the two pieces fit together very nicely. My cuts were square and the holes for the dowel were straight. Then I placed the stem into my vice so I could drill out the 15⁄64” hole for the faucet adapter. I did this with the trim piece in a vice and me standing over it with a corded drill. I drilled the hole and grabbed one of the adapters. I placed it into the hole and started to turn it. It went in crooked. I took it out and started again. It was a little better but now I saw that my three glued-together trim pieces were starting to break apart. I took a big slug of my beer. I drilled the hole out a little wider and tried again. Success! Have a slightly larger drill bit on hand in case this happens to you.

6. FINISHING TOUCHES I took the handle down to my faucets and tried it out. It wobbled a little so I readjusted the adapter until the handle spun like a top. Then I placed some glue into that hole to keep the adapter where I wanted it. This part takes some practice and the threads of the adapter make it tricky, but once you get one done, it becomes easier. Once you have it working as you would like, take the dowel out, place some glue into both holes and replace the dowel. Put the entire handle together, straighten it and lay it to the side to dry.
The final step is drilling a hole in the top of one of the handles for the “finial.” Choose a drill bit that fits the size of the drawerpulls you choose. Once the hole is drilled, cut the head off the screw with a pair of snips and then place the cut end of the screw into the centered hole. Then screw the finial onto the top.
Finally, I primed all of the handles and then painted them in various colors. When the paint was dry, I glued the finial screws into the holes and attached the hardware.