Make a Mini-Keg and In-Line Aerator: Projects
 When engineers find a solution that is simple, they call it “elegant.” For this month, we offer you some holiday elegance. Not just one, but two easy and insightful projects that serve as a welcome solution to common homebrewing problems.
The Soda-Bottle Mini-Keg
The first project is an answer to a typical homebrewer statement this time of year: “How do I bring my new holiday stout to the Christmas party?” Or, in my case, “How do I enter an Oktoberfest competition with a beer that needs another two weeks of conditioning before it’s carbonated?”
If you just transfer your beer from a keg to a soda bottle, it’s guaranteed to go flat almost instantly. And if you wanted to naturally condition the beer in a two-liter soda bottle, it would take the usual two-plus weeks that it always does. By then you’d be late for the party.
The solution is a mini-keg. One you could fill from a fermenter or regular keg, pressurize with CO2 and dispense like soda by simply removing the screw-on cap.
The first step is purchasing stainless-steel tire valves at any large auto parts store. It’s crucial that you buy stainless steel and not rubber. Tire valves consist of valve stem, inner valve core, securing nut, and upper and lower rubber gaskets. You might want to substitute O-rings because the rubber typically used in tire valve gaskets is that stinky rubber found under “off flavors” on the beer flavor wheel.

(Here’s where it all starts. An exploded view of a valve, gasket cap, gasket or O-ring, washer and nut.)
Drill a 1/8-inch pilot hole in the center of the soda bottle cap, then increasingly larger holes. In our photo, you’ll see that one of our holes is imperfectly centered. Can you guess which one did not have a pilot hole?
Unless you have very large drills you’ll have to file the hole to size. A coarse file is best for plastic. If you chose to use the supplied rubber gasket, the hole will be even larger. Be patient and get a good snug fit.
Disassemble the valve, leaving the core intact. Slip the gasket or O-ring over the stem, insert into the cap, put another gasket or O-ring on top, then the washer and nut. Tighten it and you’re done.
To pressurize the mini-keg you’ll need a tire chuck attached to your keg’s CO2 line. A tire chuck is the attachment on the end of an airhose that attaches to the valve stem of a tire. Instead of filling a tire, you will pressurize your mini-keg with CO2 just like you would pressurize a regular keg. Chucks are available at any auto parts store.
If you have a keg handy, simply remove the connection at the CO2 “in” side of your keg and replace it with a tire chuck. If you don’t keg, you will need a CO2 cylinder, pressure regulator, regulator connector, hose and a tire chuck. (For complete pressurizing instructions see “Pressurize Your PET” on page 59.)
A commercial version called “The Carbonater” is available in homebrew catalogs and shops. Price is $10 to $13 and it uses a male ball lock valve coupling for filling, so tire tools are not necessary.
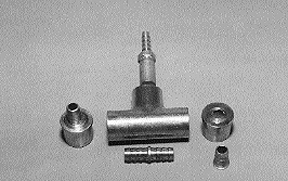
(Bits and pieces. The copper fitting large enough to hold an air stone, double barbed connectors and plugs.)
In-line Aeration System
Since becoming a homebrewer, I’ve frequently managed to arrive at the Blue Coyote Brewing Company or Lansing Brewing Company just in time to shovel wet grain from the mash tun. I usually get a free beer out of it, not to mention yeast, good brewing tips and sore shoulders. The real reason I volunteer is to get a sense of how the real brewers go about their business — how they mash, sparge, whirlpool and cool their wort.
The question of cooling has always intrigued me the most. Once their mash is finished, the sparging is complete, the wort has beenboiled and then whirlpooled, it’s ready to transfer to a vertical fermenter and receive its yeast. Or is it? How do commercial microbrewers solve the problem of wort aeration?
As the freshly cooled wort exits the heat exchanger it goes through a commercial aeration system. It’s basically a sight-glass and T-fitting, supplied with pure oxygen or filtered air. Wort goes in one side and comes out another. Between the base of the T, a sintered stainless steel air stone dispenses oxygen under pressure. Chilled wort enters and bubbling bright oxygenated wort exits.
At home I chill my wort in the kettle with an immersion chiller. (Now that we’ve built a counterflow chiller I use that.) Then I sanitize an aquarium stone or other oxygenating device and connect it to an aquarium pump or pure oxygen and bubble the air or oxygen through a carboy filled with wort. I wondered why couldn’t I do as commercial brewers do and oxygenate as I moved the chilled wort into the fermenter. Why couldn’t I build my own “commercial” in-line wort
aeration system?
There is one good reason: the potential for contamination. Any thingamabob or doohickey that has lots of fittings, angles, exits and tubes has dreaded bacteria-harboring crevices. So it’s crucial that any such device is made of materials that can be sanitized by boiling or heating to 250° F, plus liquid sanitizers. That means materials made from metal, not plastic.
The first requirement is getting wort in and out of whatever housing contained the air stone. This involves some barbed fittings plus another port of entry for the air or oxygen and the air stone, which implies a T-fitting that is large enough to hold the air stone. A 3/4-inch-copper T would do just fine.
I purchased a copper T and a double barbed connector and three plugs at Home Depot. The barbed connector was perfect, just twice the size needed. I sawed it in half and filed the rough edges flat. Then I drilled a 1/4-inch hole in two plugs and silver brazed the halved fitting to the plug.
There are several alternatives. You could purchase threaded barbed fittings and drill larger holes, then thread the plugs to size. Or you can drill larger holes and secure a nut from beneath the plug.
Now it’s time for the airstone. I’ve seen several and chose one from St. Patrick’s of Texas in Austin (www.stpats.com; 512-989-9727). It is inexpensive ($9.75) and threaded internally. The internal threading allows for more assembly options.
For the air stone port, I used another plug and drilled a hole to fit the correct size threaded barbed fitting. Then I silver brazed it into the plug. Silver solder will also work just as well.
The next step involved putting both plugs into the T and soldering them in. The air stone port requires a different solution. I wanted to be sure that I could remove it and disassemble all the parts for easy inspection and cleaning.
Instead of soldering or brazing, I used a silicone adhesive sealant. Some of these are heat rated to 450° F and can be boiled or baked without fear. They are not NSF rated, but are USDA authorized “for use in federally inspected meat and poultry plants,” according to a materials safety data sheet from Permatex. Those are Permatex 16B/81158 Black, 82517 White, or 66B/80636 Clear in 3-ounce tubes. I used black.

(The moment of truth. The completed in-line oxygenation system, ready for sanitizing and testing.)
I screwed the sintered metal air stone onto the fitting and gave it a test. After I hooked it up to my trusty aquarium pump, very little happened — no bubbles. As I was informed at St. Patrick’s, it takes about 4 pounds per square inch (psi) of pressure to push through a sintered stainless steel air stone. It was obvious that I wasn’t getting that kind of pressure from my inexpensive pump, so I hooked it up to my regulated oxygen line and voila — tiny bubbles.
The air stone worked well and I was eager to test it out. The hookup was simple. I cut a short piece of tubing to connect the the aeration device to the output of the counterflow wort chiller. It would work the same
if you were connecting it to the output of your kettle after using an immersion chiller.
Before I used my new gadget, I sanitized it in 170° F water for ten minutes, then resanitized it with Star San and connected the inlet from the kettle/counterflow chiller and outlet tube to the fermenter.
With everything in place, I connected the oxygen/air inlet to pure oxygen at 4 to 8 psi and started the wort flow. It worked perfectly.
In retrospect, I might have looked for a slightly different solution — a way to assemble the air stone port with threaded fasteners. Since I used adhesive, I still have the option to do this. And I’ll look for a way to use those cheap throw-away plastic air stones.
Maybe by using a soldered-in barb fitting, a bit of plastic tubing and the plastic air stone. The cheaper stones are more permeable and don’t require a more expensive pump.
Another option is to use an in-line filter between the aquarium pump and the stone. You can buy a stainless steel stone for $29.90 and membrane filter for $8.90 from Williams Brewing Supply in California (800-759-6025; www.williamsbrewing.com) and use it with an inexpensive aquarium pump. There’s always a better way.