Using Homebrew Pumps
There comes a time in every homebrewer’s life when you ask yourself, “Is there an easier way to transfer liquid than manhandling some 60 lbs. (27 kg) or more of wort or beer?” In other words, “Should I invest in a pump?” The answer to that question is that if you are asking the question then you probably should! If you want to install a pump, you do not have to be the type of person who can do your own stainless steel welding.
But before you go pump shopping, first think about what exactly you want your pump to do. For example, a pump that is fine for transferring beer from a carboy to a keg may well have different characteristics from one that is used for moving hot wort from a mash tun to a boiling kettle. What’s more, you will see that there are a variety of brewing operations in which a pump may be useful, so that versatility may play an important part in your choice of pump. So with that in mind, let’s explore the types of pumps available to homebrewers and their pros and cons.
Pump types
There is a great variety of pumps out there, many of them designed for particular functions and most of them too expensive or otherwise unsuitable for our purposes. There are three main types you might want to consider: centrifugal, diaphragm and peristaltic pumps, and the table on page 72 lists some of their more important properties. Just be careful as I have had to make some assumptions to keep things as simple as possible, so this is really an overview and you would need to check carefully with any supplier as to the suitability of a particular pump. Some of the questions you might have to ask should become obvious from the text on the table below.

Diaphragm pumps
I’ll start with diaphragm pumps, which operate very simply by flexing a diaphragm so that pressure changes occur inside the pump chamber, forcing the liquid that is present out and then drawing more liquid into the chamber. It is a form of positive displacement pump, which means it does not require priming; in other words you do not have to fill the chamber with liquid before the motor is switched on. These can work against a head — that is, pump the liquid upward as far as 9 feet (2.7 m), and it can accurately deliver a variety of liquids of different viscosity and chemical composition. The diaphragm can be made of a variety of flexible materials including food-grade materials. I have had some experience with these for precise dosing of highly viscous polymer solutions, at which they were very efficient. I do not see them as very suitable for the homebrewer, largely because of the limitation on operating temperature. They are only suitable for transferring beer from, say, a carboy to a keg, and you would need a different one for transferring hot wort, which is hardly economical, and something capable of doing both operations would be better.
Peristaltic pumps
The first time I saw one of these I was astonished at its simplicity. A length of tubing sits inside a housing in which a mechanically-driven shaft causes a set of rollers to compress the tubing and to force the liquid along it. The only part of the pump that comes into contact with the liquid is the tubing, which makes for easy cleaning after use and means that there can be no contamination arising from the pump’s construction materials. These too are positive displacement pumps and so can deliver accurate doses of a wide variety of materials and can lift the liquid against a head of as much as 30 feet (9 m). Peristaltic pumps can handle any kind of liquid, no matter how viscous or corrosive, so long as the right type of tubing is used. Tubing suited to food-grade uses is readily available from the pump supplier. One of the beauties of this kind of pump is that the only thing that can really go wrong is if the tube itself should split — an event that would be unlikely in a homebrewing environment where the pump will not be running for extended periods.
Peristaltic pumps are used in some commercial breweries, although usually only for dosing solutions of things like finings or water treatment chemicals, rather than for moving bulk quantities of beer or wort. I have not seen them offered by homebrew suppliers, but I do not see any reason why they could not be used for moving hot or cold wort or beer in a homebrew set-up, although I have not actually used one in this way.
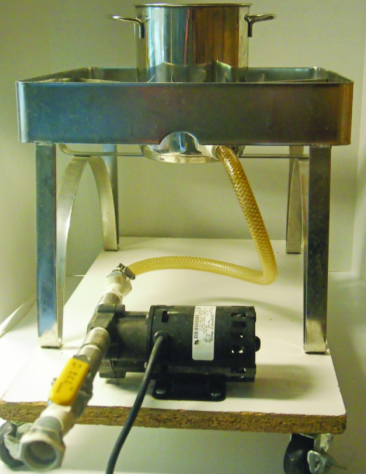
Centrifugal pumps
These are widely used in commercial brewing applications and are available from homebrew suppliers. Essentially the liquid enters through one port of a chamber and is whizzed round by a rotating impeller to the exit port. Therefore the liquid comes into contact with the material of the pump housing and of the impeller, as well as any seal around the drive shaft where it enters the housing. That is not a problem provided all such materials are of food grade. Stainless steel is generally the material of choice for the professionals, which can materially add to the cost of the pump. The type that has become popular with both homebrewers and their suppliers has the chamber constructed of food grade polysulfone, and uses a polysulfone-coated magnetic impeller, which is driven externally, so that there are no seals to be concerned about.
These pumps come in different sizes. Different suppliers seem to give them different numbers, but the most common version is often designated “815,” has a maximum flow rate of 7 gpm at zero head and can lift the liquid up to 18 feet (5.5 m). I have used a smaller version — “809” — for some years; this has a max flow of 6.0 gpm and will pump against a head of up to 12 ft. (3.7 m). My pump works very well in the way in which I use it (read on), but the larger one is more suitable if you are going to multi-task with it.
As I said earlier, these pumps are not self-priming, but that is not really a problem. All you have to do is to mount it below the outlet of the vessel from which you wish to remove liquid; that way the liquid will simply run down into the pump chamber and fill it, so that the pump is primed and ready to go. Also, these pumps do not have any flow controls, so you will get the flow the head permits and have no precise adjustment of flow as with a peristaltic pump. In fact, you are unlikely to need precise flow control for most brewing applications, and you can control it approximately (from the maximum permitted by the head) by throttling a ball valve on the outlet of the pump. For the record, at BrüRm@BAR in New Haven, Connecticut, we have an electrical controller on our centrifugal wort transfer pump, and can control flow quite accurately. However, that would add considerably to the cost and is not really necessary in a homebrew setup.
Installing a centrifugal pump:
1. You are working in a wet area, so you must use a GFCI outlet (a ground fault circuit interrupter circuit breaker) so that there is no risk of electric shock.
2. Mount the pump securely (the base of a March pump can be screwed to a suitable surface).
3. Use appropriate fittings so that the tubing can be firmly fixed on both sides of the pump. March pumps come with ½-inch pipe thread outlet and inlet, so you should use ½-inch ID (inner diameter) tubing.
4. Tubing must be food grade and made of thermoplastic material for pumping hot liquids.
5. You can install hose barbs on the pump inlet and outlet for fitting the tubing. I prefer polysulfone quick connectors, which just push into place, so that the hose can easily be removed for cleaning and drying. Use silicone lubricant on the O-rings of the connectors to prevent breakage or leaks.
6. The ball valve should be installed directly on the pump outlet (which will be marked by an arrow in the direction of flow) with a hose fitting on the other side. This is not just a flow controller, it is also ensures that you do not get liquid siphoning through the pump and onto the floor!
7. Make sure that all appropriate valves are open before switching on the pump!
Uses of pumps
The choice is yours. Use it to pump wort through a counterflow chiller, or to pump ice water through an immersion chiller. Use it to pump sparge water onto the grain bed or to pump hot wort into the kettle. Use it to pump cooled wort to the fermenter. Use it when racking beer to transfer the siphoned wort back up to a fresh carboy at the same level as the original. Even use it to transfer racked beer to a keg that is already sitting in your refrigerator or beer freezer. For the last three applications you will have to sanitize both pump and tubing using hot water with a trace of sanitizer. A pump is also indispensable in a RIMS set-up. If you use your pump in a variety of applications the polysulfone quick disconnects makes changing connections very simple.
I use my March centrifugal pump in wort re-cycling, which I like to do as it clarifies the wort and settles the grain bed. It also helps to ensure good extraction of wort from the grains. About 15–20 minutes before the end of the mash I run the wort off to a 1-gallon (3.8-L) back then pump it back over the top of the grain bed. The back is actually a stainless steel vessel with an inlet at the top and outlet at the bottom (both fitted with quick disconnects); during re-cycle I just collect enough wort to cover the outlet before pumping it back over the bed, using a low flow rate so that the bed surface is not disturbed. When mashing is done I transfer the outlet tube to my boil kettle, commence wort run off into the back (turning on sparge water as appropriate), switching on the pump to empty the back when it is full. When all the wort has been transferred to the boiler, I remove the outlet tube from the boiler, place it in a bucket and clean the back, pump and tubing by pumping through a gallon or two (3.7-7.5 liters) of very hot water.