Make a Yeast Starter
Brewers agree that it takes quality water, malt, and hops to make quality beer. Though this is true, these elements are ultimately transformed by the final ingredient: yeast. Our role as brewers is to provide the brewers yeast with the best environment possible to live, grow and make good beer.
Yeast plays an essential role in brewing beer and has a major impact on the overall flavor and quality of the finished product. For example, we have all heard interesting accounts of how homebrew club members split a wort and fermented each batch with different yeasts. Although each batch began with the same wort, each yeast will produce a unique and different beer.
Not only will different yeasts yield different beers from the same starting wort, but how well each variety of yeast works its magic also affects the outcome. Another interesting experiment might be to split one wort into several batches and pitch each of them with the same yeast that differs only in population, vigor, and purity. I believe the differences between resulting batches would be both interesting and surprising.
Situations in which the brewer put yeast at some particular disadvantage may not result in failure, but the quality of each batch would illustrate how important yeast management can be. Our goal is not simply to make beer, but to make the highest quality beer possible, and the goal in managing yeast for brewing is to produce a sufficient quantity of yeast that is full of life and ready to convert wort to beer. One of the best ways to provide a sufficient quantity of superior yeast is building a yeast starter from a pure culture.

Beginning with lab-cultured yeast provides a high probability that the strain is indeed pure. However, a pure yeast culture can only be as pure as your approach to handling it. Sanitation is essential throughout the process of creating a starter batch of yeast and cannot be over emphasized.
Commercial brewers usually aim to pitch around 1 million yeast cells per milliliter of wort per degree Plato of wort. That would amount to roughly 260 billion cells in a typical 5-gallon (19-L) batch of homebrewed ale, although you can still get good fermentation characteristics from most ale strains when pitching at about half this rate. For lagers, you should pitch 1.5 to 2 times as many yeast cells as you would for an ale.
Wyeast XL smack packs or vials of White Labs yeast contain 70 billion to 150 billion healthy yeast cells when they are packaged. After a container of yeast leaves the lab, however, its journey could be a perilous one. Factors like temperature, transportation and storage time all impact the viability of what eventually arrives in your hands. By the time you are ready to pitch a smack pack or vial of yeast into your carefully crafted wort, can you be sure it has a sufficient quantity of live yeast as intended by the manufacturer?
To achieve their target cell count, commercial breweries usually harvest and repitch yeast from batch to batch. Most homebrewers, however, don’t brew batch after batch with the same yeast strain and so repitching is not as common at home (although it’s certainly not unheard of). In order to reach our cell count targets, making a yeast starter is a good option.
Before building your microscopic yeast army, one might ask if you can have too many yeast cells in a batch of brew. While it is possible to have too much, overpitching a 5-gallon (19-L) batch of beer would require at least 400 billion cells. If you overpitch, you run the risk of producing a beer with a “rubbery” or excessively yeasty flavor, although the flavor differences may be small until really excessive yeast counts are reached.
Most homebrewers don’t have the equipment needed to count their yeast. (See the December 2003 issue of BYO for how to do this.) Instead, most rely on the fact that a yeast starter of a given size “should” contain a certain amount of yeast cells. For five gallons (19 L) of average-strength ale, a 1–2-qt. (1–2-L) yeast starter should grow an adequate number of cells. For a regular-strength lager of the same batch size, a 3–4-qt. (3–4-L) yeast starter is more appropriate. If you make a stirred yeast starter (see box at left), the size of your starter can be reduced by as much as half. For pitching recommendations more finely-tuned to the details of your beer, see Jamil Zainascheff’s pitching rate calculator at www.mrmalty.com.
Building a starter
Here is the approach I use to build a yeast starter for a standard 5-gallon (19-L) batch of brew. Since it is difficult to know how many viable yeast cells survived the trip from the lab into my hands, I begin by making a starter of 1 pint (~500 mL) that I eventually build up to 1 quart (~1 L).
If you are using yeast in a smack pack, remove the pack from the refrigerator and allow it to reach room temperature. Then, squeeze or smack it to rupture the capsule of yeast inside and release it into the nutrients. Leave it at room temperature to incubate and swell. Allowing the pack to swell provides proof that the yeast in the pack is alive before you go any further. If you are using a vial of yeast, simply let it reach room temperature then gently shake the vial to get the yeast into suspension, so none of it is stuck to the bottom of the vial. Next, we need to get a small batch of wort ready.
If you made a big batch of starter wort in the past and refrigerated some, grab a jar and allow it to come to room temperature. If not, make the appropriate volume of starter wort at a specific gravity of 1.020–1.040. (For every 1 qt./1 L of wort, use approximately 2.5 oz./70 g of dried malt extract.) Bring it back to a gentle boil for 15 minutes, cover and let cool to 75 °F (24 °C). To speed the cooling process, surround the bottom and sides of the pot with cold water. Don’t allow any contamination of your mini-batch of wort as you only want pure yeast culture to grow in it, and nothing else. After the wort has cooled sufficiently, open the pouch or vial of yeast and dump it into a sanitized glass bottle or flask that accommodates at least 1 qt. (1 L). (I use a 1000-L or 2000-mL Erlenmeyer flask.)
Sanitizing your hands and the outside surface of the smack pack or vial with a little alcohol (my brewhouse sanitizer of choice is cheap vodka) before opening the pack or vial and pouring it into your container of wort. Seal the opening of the flask with a sanitized airlock and your yeast starter is ready to grow.
At this stage, the only thing that may be lacking in our little batch of beer is oxygen. An ample supply of oxygen is needed for the yeast to prepare for a life of wort-eating. There should be some oxygen in the wort to help the yeast get started if you accompanied the transfer with splashing. You could also increase the amount of oxygen in the wort by occasionally swirling the container vigorously. Swirling also benefits the starter by keeping the yeast in suspension and in greater contact with the wort. If you have an aquarium pump or oxygen tank you use for aeration, you can also use that to more thoroughly aerate your starter.
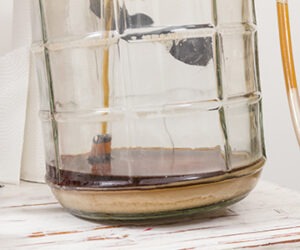
After a day or two (at the most) the yeast in the starter should have multiplied as much as possible in the pint of wort. At this stage, make another pint-batch of sterile wort as before and feed it to the starter. Reattach the airlock, swirl vigorously, and set aside for another day of yeast growth. After the extra day of propagation, there should be a substantial layer of yeast at the bottom of the flask. At this point, the yeast can be swirled back into suspension and the contents of the container pitched into your 5-gallon (19-L) batch of wort.
Note that the rule of thumb for propagating yeast is to increase the volume at each step by no more than tenfold. If I wanted a larger starter, I could have stepped my pint-sized (500 mL) starter all the way up to 5 qts. (~5 L) — enough to pitch to over 10 gallons (38 L) of ale.
If you are making a yeast starter for a beer that you know will put some strain on the yeast — for example a high-gravity or high-adjunct beer — adding some yeast nutrient to your starter may be helpful. Keep in mind that commercial yeast has already been supplied with nutrients and too much yeast nutrient can overstimulate the yeast. Check the manufacturers recommended guidelines for addition rates and don’t exceed them.
If your main batch of wort is well-aerated and kept at the proper temperature for the variety of yeast pitched, fermentation should be apparent in less than 24 hours. In some cases, you may see fermentation start within three to four hours.
A carefully-prepared yeast starter assures that you get the best bang for your buck out of each liquid yeast culture purchased. A suitable yeast starter also ferments the wort properly, giving it all the flavors and characteristics you would expect from an individual strain of yeast. My brewery may be a one-man operation, but keeping my couple hundred billion other “employees” happy makes me certain of attaining the best beer possible, every time.