Build a Stainless-Steel Hopback
We all love the aroma of fresh hops, that floral-bitter explosion you sniff when you open a new bag, the bouquet that fills the brewhouse after you toss several handfuls into the boiling pot. Don’t you wish you could capture that magnificent fragrance in every bottle of pale ale, IPA, mild, blonde or pilsner that you brew? Well, now you can. And at the same time, you can achieve a clearer, cleaner runoff than you’ve ever had before. What you want, what you need, is a stainless-steel hopback, an ancient device we will update for modern brewing at a primitive price of $30.
What is a hopback?
At its most basic, a hopback is simply a container, filled with hops, that is placed between the boil kettle and the fermenter. The hopback allows hot, near-boiling wort to pass through fresh hops in a sealed environment just prior to being chilled. The enclosed container keeps the aroma of the hops from being driven off in the heat.
A hopback can be as high-tech as the commercially-used mash tun with a screen or as simple as a Choreboy stainless-steel scrubber in a standard one-quart glass Mason jar (see “Homemade Hopbacks,” April 2000). Hot wort extracts aroma, not flavor or bitterness, from the hops and is simultaneously filtered by them. This clarifies your beer in addition to improving its character. After the hot wort is run through the hopback, the wort is immediately chilled to capture the aroma and keep it in the beer. Using a hopback is different from dry hopping. This is mainly due to heat. The hot wort is thought to affect the hop oil compounds and thus the aroma profile.
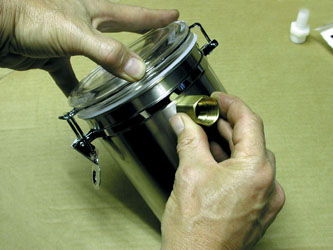
All you need to make a hopback is a way to get hot wort into a closed container — no nasty oxygen molecules please — and a way to get it out again through a filter. I first thought of using a stainless-steel restaurant condiment container and lid, a bit of pipe and a bit of silicone seal to create a gasket. Then, while shopping at a Bed, Bath and Beyond store, I spied a better solution: a stainless-steel, sealable canister that is meant to be used for holding coffee or flour — and to serve as my hopback. While the clear plastic lid with its built-in seal and bail-type lock are not meant to be immersed in boiling liquid, it is surely robust enough for our use. And it’s dishwasher safe.
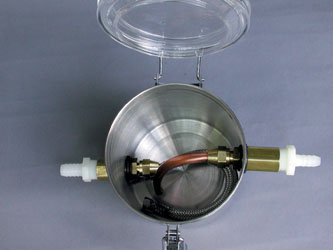
Design simplicity dictates that we should put the liquid in from the top and take it out from the bottom. Billions of bath tubs can’t be wrong. So I planned on making two holes in the container and putting one bulkhead fitting (a sealed pipe that pierces the container wall) near the lid and another near the bottom. The hot wort would enter the container, then be directed to the bottom by a copper (stainless steel is preferred) pipe. Less splashing means less hot-side aeration. Hot-side aeration should be avoided since it is widely believed to lead to a cardboard-like off-flavor.
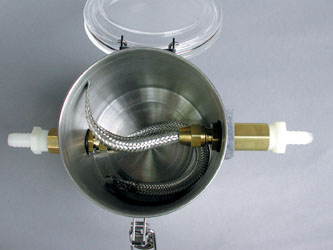
The next thing to consider was how to get the incoming wort to fully saturate the hops before exiting the container. I decided to use some kind of perforated tube inside the steel canister, from which multiple streams of wort would spray out and wet the hops. This is when I realized that my new favorite homebrewing material, the woven stainless-steel sheath around flexible water pipe, would provide a very acceptable “perforated” tube for this job.
Then I needed a filter medium. So I returned to the product that has impressed me the most in past do-it-yourself projects — more of that stainless-steel flexible sheathing. A semi-circle of stainless flex would serve to filter out hops just fine. With these decisions made, I started my project.
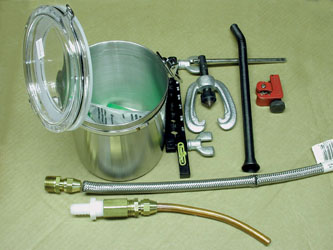
Parts List
($1) Two nylon barb to MIP adapters (3/8-inch x 1/2-inch)
($1.75) Two female pipe couplings (1/2-inch)
($1.55) Two flare to MIP half unions (3/8-inch x 1/2-inch)
($0.90) Two short rod nuts (3/8-inch)
($0.50) One 4- to 8-inch piece 3/8-inch copper or stainless steel pipe or
($5) One 6- to 8-inch piece stainless steel flexible hose covering (24-inch)
($14.00) One container (Bed Bath & Beyond)
($0.10) Two to four 3/4-inch O-rings
($0.05) Two to four 1/8- to 1/4-inch shims or washers (made from scrap)
 1. Purchase Fittings
First, purchase the container. You can use a stainless-steel canister like the one I used, or you can find some other sealable box.
2. Assemble Your Tools
You’ll need your container, the parts to make two bulkhead fittings that will go through the container wall, a tubing cutter, a spring-type tubing bender, flare fitting tools and the stainless-steel flexible hose that we will use for both the filter and the inlet tube.
3. Measure Hole Locations
Next, you need to measure your inlet and outlet hole placements. Mark the placements with a marking pen. This will be a rough measure and you need to leave enough room at the top for your lid and at the bottom for the large internal fitting.
 4. Drill Holes and Enlarge to Fit
Use a punch to mark your starting location and drill a 1/8-inch starter hole. Drill progressively larger holes up to the maximum diameter drill you own. I would suggest buying the largest drill bit necessary and sharing the cost with some brew buddies. Otherwise you will have use a file or Dremel tool to grind the opening to the final size. I had to do this, and it took me forty minutes.

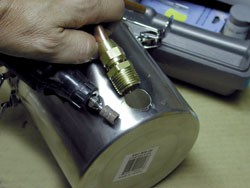
5. Make the Inlet Bulkhead Fitting
For introducing wort — it will be near boiling — a direct connection between the kettle and the hopback would be best. I don’t yet have quick disconnects, so I used reinforced, high-temp, food-grade flexible tubing to move wort from kettle to hopback.
To fill the canister with wort, I offer two options: copper tube and flex tube. In either case the object is to direct hot wort to fill the canister, then filter it completely and equally through your bed of fresh hops.
 To decide which method is best for you, I would make the decision based on kettle output. If your kettle filtration system really works, use the stainless flex method. If your runoff includes a good amount of trub, an open-ended tube might be less likely to clog.
Stainless-flex option: On the inside of the container, another flare fitting makes connecting a bit of stainless flex as simple as the filter. Crimp and seal the discharge end, then slip a rod nut over the open end and push the flex onto the flare fitting. Screw gently.
Copper-tube option: Cut a piece of stainless-steel or copper tube to a larger size than you need, approximately 4 inches to 6 inches. Install the rod nut if you’re using a flare fitting, and flare one end of the tube.
Next, bend the tube to 90 degrees or as required. I recommend spending $5 and buying a set of the spring-type tubing benders, or other tube benders, to save headaches when the tube collapses. If you’re using a compression fitting, install the gasket. Cut excess length from the tube, leaving the discharge end close to but not touching either the top or side of your container.
6. Make the Outlet Bulkhead Fitting
Cut your stainless-steel flex from its parent and remove the plastic inner tube. One end of the flex must be closed, either by crimping or sealing. I chose to crimp it, then silver solder it shut. Crimping and sealing with some silicone seal (it’s rated to 250°+F) will work just as well. I would suggest using a flare fitting to connect the flex to your bulkhead fitting. Pinching the tube will collapse it to the correct size. Then just slip the rod nut over it and secure it to the coupling.
7. Assemble with O-rings
When your bulkhead fittings are complete, you will notice that because of the thin wall of the container the assembly has more slop than a baseball through a basketball hoop. This is because pipe fittings wedge together, unlike a straight-cut nut and bolt. The easiest solution is to adjust tightness with O-rings, or homemade plastic or metal washers and an O-ring. The exotic solution is to recut the male pipe thread (MPT) of the male pipe using a pipe die run backwards. Whatever your decision, you’ll need to seal the threads with Teflon pipe tape or Teflon food-grade pipe dope.
That’s all there is to it. You now are the owner of an exotic hopback with a stainless-steel discharge and a stainless-steel woven filter, all assembled and ready to go. This means that you can clone your favorite beers with all of the fresh hop aroma that your nose desires. Now that you’ve built it, how do you use it?
How to Use a Hopback
Since opinions vary, I chatted with George “Murf” Murphy Junior, head brewer at the Arcadia Brewing Company. Murf uses what he calls the “hop percolator” to create his signature Arcadia IPA, a beer that captures buckets of hop aroma.
“We don’t use the hop percolator strictly as a hopback,” Murf says. “We start by adding 170° F water to the hop percolator to sanitize the hops and get some isomerization. Then we start running the hot wort through it. It’s my observation that within 20 minutes or so you have extracted all the aroma from the hops — which is usually before the runoff is complete. So if your runoff goes longer than 20 minutes, you could actually bypass the hopback at that point. I prefer to keep it connected, because we also use the hop percolator for filtration purposes. The hopback holds back particulates.”
Here’s my recommendation for using your shiny new hopback. When the boil is over, connect your sanitized hopback to the brewkettle with a suitable length of sanitized high-temp tubing. Toss in a few ounces of your favorite fresh whole hops. Run in enough hot wort to fill the container and push out all the trapped air, then clamp the tubing and let it steep for several minutes to sanitize the container and the hops. Or, like Murf, you could add 170° F water and hold for several minutes to sanitize the hops.
Then begin your runoff, tweaking flow rates with the kettle valve (or the hopback valve, if you’ve decided to add one). Be sure you keep the liquid level in the hopback very high or full.