Build a Beer Engine: Projects

On my very first trip “back to the Old Country,” the Isle of Man to see family, I was exposed to the British way of dispensing beer. The trip was traumatic. We’d missed a connection and were forced to take a seven-hour international red-eye. Late arrival necessitated racing from London, Gatwick, towards Liverpool to catch the SeaCat ferry to the Isle of Man. We missed the ferry, but found lodging for the night.
Yes, after being up for almost two days, learning to drive on the other side of the yellow line and missing the flight and the ferry, I wanted a beer! So — to the hotel pub, where beer flowed from odd-looking metal pipes with dispensing nozzles that resembled Guinness taps. It was served with low carbonation at cellar temperature, and had an unusually creamy, thin head. The beer was Theakston’s as I recall. This was my first exposure to English style draft beer. Dispensing this beer is vastly different from U.S. custom. This “real ale,” as CAMRA (Campaign for Real Ale) calls it, requires that the beer is dispensed from small kegs and pumped or poured from keg to glass. No CO2 tanks for movement or carbonation, no artificial carbonation. Real ale is also served at cellar temperature, 54 °F (12 ºC), like red wine.
While traditional English beer engines are readily available, international shipping costs are over $100. Why not make one? The core of a beer engine is a food grade pump. A great match was available at an RV store — the Rocket dual action pump for under $30. It is made of food grade PVC, pumps on both the push and pull strokes and holds its prime. All I would need to complete the device would be a housing box and a sparkler head for dispensing — British style!
Build a beer engine housing box
Parts List: Beer Engine –
Rocket Hand Pump
1/2” cabinet grade plywood, 2’ x 2’
Glues and screws
Beer line
Tubing clamps
C Clamp
Beer line
1/2” brass cap
3/8” x 3/8” MPT brass barbed adapter
Tools required:
Table saw or other saw
Drill and bits
Jig saw or coping saw
Hammer, screwdriver, countersink
Sander and sandpaper
Step-by-step
I think most of us will put the beer engine on a bar. Thus, a box to hold the beer engine and a method of attaching the box to the bar are needed. The box should be open at the bottom for attaching a clamp and dropping a beer line to a keg.

1. To make a box exactly like ours, cut a top and two sides, 8” x 8”. Cut the front and back 8” x 7” (8” minus two thicknesses of half-inch plywood). Lightly sand the exterior, interior and surface edges.
2. Find the center of the top and drill a large pilot hole. The pump requires a 1 7/16” hole. If you have this size hole saw, great. Otherwise enlarge a 1 1/2” hole to size. It will help to use a jigsaw blade that has extra teeth (a hacksaw blade) and is thinner from front-to-back. A normal wood cutting blade is deep enough to bind when cutting such a small circle. Cut undersized and use a half-round file and sandpaper wrapped around a large dowel to work your way to the final size. Check the fit frequently, the hole itself provides most of the clamping force for the pump. Mark and drill pilot holes for the pump.
3. Predrill and countersink one or two pilot holes for 1 1/4” exterior grade wood screws to the front and back pieces. Measure in half the thickness of your sides and drill on this line. Then clamp the four sides of the box together and drill into the edges. This will prevent splitting the plywood. (If you don’t have suitable clamps, wind some heavy twine or thin rope around the box, place a dowel or pencil beneath the twine and twist until tight. It’s a great emergency clamp.) Apply glue to the mating edges and tighten screws (11/2” finishing nails, countersunk are an alternative to screws). Even these should be pre-drilled with a very thin drill bit, one thinner than the nail itself.
4. Once the four sides are assembled, follow a similar procedure to attach the top to the sides. Glue the box sides and top at the same time; you may have to make adjustments that are impossible once the glue has set.

5. Once the glue is dry, sand the edges for perfect alignment, rounding the top’s edges at sides and back.
6. To provide a clamping surface, measure the thickness of your clamp front-to-back and cut a bottom piece that will leave room to insert and remove the clamp. This space will allow plenty of room to drop beer line to your keg. Attach the bottom with nails, again pre-drilling. Use nails that are at least 11/2” long and be sure they fit tightly into the predrilled holes.
If you want a decorative frame, a place to show off your brewery’s label for instance, cut the beveled pieces and attach now, before all holes and nicks are filled with putty and final sanding. It’s your call whether you, or your guests see the artwork. You could even make a frame for the front and back! Apply a sanding sealer before any stain or paint is applied, sand lightly, then varnish or paint. Once dry, insert the pump and screw it tightly to the top. Your beer engine is almost complete; you only need to construct the sparkler nozzle.

Sparkler Nozzle Construction
Step-by-step
Making a sparkler nozzle is quite easy, especially if you or a friend own a drill press. To make the nozzle you’ll need a barbed fitting with male MPT (3/8” x 3/8”) and a compression cap (1/2”.) While stainless steel would be ideal, brass fittings are easier to find and much easier to drill. You’ll also need a small length of clear or braided (3/8”) beer line to connect the pump orifice to your homemade sparkler nozzle.

Drill 5–10 holes into the end of a brass cap. Use the smallest drill bit you have, 1/16” or 3/32”, and use very light pressure (I’d suggest buying two drill bits). Regardless of your drill motor, use very light pressure and slow speed, under 300 rpm. Lightly sand or file the surfaces to remove any chips.
Some may be concerned about possible lead contamination from brass parts (lead is used in brass parts production.) John Palmer’s web site has an explanation of how to clean brass in appendix B. (www.howtobrew.com/appendices/appendixB.htm) Please read the full text, but if you have no Internet connection, use a mix of vinegar and hydrogen peroxide. The vinegar should be common white distilled of 5% strength, the hydrogen peroxide a 3% solution. Soak for 5–10 minutes. Look for a color change from bright to butter, but if the parts or solution turn green, start over.
After your parts are clean, wrap 2–3 turns of Teflon tape around the threads and tighten the cap to the barbed fitting. With a stainless steel hose clamp, attach 3–6” of beer line to the output of your “beer engine” pump and, using another clamp, attach the homemade sparkler nozzle. Note that the pump output tube is rather fragile and easily crushed; clamp with light pressure. Select a beer line length that will both clear the edge of the box and permit you to pour a pint with ease. That’s it, the beer engine is complete!
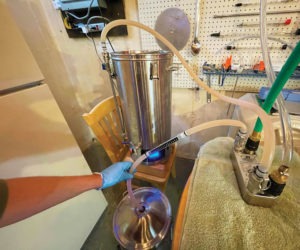
Attaching the beer engine to your keg
The barbed fitting on the bottom of the pump is 3/8”, so gather 2–6’ of beer line and attach a clamp to one end of the pump and clamp the other to a beer-out keg body connector. Clamp the pump with light pressure to avoid crushing the ABS plastic. In a British pub, the beer will be naturally carbonated and have the correct volumes of dissolved CO2. You may have an artificially carbonated keg of IPA or mild ale and want to use it with the beer engine. You will have to equilibrate the beer. That is, let the excess CO2 come out of the beer. If you don’t, the beer will foam excessively. You could draw off a few pints without adding CO2, or open the blow off several times. You want a pint that appears still and uncarbonated, yet has 1.6–2.0 volumes of dissolved CO2 at 50-54 °F (~11 ºC).

At this point you are ready to pump beer instead of pushing it from the keg. After several pints there will be a vacuum. In a proper real ale setup, the firkin is open to the air and poured quickly enough to prevent oxidation — though some aficionados think a touch of oxidation is authentic.
Home brewers will probably decide to deliver CO2 into the keg to replace displaced beer. There should be enough pressure to push gas into the keg without adding carbonation or pushing the beer through the beer engine. In practice, rack from secondary into a keg and add the correct amount of priming sugar to create proper carbonation. Half of your normal amount, less than a 1/2 cup, for starters. Allow the beer to carbonate naturally at cellar temperature. Then, to serve, lay the keg on its side with the bottom higher than the top, to gravity feed the beer. Then, connect the keg in reverse. That is, connect a beer-out keg body connector to your CO2 lines. This will require an extra body connector and beer line, and apply 1–2 p.s.i of pressure, just enough to replace the lost volume and keep oxygen off your wonderful beer. Connect your tap line and hose to a gas-in body connector to dispense through the short gas-in tube. If this is a temporary setup, you’ll have to tickle the pressure control on your CO2 set up to get this low of a pressure.