Build a Counterflow Wort Chiller
 As homebrewers we all want to cool our wort quickly after the boil. Wort needs to be cooled to a temperature at which the yeast can be safely pitched. Quick cooling also helps with cold break formation and — when some very light base malts are used — helps minimize the production of dimethyl sulfide (DMS), a molecule that lends a cooked corn odor to beer. In addition, moving the wort quickly through the 160–120 °F (71–49 ºC) range ensures that contaminating organisms have a smaller chance to gain a foothold at these temperatures that are favorable to their growth.
Cool
We have all utilized the plethora of methods available to cool our wort from boiling to pitching temperature in as fast and safe a manner as possible. Coolers or sinks packed with ice, frozen water jugs and half-filled bathtubs are the most primitive among them. These methods vary in their effectiveness and leave you open to varying levels of risk with regard to contamination of the wort you have worked so hard to produce. However, they all work to an extent . . . at least with a 5 gallon (19 L) batch — or smaller volumes of concentrated wort made on a stovetop. However, try hefting a 15-gallon (57-L) boiling pot into and out of a bathtub.
Cooler
A cleaner and simpler method is to use an immersion chiller. These devices are popular with homebrewers, but their capacity is somewhat limited. The key consideration is volume.
Using the algebraic formula (πr2h) for the volume of a cylinder — which is what a tube is, a long thin cylinder — a 3/8” (95 mm) x 25 foot (7.6 m) immersion coil has 32 cubic inches (537 cubic centimeters) of volume, equivalent to a little over a pint of liquid. That’s the amount of wort the chiller displaces and the volume of cooling medium available to do work (move heat out of the wort) during chilling. So, the wort next to this “pint of coldness” is what’s being chilled.

You can stir the wort, to get it flowing past the coils, but this takes hands-on effort during wort cooling (and your hands may prefer to be on another type of cold pint at this point in the brewday). Also, opening the brew kettle to stir it with the chiller can allow airborne microorganisms to settle in your wort when it is in a temperature range favorable to their growth. And, if you are worried about aerating your wort while it’s hot, you may shy away from swirling your immersion chiller. Enter the counterflow chiller.
The Coolest
What if you could take that volume of wort in contact with the chiller and turn it over at a constant rate? And what if you could take the water and replace it with fresh, cool water at a constant rate as well? If you could do this, what would you have? Essentially, you’d have the benefits of stirring without the effort or risk. This is the theory behind the counterflow chiller. Instead of having the same wort in contact with the cooling coil at all times, fresh hot wort and cold water flow past each other constantly. The cooling water is common tap water and the water and wort never come in direct contact with each other. The wort touches only copper and remains enclosed inside a tube so there is no risk of the aeration or contamination that stirring might introduce.
The word “counterflow” describes the flow pattern of the water and wort relative to each other. The wort entry point is at the water exit and the water entry point is at the wort exit, so the two liquids move past each other in opposite directions. This is important because as the warmest wort encounters the warmest water at the beginning of its residence in the chiller, and meets the coldest water at its lowest temperature as it exits. The hot wort encounter progressively cooler conditions and it travels through the chiller and continually transfers heat to the cooling water.
The chiller described here, when tested with 70 °F (21 °C) tap water, reduced boiling wort to within a few degrees of the cooling water, using a simple gravity feed, in no more time than it would take to gravity drain the boiling pot. An additional benefit is a trick I learned from one of our local pros. After the wort is cool and the yeast is pitched, there’s nothing left but the clean-up. I capture some of the (now well heated) discharge water while I am cooling, and save it for this use. So, the chiller can actually serve two purposes.
Constructing a Counterflow Chiller
Okay, we now know why we want one. As for how we get one, mass produced units are available to the homebrewer at prices ranging from fifty to over a hundred dollars, depending on the construction features of the individual cooler. Kits that provide the parts to allow one to assemble a unit on their own cost as little as twenty dollars. However, once the cost of the additional items that are required to complete the assembly — such as the copper tubing — are added, the cost easily rivals that of a pre-fab unit.
The construction of this unit is surprisingly simple, it takes less than an hour and requires only a few components, readily available at any hardware or home improvement store. As shown, it costs out at $39.
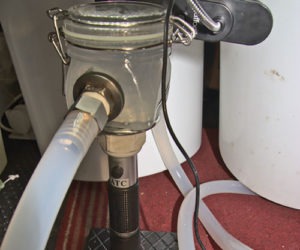
The chiller is a basic “tube within a tube” design. The key to its function is the fitting that allows connection of the input and output hoses and tubes, and connects and seals all of the components of the wort reservoir and cooling jacket.
Using A Counterflow Chiller
Use of the unit is simple. Attach the fresh (cooling) water hose to the water inlet and attach a discharge hose to take the hot water to your drain or capture vessel. Attach your wort delivery tube (I use a fiber reinforced 3/8” poly tube run directly from the outlet valve of my boiling pot) to the wort inlet of the cooler (top copper).
To sanitize the unit, I open the wort valve on the boiling pot and allow hot wort to run through the coil. I run a pint or two of liquid through the cooler without any cooling water, then close the valve on the pot, and discard this wort. I then attach a sanitized 3/8” tube to the wort discharge of the cooler (bottom copper) and turn on the cooling water. Open the boiling pot valve again and run the wort discharge directly into your sanitized primary fermenter. This wort is now cooled well enough to allow you to pitch
your yeast.
After use, detach the cooling water hoses and allow the outer sleeve to gravity drain. Rinse the copper tubing portion of the cooler well with water — the hotter the better — and drain well.
I do my initial cleaning of the copper tube and periodic subsequent cleanings with a caustic-citric cycle followed by a hot water rinse. This probably isn’t necessary if your routine pays proper respect to sanitation, but it gives me a little added confidence that there are no bugs inside the cooler.
Adding this tool to your process is like going from a bicycle to a Ducati. The old way gets you there, but the new way works oh so much better. Once you have incorporated this simple and economical tool into your routine, you will wonder how you ever managed without it.