Build Your Own Water Filter: Projects
 Parts List:
Other than the filter unit itself, you’ll need some commonly available items (all of which can be found at your local big box hardware store):
 Parts List:
•(1) 2″ 90-degree elbow join, PVC
•(2) 2″x1/2″ bushing adapter PVC
•(1) 2″x3″ coupling, PVC
•(1) 1/2″ male thread x 5/8′ hose barb, brass
•(1) Universal dishwasher snap adapter for sink, chrome
•5/8″ vinyl tubing, cut to fit
•Optional: 1/2″ ball valve, brass (instead of 1/2″ hose barb)
If your tap water isn’t quite up to muster for use as brewing water because of heavy chlorine or other off odors and tastes, you are pretty much limited to two options: buy bottled water for brewing or filter what comes out of the tap.
Buying water from your local grocery store or big-box club store is relatively painless, but it does require a trip to the store and hauling the water back to your brewhouse (garage), and then you have to dispose of the plastic containers. Buying water, if you shop around, costs about $1 per gallon.
Filtration can be quite expensive initially. Whole-home systems can cost more than $1,000. And while countertop filters can be found for starting at about $60, replacement filters cost from $20 each and need to be replaced every 300 gallons or so, on average. Considering the cost of the filter unit and the first filter cartridge, a countertop filter delivers good brewing water for about 30 cents per gallon. Pitcher-based filters, like the popular Brita models, deliver fantastic results as well but are unbearably slow for filtering in quantities needed for brewing, and the cartridges require frequent replacement.

While filtration is cheaper and easier than buying water, it generally requires a bit more upfront investment . . . unless you build one yourself.
The heart of the filter
The core of our system is, of course, a water filter. Specifically, I chose a Culligan WHR-140 in-line filter (Fig. 1) because of its long life and compact size. The WHR-140 is an in-line filter used in Culligan showerheads. It is available most places that sell filtered showerheads, such as Bed Bath & Beyond and other home stores, and it costs about $15. It is also available online. It uses a filter media made by KDF Fluid Treatment Inc., which, according to the manufacturer, removes 99% of free chlorine, reduces water-soluble heavy metals and also eliminates sulfur odor. The performance life of this filter is rated at 10,000 gallons (38,000 L) before replacement is necessary. For technical information on the filter media itself, see the manufacturer’s Website at www.kdfft.com.
Considering a total project cost of $40, the cost-per-gallon for this filter is about one-half of one cent per gallon. For all-grain brewers, this translates to approximately 1,000 batches worth of brewing water, assuming approximately 10 gallons total used to arrive at a final volume of 5 gallons. This depends, of course, on mash thickness, how long you boil and several other factors. Like anything else, your mileage may vary.
Get it together
Before you get started assembling the filter, wash all the parts (PVC and brass) in warm water with a mild soap. The PVC will likely be dirty from sitting on a shelf in the store and the brass connectors have a thin sheen of oil on them to protect from corrosion. You’ll want to wash all that off before you use the filter to clean up your tap water.
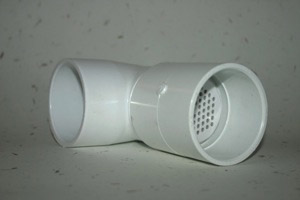
First, slide the filter unit into the smaller-diameter end of the PVC elbow joint until the rubber gasket on the filter is snug against the elbow opening (Fig. 4). Now slide the coupling over the end of the elbow where the filter sticks out (Fig. 5). On both ends of the joint, insert the bushing adapters (Fig. 6). Now we’re ready to screw in the water in/out connections. Liberally apply pipe tape to the threads of the 5/8” hose barb and screw it in to the bushing attached to the coupling piece. Repeat the same procedure with the 1/2” hose barb and screw it in to the other bushing (Fig. 7). As an alternative, you can “kick it up a notch” by using a 1/2” ball valve in place of the 1/2” hose barb. I chose a ball valve with a spigot bib because it has an angled head, which makes it ideal for countertop use (Fig. 8).
Setup and use
Note: This project is designed to be used with a kitchen sink, but can easily be adapted for use with garden hose fittings (see right for alternative parts).
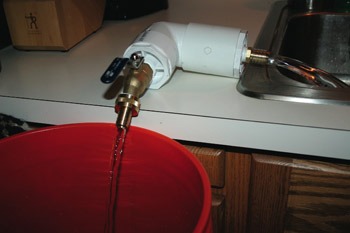
Unscrew the standard aerating faucet insert from your sink and screw in the dishwasher snap adapter. Attach one end of a length of 5/8” vinyl tubing to the faucet and the other end to the 5/8” hose barb on the water filter (Fig. 9). All that remains is to turn on the water at your faucet and collect the filtered water in a hot liquor tank, bucket or kettle (Fig. 10). If you opted to use a ball valve for the water out connection, be sure the valve is in the open position when you turn on the water from your sink. Otherwise, the pressure buildup will cause the PVC parts to fly apart rapidly and possibly violently. (I discovered this the hard way!) Be careful.
Allow a few gallons to run through the filter before collecting any water for brewing. This will allow for any filter media dust to be expelled, and give you a chance to verify the integrity of the various connections. If you notice leaks around the in/out connections, reapply pipe tape and re-tighten the connection. Leaks at the PVC joints indicate that the parts do not fit snugly. Disassemble the unit, reconnect everything, and test again. If you still get leaks, you can use plastic pipe cement to seal each connection. Just make sure that whatever you choose is safe for use with potable water.
If after time, the flow rate of the filter slows down noticeably, it is likely that there is a buildup of sediment partially blocking the filter. To remedy this, connect your sink faucet to the water-out hose barb or valve and let the water run for a few minutes. This will back-flush the filter and eject the sediment.
Flow rate
The filter used in this project is rated to operate effectively at flow rates up to 2.5 gallons per minute (which is the federally mandated maximum flow rate for showerheads and faucets, established by the Energy Policy Act of 1992). Depending on your water pressure, you may have to run water through the filter at less than the maximum rate possible in order to get adequate filtration. If it takes more than 24 seconds to filter one gallon, your flow rate is within the operating standard. If it takes less than 24 seconds, you need to lower your flow rate for optimal results.
Alternate parts
If you’d rather use the filter with your garden hose hookup, you can simply substitute a 3/4” garden hose adapter in place of the 1/2” male thread x 5/8” hose barb on the water-in side. Now just attach the filter to your garden hose connector and let ‘er rip! You can also get a garden hose adapter for your sink and use a washing machine water hose if you don’t want to fuss with the vinyl tubing and barbs. Also, you can substitute nylon hose barbs in place of the brass barbs for a cleaner look and an all-plastic configuration.