Build a Burton Union System: Projects
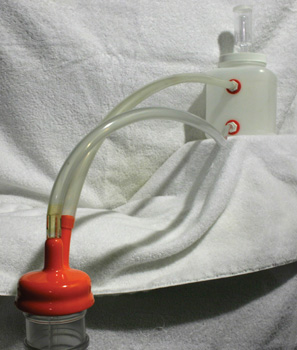
The Burton Union system derives from England. The setup circulates yeast blowoff into a collection vessel then back into the primary fermenter. Here you can see the scaled-down version that we created for homebrewing.
Of the many unique and often complex fermentation systems over the long history of beer making, perhaps none can match the style and distinguished legacy of the famed Burton Union system. At present, you’ll have to travel to the Marston, Thompson and Evershed brewery in England’s Burton-on-Trent to see a working Burton Union fermentation system in operation. The brewery, which produces the world famous Marston’s Pedigree ale (among others), is the only known commercial brewery still using the Union system.
Traditionally, a union system (later referred to as a Burton Union after becoming linked to its use in the Burton area) is a network of several wooden casks and troughs interconnected via copper plumbing. All of the casks work in union during fermentation, commingling their beer and yeast. As the beer ferments, pressure pushes some liquid up into long troughs above the casks (like blowoff in a homebrew setup), where the yeast settles out of suspension and the remaining volume of beer trickles back into the casks. This allows for easy harvesting of yeast — essentially a form of top cropping — for immediate reuse. It also minimizes the loss of beer through blowoff.
We can make use of two of the biggest advantages of a true Burton Union at home: easy yeast harvesting and minimal loss of brew volume. The second advantage also allows for brewing a given batch size in a smaller carboy — or use every bit of available volume in a larger carboy — because most of the blowoff liquid will be returned to the carboy during fermentation. In my experiments with this system, liquid loss from blowoff is kept at about 3–4 ounces (84–112 g) per 5 gallons (19 L) of wort. Volume loss from siphoning, however, is not affected by the union setup.
For this project, it is assumed that the carboy will be maxed out in terms of volume. This will give better results as far as yeast reclamation is concerned and will ensure that plenty of wort gets cycled through the collection vessel.
The parts
Our homebrew-sized system will be a union of just two vessels: a 5-gallon (19-L) carboy and a 2-liter blowoff collection vessel. For the sake of safety and convenience, I chose a 5-gallon (19-L) PET plastic carboy and a generic square HDPE (high-density polyethylene) plastic jar, respectively. The two vessels will be connected via food-grade tubing and two plastic bulkheads. One piece of tubing delivers the pressurized blowoff foam (kräusen) from the carboy to the collection vessel. Once in the collection vessel, the foam returns to liquid form, allowing the yeast to settle to the bottom. The reconstituted wort is then returned, by gravity, to the carboy through the second piece of tubing.
Most of the parts for this project are available at many homebrew retailers (exceptions are noted). To find what you’ll need to get your own Burton Union going at home take a look to the left, (assuming you already have a carboy and a standard airlock).
PARTS
• (1) 2-liter, square HDPE jar (available from scientific supply shops or from US Plastic at www.usplastic.com) $4
• (2) 5/16-inch OD polypropylene bulk head fittings (available from US Plastic) $3
• (4) Rubber gaskets, Grolsch bottle style $2
• (1) Rubber airlock grommet from fermenter bucket lid $3
• (1) 24-inch plastic racking cane $3
• (1) plastic carboy cap $3
• 4 feet, 5/16-inch tubing $3
• 4 feet, 3/8-inch tubing $3
A quick bit of drilling
First, we’ll need to drill some holes: three to be exact, and all three will be approximately 1/2-inch in diameter. I used a 1/2-inch paddle bit, but anything that will make a 1/2-inch hole will do the job. WARNING: Always wear safety glasses when using power tools!
Drill the first hole approximately 1.25 inches (3.2 cm) from the bottom and the second hole approximately 2 inches (5 cm) from the top of the 2-liter square plastic jar (Fig. 2). Now drill a hole in the center of the jar’s screw-off lid.
(FIG 2) The collection vessel now has two 1/2-inch holes drilled to accommodate the bulkhead fittings.
Grommets, gaskets, and bulkheads
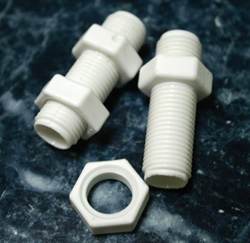
(FIG 3) Here are two 5/16-inch outside diameter polypropylene bulkhead fittings used to create tubing connections in the collection vessel.
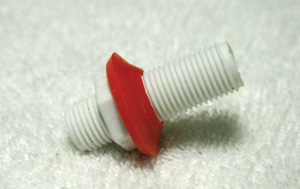
(FIG 4) Here you can see the bulkhead with a gasket flush against the stationary nut, forming a tight seal that will lock over the outside of the yeast collection vessel.
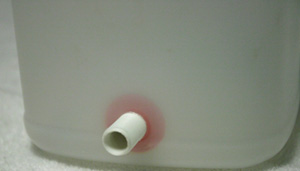
(FIG 5) Here is the bottom bulkhead inserted into the collection vessel that will help circulate the yeast.

(FIG 6) The bottom bulkhead with the outer gasket seated for a snug fit.

(FIG 7) The lid of the collection vessel drilled with a 1/2-inch hole and with the grommet seated.

Plumbing the delivery system

(FIG 9) Here is the carboy cap with a modified racking cane inserted. This will allow for hook up to the collection vessel.
But before you cut the tubing, remove the small white caps from the orange carboy cap and slide the racking cane in the larger diameter center nipple. This will take a little bit of effort, but it will fit. The idea here is to slide the racking cane in far enough so that when the carboy cap is seated on the carboy, the racking cane will dip a few inches below the level of the wort during fermentation. You may want to fill the carboy with water to figure out exactly how far in to slide the racking cane. Once you have the racking cane at the right depth, use a felt-tip pen to mark a line on the cane approximately 2 to 3 inches (5–7 cm) above where it sticks out of the carboy cap. Remove the racking cane and cut it on the line you marked. Depending on where your collection vessel is positioned in relation to the carboy, it may be advantageous to cut the bottom of the racking cane and leave the 90-degree elbow intact. Each setup will be unique, so use common sense in determining how to cut the racking cane.

(FIG 10) An alternative collection vessel design, using a 2-liter Nalgene LEXAN square bottle.
Now replace the racking cane in the carboy cap with the cut end of the cane sticking a few inches above the large center nipple of the cap (Fig. 9). Connect the 5/16-inch tubing to the racking cane and measure off the appropriate length to connect it to the bottom bulkhead fitting on the collection vessel. Again, this length will vary from setup to setup. Now fit the
3/8-inch tubing over the smaller diameter nipple on the carboy cap and measure off the right length to connect it to the top bulkhead fitting. The Burton Union is complete (see page 53).
Greed: wort volume vs. yeast
I’ve tested this specific setup with several recipes, the most effective of which for yeast harvesting was a simple extract hefeweizen using a big starter of WY3333. If you can get enough yeast going into the collection vessel, it will overflow back into the fermenter, effectively repitching continuously during the height of fermentation. Another interesting consideration when using our small-scale Burton Union is that there are two simultaneous active fermentations happening in a more or less closed system: one in the fermenter and one in the collection vessel.
Alternative design considerations
The pressure building in the carboy is released much easier by blowing off the kräusen than by pushing out the much heavier wort. This keeps the blowoff coming out of the carboy in one tube and the wort returning to the carboy in the other. Just about everything else is configurable to your specific needs or whims.
Feedback welcome
As you use your Burton Union system, please send feedback on recipes that work well or alternative equipment setups from which you think other brewers may be able to benefit. Experiment with all facets of the process, and by all means, have fun!


