Growing Hops
Picking up hops from your local supplier is easy. However, it’s possible to grow hop plants (Humulus lupulus) at your own home. Best of all, hops are perennial, so — once planted — you can enjoy a bountiful harvest of fresh and flavorful hops year after year.
The climate anywhere in the continental United States is conducive to growing hops, so long as plenty of direct sunlight is available and the chance of frost has passed for the season, typically in early spring. All of the commercial hop fields are located in northern states, and the conditions there are more to the hop plant’s liking, but — with a little care — they can be grown anywhere. Hops even grow wild in some parts of North america. In other words, if you have an open, sunny space and a motivation to produce the freshest beer possible, you can grow Your OWN hops.
Hop Bocabulary
First, you need to know that hop vines are called bines, which Webster’s refers to as “the winding or twining stem of a hop vine or other climbing plant.”
Get in the “zome”
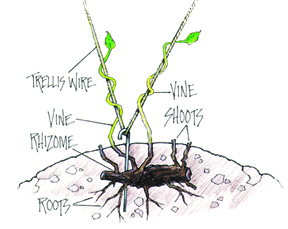
Second, when grown for use in beer, hops are not started from seed. Instead, they are grown from rhizomes. Rhizomes are short underground stems that are planted in the soil horizontally.
Males are Useless
Third, hop plants can be male or female, but only female plants produce the lupulin-laden cones used in beer-making. Retailers of hop rhizomes are aware of this trait, of course, and will only sell the female rhizomes.
Planting Window
Fourth, hop plants will only flourish if cultivated from March to May. Because of the short planting season, most retailers only stock hop plants during these times. (And, they sell out fast! It’s probably best to contact your local homebrew shop and reserve some, or order some on the Internet ahead of time.)
Guide Their Growth
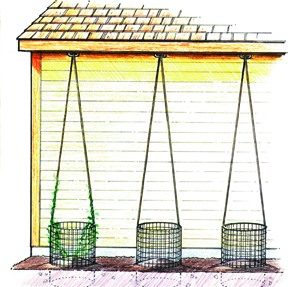
Finally, be prepared to build or buy a trellis for your hop bine, which will grow from 15 to 25 feet in a single season.
Purchasing Hops
More than 150 varieties of hop plants are available for purchase. So which are the easiest to grow? Ralph Olson, of Hop Union, says, “All hop types have an Achilles heel, but some might be better for first time hop growers. Cascade is a good choice and so is Nugget if you are looking for a high-alpha hop. Other good choices are Chinook, Willamette (if your location is not too hot) or Centennial. Aroma hops tend to be more finicky and can’t take the heat.” So, take your hop preferences, location and gardening skills into consideration when choosing a hop variety or varieties to plant.
If you plant more than one variety, space the rhizomes at least eight feet apart; hop plants grow rapidly and need a spacious area in which to take root.
The cost of hop rhizomes ranges from approximately $10 to $20 per pound, or start at $3 per rhizome. Hop rhizomes are sold at some homebrew supply stores and can be purchased from Internet retailers (see sidebar on page 45).
Planting and Caring for Hops
Your hop plants will thrive best in soil with a pH between 6 and 7.5. Testing the acidity of soil is easy with a soil test kit from your local gardening center. You can lower the pH (increase the acidity of the soil) by adding any type of organic matter, such as compost, or purchasing an additive, such as fertilizer containing ammonium, at your gardening center. If you need less acidity, add sand or lime.
Next, loosen the soil with a hoe or other gardening tool. Plant the rhizome in a shallow hole, and cover the area with one inch of soil. If your soil does not drain well, prepare a small mound of soil and plant the rhizome in that mound.
Within a few weeks, six or seven bines will sprout from the earth. Once the tallest bine reaches 12 in. (30 cm) in height, identify the two largest and clip the others off. This allows the nutrients in the soil to be devoted to only the two strongest sprouts.
The two hardy bines will grow rapidly — up to twelve inches in a single day! This is where your trellis comes in. The bines must have a support system in place before they are two feet tall since the plants grow so fast. You can build one yourself or buy a trellis at a gardening store, craft store or home improvement store.
Provide plenty of water throughout the summer, as hop plants can dry out easily. However, avoid watering the plant so much that water pools at the base of the plant.
Watch for pests or diseases on your hops. The hop aphid — a tiny, light green insect that lives on the underside of leaves — is a common nuisance that can be eradicated with organic insecticides such as insecticidal soap. Insecticidal soap has no adverse residues that may affect human consumption. Hop plants are also susceptible to different types of mildew, which are easily spotted as small, powdery clusters of black or white spores on the leaves. Fungicides should be administered immediately if mildew is noticed on the plant.
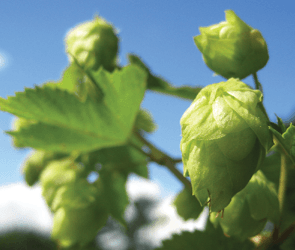
The bine will be leafy and grow vertically, and the actual hop cones will emerge toward the top of the bine on short, horizontal branches. In other words, do not give up hope if you do not see any cones at eye level. The hop cones will show up a few weeks after the small, pod-like flowers appear. The cones, made up of thick, tightly wrapped “petals,” form where the flowers were after they drop off.
Once the bine reaches ten or more feet, prune the leaves growing on the bottom three feet of the plant. This reserves the nutrients for the important part of the plant — the hops.
Harvesting and Drying Hops
By early August and no later than the end of September, you can harvest the hop cones from the plants. Hops produce many cones during the first season; however, subsequent seasons yield even larger crops.
There are two main ways to determine whether the hops are ready for picking. First, the bottom of the cone turns yellow and the casing turns thin and crispy, like parchment paper. You must not harvest the cones before they are ready; as the flavor will not be optimal. The cone should feel light and you should not be able to squish the cone between your fingers without the cone breaking. The yellow coloring at the base of the cone is secreted from the lupulin glands — and this is what gives the hops their unique flavor. Second, you can monitor the coloring of the cones and when the first few cones begin to turn brown, the cones are all ready to harvest. Do not wait until the brown coloring is prevalent; otherwise the hops will not be usable. When the first cones start turning brown, you should start harvesting the hops.
So, how do you pick the cones, which hang 20 feet above the ground? The easiest way is to cut the bine a foot from the base and bring the plant to the ground. Unwinding the bine from the support may take some tugging since tiny hairs from the bine hook into the support; this is how the bine climbs. Do not worry about losing your prized plant – the root system will survive future frosts and your hops will spring up each year.
Each plant will yield 1.5 to 2 pounds of hop cones, which must be dried before use in the beer-making process. Hops can be dried in a dehydrator, or by placing the hops on a drying rack in a cool, dark place. You can store your dried hops in a sealed plastic bag or mason jar in the freezer.
You can use your hops in the same way you would use store-bought hops. Moreover, when a friend compliments your flavorful beer, simply raise a glass and say, “Why thank you — I grew the hops myself.”


