10 Must-Haves for Pros and Amateurs
With close to 20 years of brewing experience, it always amazes other homebrewers when they see my limited homebrewing setup. While working at my day job in a brewery I get to play with all the new toys, pumps, gadgets, and pressurized glycol jacketed fermenters to make a precise, calculated, and repeatable beer. At home, where I continue to brew frequently as a hobby, I like to focus primarily on my knowledge of the brewing process to make a beer with much more basic equipment. I have no exact temperature control, often ferment out of Home Depot buckets on the porch, bottle condition using a bottling bucket and various sugars, and I’ve also been known to drink from the garden hose (though, I won’t brew with water directly from it). With little interest in keeping up with new equipment on the market, I thought, “What are 10 pieces of brewing equipment that I must have when brewing at home as well as at commercial breweries of various sizes?” The more thought went into this exercise, the more I realized it may be eye opening to other homebrewers.

When brewing at home I do not have a lot of room for equipment storage so I like to keep my inventory as small as I can get it. With all of the equipment options on the market why did I choose these particular items? I feel that the brewing items listed in this piece are what helps keep my process and beers consistent as well as make the brew day go much smoother. As I get to see other homebrewers and professional breweries with their equipment setups I often find that they are also using the same, or similar, items. So, here I’ll share these 10 items I like to have in every brewing situation.
1. WATER ANALYSIS EQUIPMENT
Water chemistry is truly the final frontier in the brewing process. Many brewers I know take the approach of “if it tastes good then use it” method, while others are very particular with every aspect. When it comes to brewing beer, hard seltzers, or even sodas, there are two main choices of water to use. The first is mineral-free water such as reverse osmosis (RO), or distilled water, in which you have a clean canvas to build your desired water profile. Many homebrewers and professional brewers use mineral-free water as a base due to its reliability, consistency, target accuracy on each batch, and ease of use. If you use RO or distilled water as your water source then you do not need water- testing equipment or a water report as everything starts at zero ppm.
For the rest of us that use our brewing water as is from the house, from a special location, or at a brewery that has no RO options, you will want to know the mineral content to see if it needs to be adjusted. Knowing your water source mineral content is critical to brewing even if you do not plan to adjust your water chemistry. I enjoy sourcing specialty water for some homebrews — which have included using rain, snow, icicles from mountain cliffs, water from the pipe in the mountain for hikers, and pure spring water from an untouched stream a few miles in the forest that needed to be carried out by hand. Sourcing water can be just as fun as the rest of the brewing process, and by knowing what you have you are better suited to brew beers that complement the unaltered water profile.
You can sometimes obtain a yearly or quarterly water report from your local municipality, however, I will say from experience that the water mineral content changes daily; and depending on the weather it might be drastic. The most respected company that offers water analysis tailored to brewing needs is Ward Laboratories. Ward Laboratories is highly recommended by everyone that talks about getting water analysis, mainly due to their accuracy and reputation for excellence. Of course if the water profile changes each time you brew, sending water off to a lab for every batch gets pricey, not to mention you need to wait for the results.
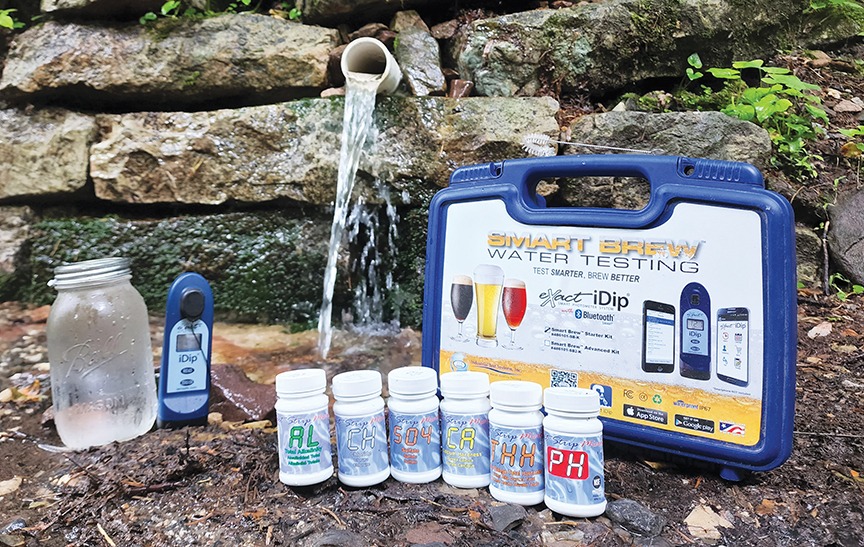
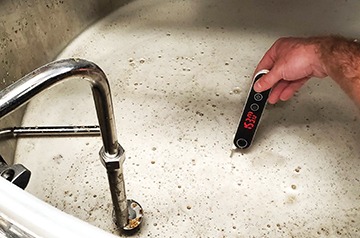
Recently I have been diving deep into water chemistry and I have found that the Exact IDIP Bluetooth water tester is exactly what I needed to run tests on everything that isn’t dry. This piece of equipment runs about $400 and requires downloading their app on a smartphone for the device to send the results of your test. You purchase the one-time test algorithm for each test, sync the IDIP device to your phone, use 4 mL of water and the appropriate test strip to get your results in less than 30 seconds per test. For just under $3 a round I test for pH, alkalinity, calcium, sulfate, chloride, and total hardness, and then the app calculates the magnesium, sodium, and residual alkalinity. I like to run this test on every single batch so that I know how I would like to adjust my water chemistry or even choose a style that is better suited to the water source.
2. CALIBRATED BUCKETS & LIDS/BUCKET FERMENTERS

In every brewery I have worked has been a collection of calibrated 5- and 6-gallon (19- and 23-L) buckets that usually consist of a combination of homebrew buckets and empty PBW buckets. In the brewery, we use these for everything — fermenter CO2 blow-off buckets, weighing and milling grain, cleaning small parts, sanitation/caustic/other chemical soaking buckets, hose and pump sanitation siphon loop rig, and endless other uses. It’s also nice to have a homebrew bucket at the brewery for an occasional side project to make a unique keg of your favorite altered flagship. You never know when you will need a homebrew bucket at the brewery.
I find the same to be true when homebrewing, which is why I own my own stack of calibrated buckets used for similar tasks. Once they are no longer fit for brewing purposes they get moved over to the farm-side of the yard for animal feed, water, and gardening purposes. You can never have enough buckets!
3. CALIBRATED MASON JARS
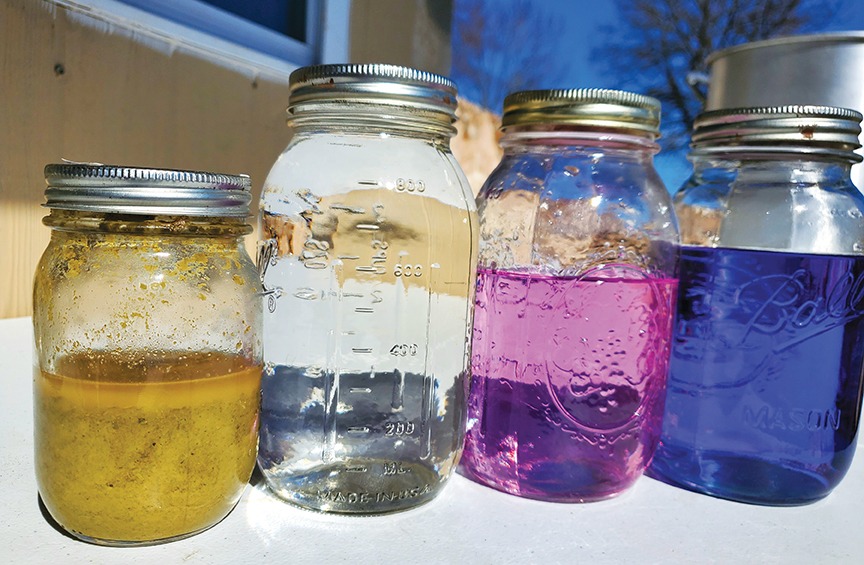
Calibrated Mason jars are just like buckets (but much smaller), meaning that you want to have a few around. These are great for collecting and storing yeast, measuring volumes of liquids, taking water samples, brew day samples for tests, and storing dry powders like gypsum, calcium chloride, or Irish moss when bags rip. They can also be used as a small mixing container for kettle finings or extracts and can easily be cleaned or sanitized if needed. I always keep plenty of Mason jars on hand at the brewery, and even more at home. I even keep a clean Mason jar in the trunk of my car for when I am in a situation where I want to collect a water sample to test.
4. SCALES

I enjoy understanding each of my ingredients and the process of recipe formulation to create the perfect beverage. However, this is only useful if the recipe is strictly followed. Having accurate ingredient weights helps ensure that all of your calculated targets are achieved or are within respectable ranges. I like to have a scale that can read at least 10 pounds (4.5 kg) and also offers options for kilogram, ounces, and grams. Scales like these are usually my first choice to use because they read in the ranges that I normally work. Common weights for this type of scale would include: A 5-gallon (19-L) batch worth of base malt, specialty malts, hops (pounds, ounces, or grams), sugar, honey, other adjuncts, and various cleaning chemicals such as PBW.
Most homebrewers and breweries have a moderate scale of this size and it gets chosen 90% of the time over the other scale options available. The catch is that often these scales do not read in decimals in grams suited for precise smaller weights. For cases where I need smaller measurements with a +/- 0.1 g variable I have a small handheld scale. This scale is perfect for weighing powders like kettle finings, yeast nutrients, citric acid for sodas and hard seltzers, sodium benzoate for sodas, and priming sugar for exact carbonation targets for bottle or keg conditioning. Having these two scales will help ensure that the weights are exactly as intended so that you hit your targets and help prevent you from using excessive ingredients or chemicals. This will save you inventory and money no matter what size batches you brew.
5. GRADUATED CYLINDER

Just like with scales, I find calibrated graduated cylinders of multiple sizes to be extremely useful at home and at the brewery. To accomplish my various brewing tasks I have three plastic graduated cylinders that are commonly used. The first is 250 mL and is used for taking hydrometer readings, measuring larger quantity chemicals, or calibrating volumes for tests. The second is a smaller 50-mL cylinder with every 5 mL marked out. This is the one that sees the most usage. With this calibrated container I can properly measure things like sanitizer, Fermcap S, Clarity Ferm, flavor extracts, or liquid hop extracts. The third container is a 10-mL vial that is rarely used, but useful when needed (another option may be a syringe of this size). When you are fine-tuning recipe formulation and your adjustments are in mL, having something to measure these micro volumes is very useful. For instance, when making beverages with flavorings like soda, hard seltzers, or flavored beer we like to do trials with 4-oz. samples and 0.5 mL changes to narrow in our spectrum of desired flavor.
Enzymes and lactic acid are other liquids that require small dosing rates. For instance, I have used SEBamyl GL Liquid Saccharification Enzyme to brew a brut IPA that has a dosing rate of 0.36 mL per pound of grain. So 10 lbs. (4.5 kg) of malt would require 3.6 mL, which can be rounded up to 4 mL of enzymes. Having a smaller calibrated container will help you hit your targets and save on waste from overuse.
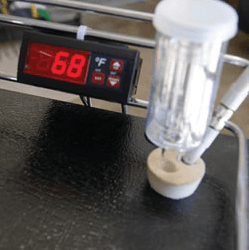
6. DIGITAL THERMOMETER
I get that floating thermometers are cheap and do the job, but the ease and instant readings of a digital thermometer or thermal gun is well worth the little extra money. I have many things to do during a brew day and waiting around to figure out a mash or knockout temperature is not on the list of things I want to do. I want to get an accurate reading, make a decision, then move on. For this, digital thermometers are the way to go.
7. REFRACTOMETER
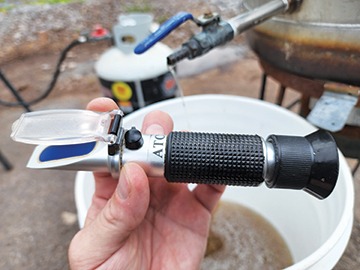
I didn’t think that the refractometer would make it on my list, but the more I thought about my brew days I realized that I rely on this tool fairly often. A refractometer is a device that reads sugar content in a liquid sample that is usually expressed in °Brix, while others offer specific gravity, or both. I use this device to help guide my lauters and make sure I am on target with my lautering operations. When making sodas I like to back up my specific gravity readings with a Brix refractometer reading to double check numbers. Another great use of the refractometer is to measure the sugar content in fruit. Once you know how much sugar is in the volume or weight of your fruit you can then calculate the fruit’s alcohol contribution. I have done brew days without using a refractometer and it did not feel right because I like knowing where I am in the process at particular times. I personally have two different inexpensive handheld refractometers for homebrewing, and several more expensive handheld refractometers at the brewery of various styles, and as long as they are calibrated they should all read accurately. Over time, and with heavy use, the cheaper refractometers might need to be replaced. There are more precise digital refractometers on the market if this item is next on your upgrade wish list.
8. pH METER
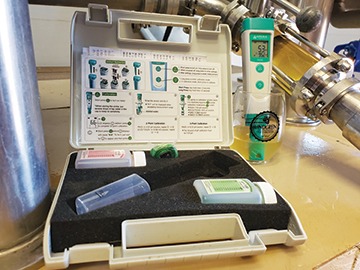
A pH meter is a must-have for all serious brewers. I must admit that it took me longer than it should have to get into taking pH readings, but now that I do, every sample gets tested. I thought that my beers were respectably good until I dove into water chemistry and realized how unbalanced they actually were. Controlling mash pH is vital to making a well-rounded and balanced beer. Homebrewers often use pH strips because they are cheap, however they are not precise. When I need to know a pH of a sample, I am looking for a quick, accurate number. Just like the thermometer, the extra money for digital equipment is well worth it.
9. CAPPER, EXTRA BOTTLES, AND CROWN CAPS
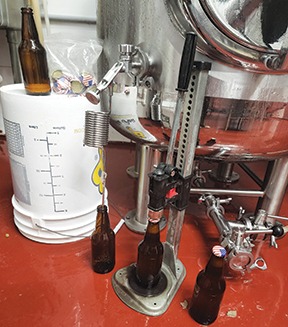
Most breweries package a large portion of their production in kegs and many homebrewers choose to go the kegging route as well due to the ease in cleaning and sanitizing, transfers, carbonation, dispensing, and time saved. While I love the ease and convenience of using a kegerator, it does not as easily allow me the option to bring my homemade creations with me when visiting friends and family. I usually give half of each batch away to friends so that I can brew another batch without the concerns of over consumption just to brew another batch again. For this reason, even after all the years of homebrewing and professional brewing, I still hand bottle every homebrew batch using a bottling bucket and bottle
conditioning methods.
I found it interesting over the years that every brewery I have worked at has had a hand capper, spare crowns, and bottles available for small projects. Even with a fully operating bottling line or canning line that we could use, for a small 5- or 10-gallon (19- or 38-L) experimental batch. Sometimes it’s easier just to bring out a couple cases of bottles, a bottling bucket or a Blichmann BeerGun®, and a capper. These pieces of equipment are a must for all of my homebrewing and professional brewing inventory. They are great to have on hand when you need them, even if you do keg the majority of your beer.
10. TEMPERATURE GUIDANCE AND/OR CONTROL

Breweries are fairly exacting when it comes to fermentation temperature control to create precise, repeatable products. Homebrewing equipment has come a long way in recent years and now there are many options for homebrewers to choose from for their fermentation control needs. There are products like conical jacketed stainless steel fermenters of every size, digital temperature controllers that hook up to your refrigerator or deep freezer, small glycol units, and a variety of fermentation chambers. These types of temperature control all work well and are nice if you have the extra money and space, though I consider them a luxury.
At the brewery we use fermentation temperature control, however, when I am homebrewing I have always used temperature guidance. Temperature guidance means to use nature, ambient in-house/garage temperatures, or other basic means to guide my fermentation temperature. I ferment my homebrew batches in fermentation buckets and plan my brew days during the right time of year and adjust for style. Brewing a lager in July proves to be mighty difficult without temperature control, so waiting until colder fall and winter temperatures to do outside lagering is what I do. Instead, when I’m brewing in July I pick yeast strains that perform at higher temperatures such as Belgian, hefeweizen, or kveik strains. Even if you pick a lager yeast and ferment it in your living room at ambient temperatures, you can help guide the temperature to not be excessive, and cold crash the fermenter using a basic method of your choice.
Picking beer styles that ferment in the range of your current environment is not necessary but very helpful. When not using nature to guide your temperature you can do a few clever things to adjust your temperature. In the past I have used a big bin to place my bucket fermenter in as an ice bath or to increase temperature as a hot bath. This surprisingly works well and you can even add cold/warm towels to help maintain the temperature. Even at a commercial brewery I’ve worked at I have experienced temperatures too cold in our fermentation room that we needed to add space heaters to keep the ambient temperature to at least 65 °F (18 °C) so that the wort would ferment at the ideal temperature. I have done this countless times when brewing in the winter at home and at work when I need a quick fix to increase the fermenter temperature.
It was more work than it was worth, but to drop the temperature I once dug a hole in my yard that was deep enough to place my bucket fermenter in along with some ice for a 4-day cold crash with gelatin. It was a hassle, but it worked as planned. A homebrewing friend of mine even has a small natural cave on his property that he ferments, ages, and stores his homebrews in.
Whether you have the best advanced temperature control fermenter on the market, use ambient living room temperature, use a bin, or have a hole dug in the yard, use what you have around to help guide your temperature control. Over the years I have become more relaxed with precise fermentation temperature control and try to keep my fermentation temperatures within a respectable range.
A SPECIAL SHOUT OUT FOR OFFICE SUPPLIES
There are some items that we take for granted and I feel that a special shout out to the office supplies is in order before closing out this article. These items are often overlooked until you run out and need to get more to have a smoother brew or work day. I am sure that we all have bookshelves full of notebooks, stacks of printing paper, printer ink, staplers, binders, clear paper sleeves, pens, markers, highlighters, assorted batteries, calculators, and other office supplies that help document our brewing experience. In a commercial brewery, full batch documentation is required by law, and is a great habit to continue when homebrewing. Detailed documentation is a great resource to have to review your process and allow you to make better quality beer, or to save money on your upcoming batches. Without these supplies our daily tasks would be much more difficult.