10 Tips for Tastier Homebrews

Brewers new to the hobby of making beer are often overwhelmed by unfamiliar ingredients, techniques, and equipment. Those who master the craft have to understand not only their equipment and processes, but a wide array of living ingredients that can produce a rainbow of flavors.
In this article I’m going to focus on 10 tips I would like to share after some 32 years of homebrewing. While some experienced brewers may notice my focus on brewing fundamentals, I will argue that it is the flawless execution of fundamentals combined with a bit of artistry that produces truly great beer on a consistent basis.
1. Good Sanitation
One of the first things any new brewer learns is the importance of sanitation in beer brewing. Due to the relatively low alcohol content of the final product, beers are very susceptible to infection from wild yeast and bacteria. Unfortunately these wild “bugs” are native to the malt, equipment, and ingredients we brew with.
While a lot of us are familiar with the risk of “sour beer” from bacterial infection, the wild yeast and bacteria can manifest in a variety of other ways in the finished beer. A large number of the off-flavors we associate with beer including acetaldehyde, diacetyl, alcoholic, esters, phenolics, solvent, sour, and sulfur are yeast-related. Wild yeast can produce high levels of many of these compounds on their own, and some even work in conjunction with naturally occurring bacteria like Lactobacillus and Pediococcus to create additional off-flavors.

So what does a good sanitation program look like? It consists of at least two separate steps: Cleaning and sanitation. Cleaning removes the “dirt” from all surfaces and crevices in your equipment including organic residue, dust, and stains. Generally you should clean all of your equipment immediately before you brew to remove dust, residue, and dirt, and clean it again immediately after brewing so you are not storing dirty equipment. Some common homebrewing cleaning agents include PBW, Oxiclean, Straight-A, and B-Brite (for stainless steel).
After you clean, you sanitize by using a sanitizing agent to kill nearly all of the bacteria and wild yeast on the surface of your equipment. Anything that comes into contact with your wort or beer after it has been boiled should be sanitized including tools, instruments, tubing, and all equipment. Some common homebrewing sanitizers include very hot water, Star San, IO Star, Iodophor, Saniclean, San Step, bleach, and Onestep.
2. Fresh Ingredients
Anyone who has sampled the beer from the tasting room at a world-class brewery can tell you the importance of freshness — you can literally taste it in the beer. The malt, hops, yeast, and even the water you brew with make the difference between a great and mediocre beer.
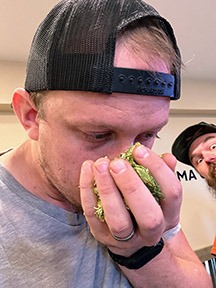
This point was made clear to me a few years back when I had the opportunity to do some small batch brewing with a few top professional brewers. We were selecting hops for a beer recipe and cut open about ten pouches of different hop varieties using a dry rub technique to see which ones had the hop aroma we were after. I was shocked to find a huge variation in the freshness and quality of the hops, which were all properly vacuum-packed and cold-stored. Two of the ten hops really popped, with a strong fresh aroma you could pick up as soon as you put them to your nose. We ultimately used these as the aroma addition in the beer.
Equally surprising was one of the ten hops that had a particularly pungent aroma of rotten vegetables. I’m not sure if the hops were processed, packaged, or stored improperly, but they were not fit for brewing and were quickly discarded. This got me thinking of the number of times I had just opened up a few packages of hops and dropped them into my beer without even smelling them. How many bad beers had I made that started with poor ingredients?
I had a similar experience one year with some old malt I had laying around the house that resulted in sub-par beer and an incomplete fermentation. Now, I rarely brew with anything but fresh ingredients (being very aware of the dates on the packaging and trying not to store ingredients for too long), and I sample the taste and aroma of all of the ingredients before brewing to make sure I’m not working with ingredients that have passed their prime.
3. Understand the Harsh Zone in Malts
A few years ago, Mastering Homebrew author Randy Mosher introduced me to the concept of “harsh zone” malts. Randy made the observation that very few malts are made in the color range between roughly 70 and 200
Lovibond. This is due to the fact that grains in that range have a decidedly harsh profile including flavors like burnt toast, burnt marshmallow, and harsh tannins.
Some of the malts in this zone include all of the dark crystal malts as well as Special B. Randy also made the observation that malts on the edge of the harsh zone like brown malt and pale chocolate malt can have the same harsh character if used in large quantities.
The harsh zone, in part, explains why many extract brewers who use larger quantities of dark crystal malt for color often produce beers with harsh flavors. It also explains why beers with large quantities of chocolate malt can seem harsher than something made with a darker malt like Black Patent.
Since I’m a big fan of dark beers, understanding the harsh zone helped to revolutionize many of my recipes. While I still use some harsh zone malts like Special B or Crystal 80 to add depth to my dark beers, I do so in much smaller quantities than before. Two or three percent of Special B in the grain bill will bring out nice dark fruit flavors like plums, raisins, or Turkish coffee. Using more can result in burnt toast.
I’m also more sparing in my use of caramel malts now. While caramel malts can be appropriate in certain styles like English beers, it is often overused. I find that the kilned color malts like honey, amber, melanoidin, and brown malt are often better choices depending on the flavors I am looking for.
For those interested in learning more on this subject, please read my full-length article “Avoiding the Harsh Zone” in the January-February 2018 issue of BYO, available online at https://byo.com/article/avoiding-harsh-zone/.
4. Maximize Hop Impact
The popularity of IPAs has driven an explosion in research and experimentation into the best use of hops. This led to a new body of knowledge in hop utilization in the boil as well as aroma oils. As a result we now have a much better understanding of how to maximize hop impact than we did even just a few years ago.
The first major revelation has to do with aroma oils in hops. Where previously many brewers used short boil times (aka aroma and flavor additions) to add aroma to the beer, we now understand that aroma oils are volatile and boil off very quickly. As a result, many brewers have moved to a single long-boil addition to add bitterness to the beer and have moved aroma hops to either the whirlpool or dry hopping. Instead of a bunch of boil additions, I now use one for most beers to get the bitterness level I desire.
Since aroma oils boil off quickly, brewers now use large whirlpool or dry hop additions for beers where hoppy aroma is needed. The lower temperature steep in the whirlpool or during dry hopping will preserve a wide variety of aroma oils in the hops, resulting in a strong fresh hop aroma in the finished beer.
To maximize your hop impact for something like an IPA, I recommend using a single long-boil addition to achieve the bitterness you want, and then steep hops in both the whirlpool (or hot steep) and then add another addition (or two) as dry hops.
For more on this subject, I wrote a story in the March-April 2018 issue of BYO called “Save Your Hops For Post-Boil,” which can be read online at: https://byo.com/article/save-hops-post-boil/.
5. Understand Your Water
A typical beer is 90–95% water, so the quality of your water has a significant impact on the quality of your beer. Yet many brewers simply use the water coming from their tap without evaluating it. Some municipalities make things more complicated by getting their water from different sources during the year, which means that a beer brewed one month could be completely different than one brewed the next month.
There are two ways to make sure you are brewing with good water. One is to measure your tap water using a test kit or by sending it to a brewing lab like Ward Laboratories. The second method is to start with distilled or reverse osmosis (RO) water and “build the water up” by adding water salts.
Most brewers will have a tap water source suitable for brewing, so testing your water is a good option. You want to use a “brewers test” or kit that tests for the “big six” water ions. I’ve listed them here along with what is considered the “good” range for brewing: Calcium (50–150ppm), magnesium (10–40 ppm), sodium (0–150 ppm), sulfate (50–250 ppm), chloride (0–250 ppm), and bicarbonate (0–250 ppm).
If your water falls within those ranges it is probably appropriate for brewing. If it is over on a few numbers you can often dilute it with some distilled or RO water to get it into the acceptable range. If it is low on certain ions you can add water salts to bring it up to the correct range. You can use brewing software or online calculators to estimate the dilution or salts needed. Those same tools can be used to duplicate the water profile of famous breweries from around the world if you are trying to brew a particular style. For those who choose to start with RO or distilled water you can use the same software to estimate the salts needed to get the desired water profile.
For those of you brewing with malt extract, I recommend starting with RO or distilled water and don’t add any salts. The reason for this is simple — the malt extract was made by mashing grains to produce wort, just as any all-grain brewer would do, and then it is boiled under a vacuum to remove the water. The maltster already started with “good” water and handled the chemistry for the mash to produce good wort. When they removed the water, the salts and ions were left in place so simply adding distilled or RO water back will get back to the “good” water profile they started with.
6. Get the Most from Malt Extract and Specialty Grains
If you are an extract brewer, there are several techniques you can use to get the most flavor out of your extract brews. The first is to use what is called a “late extract addition.” The technique is to simply add a portion (perhaps 25–30%) of your malt extract up front when you begin to boil and then add the remainder of the malt extract only a few minutes before the end of the boil.
The advantage of using this late extract technique is it reduces the risk of scorching your malt, particularly early in the boil when malt can settle at the bottom of the kettle and caramelize. A second advantage is that there is less darkening of the malt color during the boil. Because of the way malt extract is manufactured and stored it is susceptible to darkening when heated, but the late malt extract reduces this effect.
You can also get more flavor out of your specialty grains using the right techniques. First, select fresh but flavorful grains that can be steeped including crystal and roasted malts. Second, try to use less water during the steeping phase. Much like all-grain brewers are concerned about the pH during the mash, you can create pH problems in your steeping phase by using a lot of water with only a pound or two (0.45–0.9 kg) of grain.
The slightly alkaline water can combine with the slightly acidic grains to produce a high pH during the steep. At pH levels above roughly 6.0 you can extract excess tannins when steeping the grains, which can result in an astringent tannic (aka sucking on a tea bag) finish. To avoid this you should use 2 quarts (2 L) or less of water per pound (0.45 kg) of grain.
Some care needs to be taken when using small amounts of grain and water in a grain bag in a large pot as you can easily burn the bag. For smaller batches, I’ll often use a small stovetop pot and strainer instead of a grain bag to solve this problem.
7. Manage Mash pH
For all-grain brewers, managing the mash pH can result in a beer with a brighter overall flavor profile as well as improvements in the shelf stability of the beer. To achieve this you want your pH during the main conversion step of the mash to be between 5.2–5.6.
If you recall your high school chemistry class, pure water has a pH of 7.0. Most tap water is slightly alkaline, which means it has a pH of roughly 7–8. However, the malts we add to our mash are acidic, with darker malts being more acidic than light malts. So when we mix our slightly alkaline water with acidic malt at the beginning of the mash we can end up with a mixture that is anywhere from 5 to 7 in overall pH.
Dark beers with a lot of roasted malt will often have a pH in the “good” range due to the dark malt alone, but lighter-colored beers will usually need some pH adjustment by adding acid. Lactic acid, available at any homebrew shop in liquid form, is probably the easiest to work with and a few milliliters will usually get you into the “good” range quickly.
Most of us use software or an online tool to estimate the pH of the grist from the base water and grain bill and then estimate how much lactic acid is needed. The technique I recommend is to add at least half of that amount up front when you mash in, which should get you into the “good” range and then measure the pH of the grist after it has settled to make a final pH adjustment if needed. This will ensure you are in the target 5.2–5.6 range for the entire mash.
8. Healthy Yeast
There are 16 “off-flavors” on the score sheet used by Beer Judge Certification Program (BJCP) judges to judge beer competitions. The root cause of nine of these off-flavors can be traced back to problems with the yeast. This includes beer flaws like acetaldehyde, alcoholic, diacetyl, esters, phenolics, solvents, sour, sulfur, and yeasty flavors. The antidote for all of these off-flavors is to ensure good yeast health throughout the fermentation process.
Start by pitching enough fresh healthy yeast. While dry yeast has a very long shelf life, liquid yeast manufacturers generally recommend using liquid yeast within 6 months of the packaged date (assuming it has been stored properly). Even during this period, its viability does drop each month. A fresh liquid yeast packet has roughly 100 billion yeast cells, but even a 5-gallon (19-L) average batch of ale has an ideal pitch rate in the range of 160 billion cells. That’s why most brewers using liquid yeast will make a starter from the yeast using dry malt extract.
You can use software or an online tool to calculate how large of a starter you need but a good rule of thumb is roughly a 2-liter starter (at 1.036 gravity) for a 5-gallon (19-L) batch or a 4-liter starter made from 2 packets of yeast for a 10-gallon (38-L) batch. A larger starter may be needed if your liquid yeast has an older date.
The next important consideration is aeration of your wort. During the initial rapid growth phase, yeast cells require oxygen. Boiling your wort removes most of the oxygen, so you need to add some oxygen back to promote yeast growth before you pitch your yeast. You can add some oxygen by agitating your fermenter, or even better; use an aquarium pump and aeration stone to add air. However, pure oxygen is the best option. Fortunately you can purchase relatively inexpensive oxygen wands that connect to small disposable oxygen bottles from your local hardware store. This will provide pure oxygen that can get your wort up to the ideal oxygen level in about 90 seconds.
Long story short, aerate your wort and pitch enough healthy yeast and you will avoid the vast majority of yeast-related off-flavors in your finished beer.
9. Manage Your Fermentation
Hand-in-hand with pitching a healthy yeast starter, you need to manage your fermentation temperature to keep it from producing off-flavors. While there are a wide variety of temperature-controlled fermenters available now, you don’t need to spend a ton of money to maintain good fermentation conditions, particularly for ales.
To manage fermentation temperatures you need to place your fermenter in a cool, dry place ideally away from any direct sunlight. You can monitor fermentation temperatures with a simple “stick-on” temperature strip, but keep in mind that the temperature inside the fermenter could be as much as 10 °F (5 °C) higher than the surface of your fermenter. You are mainly concerned with keeping the fermenter cool as high fermentation temperatures can create esters (fruity flavors) as well as higher order fusel alcohols.
A simple method to keep a plastic or glass fermenter cool is to wrap wet towels around it and point a fan at it. The evaporation from the towels will lower the temperature by several degrees, which should get you into a good range for most ale yeasts. Keep the towels wet by soaking them in water as needed.
There are a variety of more sophisticated methods of temperature control including converting refrigerators and freezers, ice baths, insulated boxes, water chill systems. You can build an insulated box using ice to chill it with inexpensive parts from your local hardware store, convert an old refrigerator, or spend hundreds on a complete refrigeration system depending on your budget and time available. You could also go the route of investing in a glycol chiller, as many models have hit the homebrew market over the last couple of years.
10. Understand Flavors and Beer
Perhaps the hardest aspect of beer brewing to master as you grow to develop your own recipes is knowledge about flavors and the ability to judge beer. When we cook or bake at home we’re able to develop new recipes based on expert knowledge developed over a lifetime about the basic ingredients like spices, butter, eggs, flour, and sugar. Unfortunately, new brewers simply don’t have that level of experience or knowledge about hops, malts, yeast, and water.
However it’s never too late to start developing that knowledge. Before you brew any beer, I encourage you to sample the ingredients. Do a dry rub of your hops and get your nose right down into them. Sample your grains, either by tasting them or creating a small tea with some grains and hot water. Taste your water before you brew to make sure it is free of off-flavors. While it’s hard to taste your yeast up front, you should know what a good fermentation looks and smells like, and when using liquid yeast you can often use your starter to get an idea of whether the yeast is performing properly. If any of the ingredients are not up to your standard do not use them.
After you brew, critically judge your own beer and see if you can tie back the flavors you taste to the ingredients you used. Pull out some of the original grains or the hop variety you used and make the connection between the individual ingredients and flavor of the beer. What flaws are in the beer? How is the color and hop balance? What do you like about the beer? What don’t you like?
After some practice you may be able to identify many of the ingredients used in commercial beers. What hop variety did they use? What do you like or dislike about the commercial beer? What kind of specialty grains do you think they used? Along with this you can research recipes of different styles to understand the key ingredients used, characteristic flavors, and even processes used.
Over time you will identify the flavors you like and how the ingredients fit together to produce various beer styles. Developing the skills needed to evaluate ingredients, combine them into a unique beer, and critically judge the resulting beer are skills required to becoming an outstanding brewer!