Alternative Mashing Techniques
Mashing, or the process of transforming grains into fermentable sugars, is what I consider to be one of the main tasks of the all-grain brewer, and one where much of the character of the finished beer is determined. Yet, I often find myself in arguments with people about this concept. I am often asked about how I brew, and after describing my methods, people then attempt to rebut me with statements like, “but <some other brewer> says that isn’t necessary,” or they do something differently. One point that I always stress is that there is more than one way to brew, and that brewers can always make their own choices.
If you study the historical brewing traditions of different countries, you will easily see that brewers were making their own choices based on their available ingredients and their systems, but also based on how they learned and what their consumers preferred. These decisions often led to the creation of distinct beer styles, which then had their own influences. In the craft beer era, brewers began borrowing traditions from other countries, as well as later innovating on their own. So, I like to consider techniques and methods from the traditional, pre-craft era, as well as the newer techniques we see today. Using these different techniques to solve brewing problems is part of how you develop your own personal style of brewing.
In this article, I want to examine three of these techniques: Parti-gyle mashing from England, step mashing from Germany, and decoction mashing from the Czech Republic. These approaches to wort production have a place in my own personal toolbox of brewing methods, and you may wish to consider them in your own.
Parti-Gyle (England)
Parti-gyle brewing is a historical English method of producing beer where a single mash is sparged to produce multiple worts that are boiled, sugared, and hopped separately, then blended and fermented to produce beers of different strengths. It is probably the least well understood of the brewing methods I will cover since it doesn’t always make much sense for modern homebrewers. However, I do use portions of the method in several of my recipes.
In English brewing, a gyle is a wort of a given strength — but perhaps thinking of it as a batch of beer during the brewing process is better. Parti-gyle brewing is then where you use one mash to produce multiple finished beers. Historical English brewing systems of the early industrial era featured larger mash tuns that would receive infusions of hot brewing liquor (water). Once the wort was lautered, it would then be boiled in smaller direct-fired kettles. Sparging would be continuous, and take a long time to extract all the sugars from the mash.
Each batch (gyle) is treated differently, meaning that it could have additional brewing sugars (typically invert sugar of varying color, somewhat serving the same purpose as modern crystal malts of different colors) and its own hopping level. Since the sparge was continuous (and slow), each batch would be ready for boiling at different times. Once all the gyles (often two or three) from a single mash were boiled and chilled, fractions of each gyle were blended in the fermenting vessels in different proportions, and then fermented and matured separately to produce different strength beers, often of different character given the varying sugars and hops involved, as well as the cold-side treatments (such as aging times and dry hopping). Basically, portions of each gyle are being used as ingredients to make the various finished beers.
Perhaps the best-known brewery to use this in modern times is Fuller’s of Chiswick in London, England. They parti-gyle to produce their strongest beer, Golden Pride, as well as their bitters — ESB, London Pride, and Chiswick Bitter. This is a large-scale method that allowed commercial breweries to produce multiple, consistent products from a single mash, which was the most expensive resource of the time. The extended sparging extracted the most fermentable sugars from this mash, so there was definitely an economic reason involved. However, those economics are not necessarily the same today, which is likely a large reason this method of brewing is now less common.
At this point, it might be good to pause and discuss the finer points, and to deal with common misunderstandings. Parti-gyle brewing does not mean just brewing separate batches with first runnings and second runnings (resulting in one strong beer and one low-gravity beer). Well, this could technical qualify as parti-gyle brewing, but this is not how the English do it. The gyles are always blended to produce separate beers, often many more finished beers than the number of individual gyles. These gyles were blended after boiling but before fermenting — blending finished beers is not part of this method. Each fermenter might receive different sugars of varying colors, which would affect color and flavor of the finished beer, and a different hop treatment during the boil, so finished beers could be of very different bitterness levels in addition to different strengths. Beers were often fermented with the same yeast strain, as would be expected in commercial breweries, however this does not have to be the case for homebrewers.
You might be asking yourself at this point, why would brewers go to all this trouble? Like many answers, it made sense at the time. Given the systems brewers had, the economics involved, and their desire for a wide range of consistent products in their portfolio, this solution made sense. I contend that the average modern homebrewer doesn’t have any of these considerations, so the method has little utility in its full form.
That said, understanding this approach does allow for some cool modern techniques. Making a beer with just first runnings will produce a strong beer of high quality, and is something I do with many of my strongest beers. I don’t necessarily want to blend any of that first runnings wort, as I like to have as much of the strongest beer as possible. Again, my economics and portfolio considerations are different as a homebrewer.
Blending worts of varying strengths to hit a target gravity is a useful skill to have, just as it is to understand how to add sugars to raise strength in a batch or to dilute with water to lower the starting gravity. To do this properly, you need to have accurate measurements of the gravity of each separate wort, as well as the volumes involved. You need to do some basic math to calculate the expected gravity of the blended batch, and you need to be able to precisely measure the volume of wort being blended. Or, you can measure as you go to hit a gravity target as long as you don’t mind differences in final volume.
The trick to blending for gravity is working in gravity points per gallon (or liter), or essentially the amount of sugar in a unit volume. A gallon of 1.050 beer has 50 gravity points. Five gallons of the same beer has 250 gravity points. If you have multiple worts, measure the gravity and volume of each to know how much sugar you have. Then do simple arithmetic to calculate the gravity of the blended batch, taking into account the contributions from each fraction of the total wort. Just think about the total sugar in the beer, and divide by the volume to get the points per gallon. This is the same as the specific gravity of the wort, if you just add the “1.0” portion back. Some brewing software may do this calculation for you, but you still have to have accurate gravity and volume readings. Bitterness works the same way, except you are dealing with IBUs per unit volume, not gravity points. But the math is the same.
Your system efficiency and sparge techniques will have an impact on the gravity of your runnings. It’s very hard to just grab a recipe and apply this technique — you will have to measure and calibrate it for your system. I sometimes use the no-sparge technique for my first runnings. These will have a higher gravity than those produced by continuous sparging. Batch sparging will also have different results. Measure your gravities and volumes to be sure what you are working with.
One thing that hasn’t been discussed so far is the flavor differences of wort in successive runnings. First runnings have higher gravity, of course, but they also have superior flavor quality. You are extracting the best-tasting sugars at this point, with little of the husk material. As sparging continues, the quantity of undesirable compounds increases, such as polyphenols, silicates, ash, and phosphates. If you make a beer with only second runnings, you might find the flavor to be thin (more so than the gravity might suggest) and somewhat grainy and harsh. Blending in some of the first runnings gives you a smoother profile. But you can obtain some of that same effect by a technique I call mash capping — adding some additional malts during the sparge that don’t need to be mashed (crystal malts, chocolate malts, etc.). Adding sugars to the fermenter (invert sugar, candi sugar, honey, etc.) can also give additional flavor, and shouldn’t be overlooked.
Here is a great pro tip if what you are really after is just the first runnings to make a strong beer and don’t care about the rest: Don’t throw the second runnings out — use them for making yeast starters.
So, to summarize, I see parti-gyle as a historical method that makes sense for making certain types of English and Scottish beers, if you have a large mash tun, multiple kettles, multiple fermenters, and a desire to produce multiple beers from a single brewing session. If you don’t, you might use pieces of the method to give you higher-quality strong beers, and to not waste the rest of your mash. Many homebrewers will not have the time, equipment, or patience for the full method, or might be turned off by the additional measurement steps involved. I personally find it easier to optimize a single batch, but I’m not running a business where I produce the same beers over and over again.
When I apply the method, I tend to think about the biggest beer first. Often, I will pick something like a barleywine, a strong Scotch ale, or an imperial stout. But you can start with something like a strong bitter or an old ale too, or even just shoot for different strengths of Scottish ale, bitter, or mild. One advantage of making a big beer and a small beer from the same batch is that it gives you something to drink while you’re waiting for the big beer to mature.
See the recipes for an English pale ale and light mild that follows for an example of a parti-gyle brew day.
Step Mashing (Germany)
German brewers have always used fairly intensive methods of mashing their grains, including the decoction mash. But as modern malts were made more highly modified, German brewers (and others) moved away from the traditional decoction mashes to something that is more resource-efficient, the step mash. They both have similar primary goals in breaking down the grains into a wort composed of multiple kinds of fermentable and unfermentable sugars, body-building dextrins, and other lesser compounds. The specific wort composition affects its fermentability, as well as the mouthfeel of the finished beer. Both step mashing and decoction mashing can produce well-attenuated beers, but the step mash does this without adding the color, flavor, and mouthfeel effects produced by a decoction mash.
Step mashing is easy for most brewers to understand. Think about the typical infusion mash, which is resting the mash at a temperature somewhere in the saccharification range for amylase enzymes (generally, 151–154 °F/66–68 °C). The simplest step mash program will use a rest in the range for beta-amylase (143–149 °F/62–65 °C) followed by one in the alpha-amylase range (158–163 °F/70–73 °C). The lower temperature rest creates maltose, making the beer more fermentable, while the higher rest helps build unfermentable dextrins, which adds to the body of the beer.
There are many other potential rest temperatures that can be used (depending on the recipe and ingredients), including protein rests in the 122–131 °F (50–55 °C) range, beta glucan or acid rests in the 86–122 °F (35–50 °C) range, and ferulic acid rests in the 111–115 °F (44–46 °C) range. Lower temperature rests generally break down more complex structures, and can be used when higher proportions of flaked adjuncts are used. Overuse of protein rests with modern grains can cause poor head retention, however. A ferulic acid rest is sometimes used when making German wheat beers since it helps develop a precursor that yeast metabolize into the clove flavor.
Mashout typically takes place at 168–170 °F (76–77 °C). A step mash program uses rests of specific times at the specific temperatures, and is always moving upwards in temperature. The rate at which the temperature is increased is an important variable, since enzymes continue to be active well outside their preferred temperature ranges. Slower rates of increase give enzymes more time to do their work and generally result in greater degrees of attenuation.
Depending on your system, you can conduct steps through the infusion (addition) of hot or boiling water, or through the direct heating of the mash. The mash can be heated by direct heat/fire, or by applying heat to the wort as it recirculates. Care should be taken in direct heating to avoid extreme temperature variations throughout the mash, so slow mixing is advisable.

If increasing temperature by adding hot water, keep in mind that the mash will be diluted with each addition. Starting with a thicker mash is normal, but understand that a thick mash will initially slow protein degradation. The mash can also be difficult to stir as the viscosity of the mash is high at lower temperatures, particularly below 140 °F (60 °C) when the barley malt has not yet gelatinized.
I use step mashes in the majority of my recipes since they are easy to accomplish on my system, which allows heat to be added to the recirculating wort during the mash. I prefer step mashes in any style that has a malty-but-attenuated profile, since I believe it really increases drinkability to avoid a heavy or sweet finish — even with modern, well-modified malts. Just because malts are well-modified doesn’t mean they automatically convert into the types of fermentable sugars that you want in your recipe. You still have to control the activity of the very well-developed level of enzymes in your malt. In cases where I use other methods (especially decoction), I sometimes will use step mashes for part of the mash program. So, the ability to easily raise the temperature of a mash from one level to another is a technique I use all the time — even for nothing else but mashout.
See the recipe that follows for an example of a step mash recipe that won’t disappoint.
Decoction Mashing (Czech Republic)
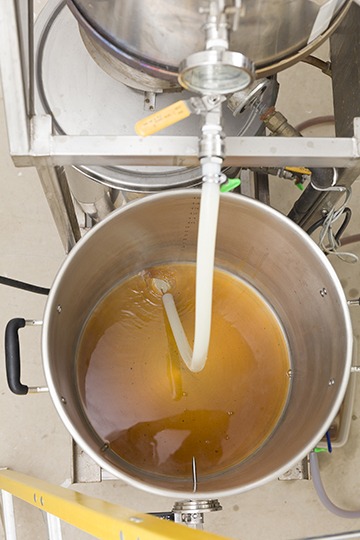
Decoction mashing is similar to step mashing in that it involves moving the mash through a series of rest temperatures designed to degrade the grain material into fermentable sugars. However, the manner in which the rests are accomplished and the side effects from the process are quite different. The root of the word “decoction” means to extract flavor by boiling, and that’s a good clue as to what’s involved. A portion of the mash is removed, boiled separately, and then remixed with the remainder of the mash to cause an increase in the mash temperature.
The word decoction can be used like a verb, meaning the process, or as a noun, meaning the fraction of mash removed. It was a traditional central European brewing method that is sometimes still practiced in Germany (although it has largely been replaced by step mashing), but is still extremely popular in the Czech Republic. Just as with step mashing, there may be multiple temperature rests involved, so multiple decoctions may be performed to make a specific beer. Single, double, and triple decoctions are commonly performed, although the Czechs prefer at least a double decoction for most styles.
In a step mash, we have seen how the mash is moved through series of rests at increasing temperatures. In a decoction mash, the main mash is also moved through a series of rests, but so is each decocted fraction. Subsequent decoctions in a recipe will begin at a higher temperature, so they typically have fewer rest temperatures. However, the final step in a decoction is always to bring the decocted fraction to a boil. The duration and vigor of the boil can depend on the style being made, with darker beers involving longer boils.
The purpose of each rest temperature is the same as in step mashing — to spend time at a temperature where certain desired enzymes are active, and thus causing complex carbohydrates to degrade into simpler substances. When the decoction is boiled, all enzymes are denatured, which seems like saying they are killed (except they aren’t alive), so it’s more proper to say that they are deactivated by causing their complex shapes to unwind. Regardless of how you think of it, they will no longer function as enzymes. This is the reason why the thick portion of the mash is what is decocted, since most of the enzymes in the mash are in the thin liquid portion. Leaving that liquid in the main mash preserves the enzymes for future use during the remainder of the mash program.

Decoction mashing is a more intensive mash program, and takes more time, labor, heat, and equipment. While traditionally it helped break down undermodified malt, don’t be deceived into thinking that is the only reason to use decoction mashing. The boiling portion of decoction mashing allows Maillard reactions to transform the malt, which cause a darkening of color through the creation of melanoidins, and the increase in flavor compounds. The Maillard reaction is important in food science for creating deeper, richer flavors, and is classified as a non-enzymatic browning reaction between amino acids and sugars in a hot, moist environment. It’s what makes chef Anne Burrell say, “brown food taste good” in her caveman voice. It is not the same as caramelization, which is simply the heating of sugar until it starts to brown.
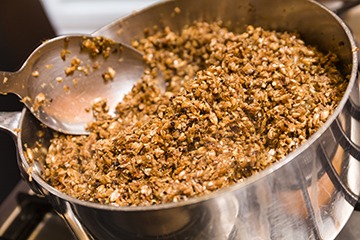
When you perform a decoction mash, you remove a portion of the mash to another vessel for separate treatment. Typically, this is the thick portion of the mash, but the final decoction in a mash program can be conducted with the thin portion. I typically use a heavy stockpot — you will appreciate having a heavy bottom in the pot as it tends to reduce scorching. You should stir the decoction frequently to ensure that it isn’t sticking to the bottom of the pot, which would cause the grain to carbonize (burn) quickly. You’ll know if this happens if you have a burned bottom of the pot and the mash tastes like cigarette butts. Remember, brown food tastes good, but black food is burned.
I find it helpful to use a long spoon to stir, which allows me to scrape along the bottom of the pot to see if anything is sticking. The decocted mash shouldn’t be totally dry, and you shouldn’t pre-heat the decoction pot. Apply the heat slowly and keep stirring. I generally use between 30–40% of the main mash when decocting, although there are some types of decoction mashes where the entire volume of the mash is boiled. In a kesselmaisch (kettle mash), the liquid portion is separated and reserved from the thick portion and the entire thick mash is boiled.
Another variation of a decoction program is the hochkurz (high short), meaning that it starts at a higher temperature (generally in the saccharification range) than a traditional full decoction program. It can be used in conjunction with the other decoction terms, and is a program typically used with well-modified malts. The short boil times of perhaps five minutes represent the low end of most decoction boils, while some darker beers may see boiling times of 20 minutes or greater. Longer boils develop more flavor and color, which isn’t wanted in every style (like pale ones).
German brewing textbooks say the benefits of decoction mashing include increased brewhouse yield, increased melanoidin formation, decreased dimethyl sulfide (DMS), more extensive gelatinization and liquefaction of starches, and less protein breakdown. The Czechs, however, generally consider it part of the national character of their beer. They believe it improves beer quality in terms of drinkability, body, smoothness, and character, while also improving brewhouse yield, developing more melanoidins and polyphenols that improve beer stability, and more completely removing volatile compounds. The technical aspects of German and Czech sources seem in agreement, but the Czechs add a qualitative assessment indicating their preference for beers with more of a robust character and often a fuller mouthfeel.
I tend to use the technique in German lagers, especially darker and maltier ones, Czech lagers (see recipe that follows), and German wheat beers. I may use it in some other styles that use a large percentage of wheat malt, or ones that have a malty character. Sometimes using an unusual technique in a non-traditional style helps your beer stand out in a competition.
Applying the Techniques
While some recipes are designed around a specific technique, you as the brewer can formulate your own recipes and decide on the methods you want to employ. I often use part of all of these techniques when I brew. Are there other ways of solving the problem? Certainly. But it’s useful to know what these methods produce, so if you do vary from a recipe, you can understand what outcomes you are trying to achieve. As you try to reproduce some of the world’s beer styles or invent ones of your own, you may find that these methods give you a better outcome.
Alternative Mashing Recipes
Parti-Gyled English Pale Ale and Light Mild
First gyle (65% efficiency):
(5 gallons/19 L, all-grain)
OG = 1.054 FG = 1.011
IBU = 34 SRM = 13 ABV = 5.8%
Because these recipes are designed to illustrate differences in mashing techniques, there are no extract equivalents. Many brewing software apps don’t directly support parti-gyle brewing, so each gyle must be entered as a separate recipe. Create two recipes, but use the same grist for both. For the second batch, change the brewhouse efficiency setting to one half the first recipe (in this case, 65% and 32%). Each recipe has different sugars, hops, and yeast. But read the recipe — these beers are blended before they are fermented! You will likely have to adjust this recipe after brewing to use your system efficiencies based on your sparge techniques.
Ingredients
4 lbs. (1.8 kg) Belgian pale ale malt
4 lbs. (1.8 kg) Golden Promise malt
2 lbs. (908 g) flaked maize
1.6 oz. (45 g) chocolate malt
1 lb. (454 g) amber Belgian candi syrup, D-45
5 AAU East Kent Goldings hops (first wort hop) (1 oz./28 g at 5% alpha acids)
3.7 AAU Challenger hops (60 min.) (0.5 oz./14 g at 7.5% alpha acids)
1 oz. (28 g) East Kent Goldings hops (5 min.)
1 oz. (28 g) Styrian Goldings hops (dry hop)
Wyeast 1968 (London ESB) or White Labs WLP002 (English Ale) yeast
3⁄4 cup corn sugar (for priming)
Second gyle (32% efficiency):
(5 gallons/19 L, all-grain)
OG = 1.027 FG = 1.005
IBU = 13 SRM = 8 ABV = 2.9%
Ingredients
Same grains from first gyle, plus:
0.5 lb. (227 g) Lyle’s Golden Syrup
3 AAU Whitbread Golding Variety (WGV) hops (60 min.) (0.5 oz./14 g at 6% alpha acids)
Wyeast 1335 (British Ale II) yeast
2⁄3 cup corn sugar (if priming)
Step by Step
This recipe uses reverse osmosis (RO) water. Adjust all brewing water to a pH of 5.5 using phosphoric acid. Add 0.5 tsp. of calcium chloride and 0.5 tsp. of calcium sulfate to the mash.
This recipe uses a parti-gyle infusion mash with multiple sparges. Use enough water to have a relatively thin mash (2.5 qts./lb. or 5.2 L/kg) because we will be using the no sparge technique initially. Mash in the malts at 152 °F (67 °C) and hold for 60 minutes. Raise the mash temperature to 169 °F (76 °C) by adding at least 2 gallons (7.5 L) of near-boiling water. Recirculate for 15 minutes.
Put the first wort hops in the kettle. Run off the mash tun slowly without sparging, collecting 6 gallons (23 L) of wort in the kettle. Boil the wort for 60 minutes, adding the hops from the first gyle recipe at the times indicated. Add the candi syrup with 15 minutes left in the boil.
Meanwhile, slowly sparge the mash and collect 6 gallons (23 L) of wort in another kettle. Boil the wort for 60 minutes, adding the hops from the second gyle recipe at the times indicated. Add the candi syrup with 15 minutes left in the boil.
Cool both worts to 66 °F (19 °C). You should have about 5 gallons (19 L) of each wort at the end of each boil. Prepare two fermenters. Blend 4 gallons (15 L) of gyle one and 1 gallon (3.8 L) of gyle two in the first fermenter, yielding 5 gallons (19 L) of 1.049 wort. Blend 1 gallon (3.8 L) of gyle one and 4 gallons (15 L) of gyle two in the second fermenter, yielding 5 gallons (19 L) of 1.032 wort.
Pitch the first yeast into the first fermenter, and ferment the 1.049 beer at 66 °F (19 °C) until complete. Dry hop for 3 days at room temperature.
Pitch the second yeast into the second fermenter, and ferment the 1.032 beer at 70 °F (21 °C) until complete.
Rack the beers, prime and bottle condition in bottles or casks, or keg and force carbonate each beer.
The finished beer from the first fermenter is an English pale ale, OG = 1.049, FG = 1.012, IBU = 30, SRM = 12, ABV = 4.9%.
The finished beer from the second fermenter is an English pale mild, OG = 1.032, FG = 1.005, IBU = 17, SRM = 9, ABV = 3.5%.
Step-Mashed Kölsch
(5 gallons/19 L, all-grain)
OG = 1.046 FG = 1.011
IBU = 18 SRM = 4 ABV = 4.5%
It is possible to produce a Kölsch in less time, but Kölsch yeast is notoriously difficult to clear because it is a powdery yeast. Giving it sufficient classic lagering time does help it clear, and it also helps reduce some of the sulfur notes produced by the yeast. Kettle finings or post-fermentation clearing agents (even mechanical filtration) is recommended if the beer isn’t fully clear. Kölsch should be a brilliantly clear beer, so please pay attention to this important part of the style.
Ingredients
9 lbs. (4.1 kg) German Pilsner malt
4 oz. (113 g) Vienna malt
3 oz. (85 g) Caravienne®, Caramel Vienna, or Cara 20 malt
1.4 AAU U.S. Liberty hops (first wort hop) (0.33 oz./9 g at 4.3% alpha acids)
4 AAU Hallertauer hops (30 min.) (1 oz./28 g at 4% alpha acids)
0.4 oz. (11 g) U.S. Crystal hops (5 min.)
White Labs WLP029 (Kölsch Ale), Wyeast 2565 (Kölsch), or SafAle K-97 yeast
3⁄4 cup corn sugar (if priming)
Step by Step
This recipe uses reverse osmosis (RO) water. Adjust all brewing water to a pH of 5.5 using phosphoric acid. Add 1 tsp. of calcium chloride to the mash.
This recipe uses a step mash with a mashout. Use enough water to have a moderately thick mash (1.5 qts./lb. or 3.1 L/kg). Mash in all the grains at 131 °F (55 °C) for 10 minutes, then raise to 145 °F (63 °C) and rest for 45 minutes. Then raise to 158 °F (70 °C) and rest for 20 minutes. Then raise to 168 °F (76 °C) and rest for 10 minutes to mashout, recirculating. Sparge with 168 °F (76 °C) water until 6.5 gallons (25 L) of wort is collected.
Boil the wort for 60 minutes, adding the hops at times indicated in the recipe. After the heat is turned off, let the wort stand for 20 minutes before chilling the wort. Then chill to 58 °F (14 °C).
If using a liquid yeast, oxygenate and then pitch the yeast. If using a dry yeast, oxygenation of the wort is not necessary. After four days, allow fermentation temperature to rise to no more than 68 °F (20 °C) until fermentation is complete. Rack and lager for two months at 40 °F (4 °C). Rack and allow the beer to drop bright, filtering or fining if necessary. Prime and bottle condition, or keg and force carbonate to 2.4 v/v.
Double-Decocted Czech Dark Lager
(5 gallons/19 L, all-grain)
OG = 1.052 FG = 1.014
IBU = 30 SRM = 27 ABV = 5%
This beer is in the style of U Fleků, the best-known Czech example of this style, and uses the mash schedule from that brewery. It is a little different from the common schedules that I use. When pulling decoctions, take about 1⁄3 of the thick part of the mash to heat in your decoction kettle. Maintain the main mash at the current rest temperature until the decoction is finished. The recipe uses a slow, traditional lagering schedule.
Ingredients
5.5 lbs. (2.5 kg) Pilsner malt
3.33 lbs. (1.5 kg) Munich malt
1.66 lbs. (750 g) Weyermann CaraMunich® Type 3 malt
8 oz. (227 g) Weyermann Carafa® Special Type 3 malt
3.8 AAU Saaz hops (first wort hop) (1 oz./28 g at 3.8% alpha acids)
3.8 AAU Saaz hops (60 min.) (1 oz./28 g at 3.8% alpha acids)
1 oz. (28 g) Saaz hops (5 min.)
Wyeast 2278 (Czech Pils), White Labs WLP800 (Pilsner Lager), or Mangrove Jack’s M84 (Bohemian Lager) yeast
3⁄4 cup corn sugar (if priming)
Step by Step
This recipe uses reverse osmosis (RO) water. Adjust all brewing water to a pH of 5.5 using phosphoric acid. Add 1 tsp. of calcium chloride to the mash.
This recipe uses a double decoction mash, with some step mashing. Use enough water to have a moderately thin mash (2 qts./lb. or 4.2 L/kg). Mash in the Pilsner and Munich malts at 99 °F (37 °C) and hold for 10 minutes. Raise the mash temperature to 127 °F (53 °C) and hold for 15 minutes.
Pull the first decoction, resting it at 145 °F (63 °C) for 15 minutes and 163 °F (73 °C) for 15 minutes, before boiling for 15 minutes. Remix the decoction with the main mash. The mash should now be at 145 °F (63 °C). Allow the mash to rest for 15 minutes.
Pull the second decoction, heating and resting it at 163 °F (73 °C) for 15 minutes, before boiling for 15 minutes. Remix the decoction with the main mash. The mash should now be at 163 °F (73 °C). Allow the mash to rest for 15 minutes.
Add the CaraMunich® Type 3 and Carafa® Type 3 malts. Raise the mash temperature to 170 °F (77 °C), and recirculate for 20 minutes.
Sparge slowly and collect 6.5 gallons (24.5 L) of wort. Boil the wort for 90 minutes, adding hops at the times indicated in the recipe.
Chill the wort to 50 °F (10 °C), pitch the yeast, and ferment until complete (which could take up to two weeks). Rack the beer and lager at 32 °F (0 °C) for 13 weeks.
Rack the beer, prime and bottle condition, or keg and force carbonate to 2.4 v/v.


