Australian Brew-in-a-Bag Technique
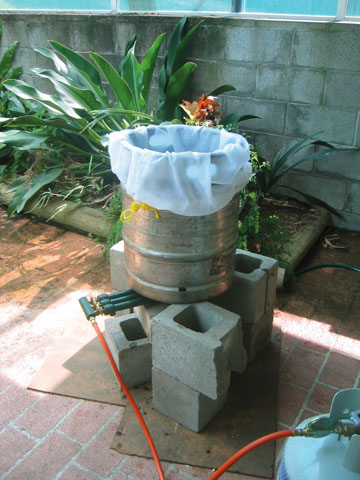
It’s a mash tun . . . and a brew kettle? Using the brew-in-a-bag method of Australian homebrewers, one vessel can serve both purposes. A large bag is draped over the vessel (top left) and the grain is stirred in. The mash rests (top center), then — once the mash is converted — the bag is lifted and the wort is boiled. As an option, the hot wort may be racked to a “cube” and allowed to cool overight. Some brewers even practice no-boil hopping in the cube.
If I try to pick out the one thing from my trip to Melbourne for the Australian National Homebrewing Conference (ANHC) that really stood out for me, it was that good beer was good beer. I judged at their National Homebrew competition, and I wanted to point this out before we delve into three techniques from Downunder, the radical — if not potentially heretical — brewing practices of brew-in-a-bag, no-chill cooling and no-boil hopping. I am not trying to give you the raw prawn, this is the good oil. The Australian brewer likes to make up his own mind, to prove it to himself, and not take someone else’s word for it. The Aussies are great innovators and seem to have the doctrine, “That sounds too complicated, I betcha it would work like this…”
Overview
In a nutshell, the Aussie brew-in-a-bag method consists of lining a 10-gallon (38-L) pot with a nylon or polyester mesh bag, adding enough water to account for grain absorption and the pre-boil volume. The grain is poured into the bag-lined kettle and stirred to start the mash. When the mash is over, the bag is lifted from the wort and allowed to drain. The wort is then boiled with hops as usual.

The no-chill method consists of transferring the boiled wort to a sealed container – hot. The hot wort sanitizes the container, and the wort is allowed to cool overnight.
Equipment
The Bag: The brew in a bag system utilizes a large polyester mesh bag that is as large or larger than the brewpot. The mesh is very fine, like “voil” or “chiffon,” and can be purchased at a fabric store and sewn as a large pillow case.
The bag should be large enough to fold over the rim of the brewpot to allow easy stirring. It also needs to be strong – 10 lbs. (4.5 kg) of dry grain weighs about 20 lbs. (9.1 kg) when wet.
The Pot: The brewpot needs to be large enough to contain all of the water used for the batch. A rule of thumb is that the pot needs to be about twice the batch size. For example, a 5.0-gallon (19-L) batch of 1.054 OG beer would use about 10 lbs. (4.5 kg) of malt at 75% efficiency. The water retention factor is lower than in conventional mashing, due to more drainage, about 0.3 quarts per pound of malt (0.6 L/kg), so about 0.75 gallons (2.8 L) would be retained by the mash. If you wanted to boil 6.5 gallons (25 L) of wort to obtain 5.0 gallons (19 L) in the fermenter, you would need to mash with about 7.25 gallons (27 L) of water, and have a total mash volume of about 8.0 gallons (30 L).
The Cube: The wort storage container (and often fermenter) is a large re-sealable jerry can made from high density polyethylene (HDPE). They are available in Australia from hardware and outdoor stores in 15, 20, and 25 liter sizes for about 15–20 dollars. Here in the US, the typical size is 5.0 gallons (19 L) and one online source is usplastics.com.
The Method
Heat the water in the brewpot to strike temperature. Turn off the heat and place the bag in the pot, draping the top of the bag over the sides. Stir in the grain quickly using a mash paddle to break up clumps and ensure that all the grain is thoroughly wetted. Check the mash temperature and adjust as necessary. If you need to add heat, you must stir the mash continuously to ensure that the temperature rise in the mash is homogenous.
Cover the brewpot with a lid and let the mash rest for at least an hour. This mash is more dilute than most mashes, especially if adjuncts are being used. You can wrap the brewpot with insulation if you wish, but with this much thermal mass, the temperature drop is usually only a couple degrees over the hour.
After an hour, the mash should be raised to mashout temperature, 170 °F (77 °C), for best results. The reported efficiency for this process is 75–80%, with lower gravity beers being more efficient. Stir continuously to prevent the mesh bag from scorching or melting on the bottom during heating.
At the end of the mash, gather the top of the bag together and lift it just out of the water to allow it to drain. The bag can be washed and re-used.
Next, conduct the boil. No recirculation or sparging is necessary with the brew-in-a-bag method. When the boil is complete, you have the choice of using the no-chill method of wort cooling or not. For the no-chill process, whirlpooling is recommended to separate the majority of the hot trub from the wort before racking it to the cube.
When the container is full, gently tip it up and squeeze all the air out. Remember that the wort is boiling hot! Do not over-tighten the lid. The container should be sanitized before you fill it, but it’s a good idea to tip it on its side while hot to further sanitize the lid with heat as it cools.
Australian brewers report that this method saves them an average of two hours from a typical all-grain brewing day, mainly due to the lack of sparging and the reduced cleaning of the single vessel. The sealed wort can be kept for several weeks before fermentation without contamination. The wort should be stored chilled if possible to reduce wort darkening.
But What About…?
The brew-in-a-bag and no-chill concepts seem like they would result in at least three problems: poor conversion due to enzyme dilution, clarity problems due to lack of a vorlauf or recirculation step, and clarity or chill haze problems from the slow cooling. However, the experiences of the brewers whom have tried this method have not shown this to be the case. Dan Walker of Melbourne has noted that several of his brews have tended to over-attenuate to a small degree and he has adjusted his mash temperature upwards to compensate. No Australians have reported any beer clarity problems when using brew-in-a-bag, but beer clarity would need to be compared using the same wort in a controlled experiment to be sure of the results.
Brew-in-a-bag does result in higher wort turbidity (cloudiness) and the retention of all the cold break into the fermentation. But, a review of the technical literature shows that this could be beneficial to fermentation performance and may be beneficial to overall beer quality as well. A fairly recent paper by F. Kuhbeck et. al., sums up the situation well. In their paper “Influence of Lauter Turbidity and Hot Trub on Wort Composition, Fermentation, and Beer Quality,” Journal of the ASBC, 64(1)16-28, 2006, Kuhbeck and his colleagues at the Technical University of Munich at Weihenstephan determined that turbid wort — 5–6 times that of the normal clear-lautered wort (per EBC test) — performed better than clear wort in several respects. The overall result of these investigations was that increased wort turbidity due to higher lauter turbidity and lack of hot trub removal may simplify brewhouse operation (faster lautering process and whirlpool operation), may increase fermentation performance and does not lead to significant deterioration of flavor quality, flavor stability or foam stability. Of course, the degree in turbidity of the brew-in-a-bag wort may exceed the degree of turbidity in the study, so it’s hard to know if their results apply to this situation. Again, head-to-head testing with standard methods would be needed.
The risk of hot side aeration would seem to be another pitfall of these methods, but a recent Brew Strong podcast with Dr. Bamforth addresses that concern too. He agreed during the interview that proteins, melanoidins and other wort compounds can and will be oxidized during the mash and lauter, but his research into oxidation and beer flavor stability has shown him that a healthy fermentation will correct much of what happens upstream in wort production. The primary factors for beer flavor instability are oxygen in the package (bottle) and storage temperature. Again, these statements may seem to go against all of the do’s and don’ts that we as beginning brewers learn, but they do make sense in the larger context. And, as with the issue of turbidity, only head-to-head testing could demonstrate the level of hot-side oxidation in brew-in-a-bag worts and if this oxidation was partially or totally countered by running a healthy fermentation.
Another innovation that is being practiced with no-chill brewing is no-boil hopping. Over the past year, a lot of Australian brewers have been experiencing higher-than-anticipated bitterness in their no-chill beers. They have wondered about the possibility of increased isomerization of late hop additions and “cube additions” due to the near boiling temperatures as the wort gradually cools down. The cube additions can be likened to the effect of putting hops in a hopback, or added to the whirlpool at a commercial brewery, but it differs in that the contact time is much longer. Matt Brynildson, brewmaster for Firestone Walker Brewing Company in Paso Robles, California, estimates that whirlpool hopping contributes about 40% of the bitterness of kettle hopping.
A paper by M. Malowicki and T. Shellhammer in the Journal of the ASBC 64(1):29-32, 2006, gives experimentally derived equations for the alpha acid isomerization rate constants K1 (for isomerization) and K2 (degradation) at near-boiling temperatures. The curves, shown on page 52, suggest that isomerization is substantial at 95–100 °C, but below 70 °C, the isomerization constant K1 has decreased to 1% of its value at 100 °C.
An experiment by Dan Walker indicated that a cube hopped beer had higher bitterness, slightly more hop flavor, and slightly less hop aroma than the same beer made with 60 minute, 10 minute, and flame-out additions targeting the same total IBUs. In fact, all three experimental tasters said they preferred the cube-hopped beer, describing it as more complex and full in its flavors. Other brewers have reported different results and preferences in their own brewing, but the fact remains that cube-hopping contributes bitterness to beer.
Summary
There are many ways to squash a cane toad, and many ways to brew good beer. In fact, many award-winning beers in Australian competitions have been brewed using these methods. The science of brewing is to determine what the process variables are for each process and the consequences of manipulating them. The art of brewing is to decide how to best combine brewing processes to produce the desired beer. This look at some unusual Australian brewing processes is intended illustrate the brewer’s art, not overturn it. I look forward to drinking more good Australian homebrews in the future.


