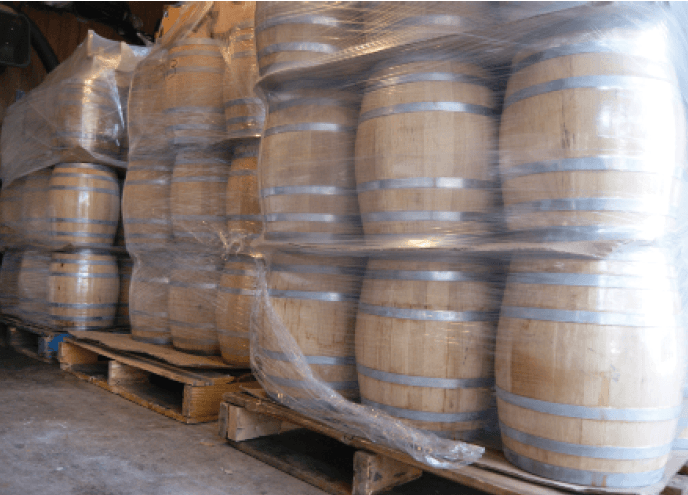
Barrel programs are a capital-intensive investment for breweries and a labor of love, but can be amazingly rewarding when run properly. Photo by Christian Lavender
You’ve just opened up your small brewery. You’re on top of the world, making IPAs for the masses and a delicate Italian Pilsner for your own personal consumption. You’ve mastered the main skill of a brewer, which is cleaning and sanitation. And now you’re ready to throw some of that out of the window and start making some exotic, slow-selling projects aged in oak barrels. Good for you. Get out there and get crazy with it, but here is a brief primer that just might help you make better beer without a multi-year learning curve.
1. Overall mindset
In many ways, making barrel-aged beer is just like making all-steel beer. Your job is to make your vision come to life and that involves most of the same principles. Keep everything as clean as possible. Keep oxygen away from your beer. Monitor it over time. Barrels aren’t some magical unicorn that will take a subpar beer and make it great. Once you put beer into oak barrels, you’re embracing the chaos factor. You’re inviting a higher risk of infection, oxidation, and plain old bad beer, so don’t forget the basics of brewing just because barrels are involved.
2. The fifth ingredient in your beer
Pay as much attention to those barrels as you would to your grist bill or hop varieties and build your recipe so that all the ingredients work in harmony. For example, the tannins in most oak barrels will add astringency and the bitterness from high IBUs can be astringent, which is why you rarely see fresh oak-aged IPAs. Bourbon barrels will come with some inherent sweetness from vanillin, so you can adjust your final gravity accordingly.
Once you put beer into oak barrels, you’re embracing the chaos factor.
As for the actual barrels — a direct connection with a local distillery or winery is optimal. If not, there are great barrel brokers across the country. Just remember that you might not be able to inspect those barrels until they’re at your door. If that’s the case, open them up as soon as they get to you. You have three basic things to inspect.
Aroma
If you ordered some Bourbon barrels and they smell like Bourbon, then Yahtzee! You’re probably good and you’ll end up getting a lovely combination of vanilla, coconut, and charred oak. If that aroma is mild or seems off in some way, maybe you can make changes to your recipe and make up for any shortcomings.
Visual
Look in every barrel with a flashlight. Over the years I’ve inspected thousands of barrels and in that time I’ve found (among other things) a dead frog, a dead snake, and an empty but intact 24 oz. aluminum can. Somewhere out there a cooper must have taken off a barrel head and the can fell in. That person didn’t notice, put the head back on, and then filled it with rum. And for all we know, the ink that leeched off of that can made the best rum ever . . . maybe . . . probably not.
Barrel integrity
Sometimes barrels will show up at your door and your beer isn’t ready yet. Without some work those barrels could dry out, the staves could contract, the hoops fall off, and now you just have firewood and painful hula hoops. The basic goal is this: Maintain structural integrity without leeching out any of the flavor you’re trying to get from that barrel. There are chemical solutions, sulfur sticks (safety note — NEVER burn a sulfur stick in a barrel that most recently held spirits), steaming, and other methods that would require their own article.
For these reasons I usually go with watering externally. As an example, we recently acquired some Scotch barrels that spent extra time on the ocean, so they were drier than expected and the aroma was muted. We did not want to fill those barrels with water for fear of extracting what flavor was left. So we alternated between spraying the barrels on the racks and setting them up vertically so we could fill one of the barrel heads like a little swimming pool. When we finally filled those barrels two months later every barrel held and we didn’t sacrifice anything from flavortown.
3. Filling Barrels
The filling part is the easiest part of the process. The goal is simply to keep oxygen out of there, just like any other vessel. An extended purge is best but at least get a layer of CO2 at the bottom of the barrel. It’s heavier than air, so having that blanket down there and a nice, laminar flow will gently push that blanket up while you fill. Any basic steel tube with a sight glass will do the job nicely. So now you’ve responsibly filled your purged barrels. Congratulations! The next three tips will help with the most common question people ask me — how do you know when it’s ready?
4. Aging something in barrels longer does not necessarily make it better
“The longer you age it, the better it gets.” This is one of those lasting myths. And of course longer aging sounds sexy. But with many spirits and beers I’m looking for big, vibrant, barrel-aged flavors and don’t want oxidation to mitigate that. In general you can extract almost all of the flavor from a Bourbon barrel in 2–3 months. Anything after that can open the door for oxidation, infection, or worse.
This is certainly not the only way to do things — some highly respected breweries have a certain amount of desirable sherry-like oxidation as a goal, while some other breweries manipulate their beers to have an extremely high final gravity in order to meld harmoniously with that longer aging. So there’s no “one right way” to do things when it comes to barrel-aging, but in every case these breweries are making conscious decisions about their processes and every one of those brewers knows that older is not always better.
5. Be aware of your ambient temperature and humidity
Unless you have a climate-controlled warehouse or an underground cave, geography matters. The brewery I work for resides in Colorado, which is technically a desert. So some barrels, even after as little as 4–5 months, can dry out on top and create gaps in the staves. Then oxygen floods in and the off-flavor party starts.
Also remember that oak is porous. Evaporation through that wood is happening at all times and evaporation accelerates in an environment with low humidity and high heat. In a recent project, the best place to put four barrels was right by glass garage doors in the summer. The higher temperatures meant losing an extra five gallons (19 L) from each 53-gallon (200-L) barrel after only three months of aging. We anticipated this and pulled the beer out before the barrels could dry out and anything could oxidize. While more climate control could be an option, I’ve made a conscious decision to alter the amount of time in barrels based on the natural environment. It takes a little more care and monitoring, but also could be considered a sort of “terroir.”
6. How do I really know when to take the beer out?
First, monitor those barrels. Frequent tasting isn’t only useful, it’s also much more fun than scrubbing floors. Enjoy it. For sampling, some brewers use a wine thief to extract samples from the top of the barrel. Most use what’s become known as the “Vinnie Nail,” an homage to Vinnie Cilurzo of Russian River Brewing in Santa Rosa, California. As one of the OGs of barrel aging in the U.S., he graciously shared some of his methods with the industry. In this case, you drill a hole into the head of the barrel and put a stainless steel nail into the hole. This makes it simple to pull that nail and take samples whenever you want.
One obstacle is that barrel-aged beer is warm and flat and sometimes it’s useful to try it cold and carbonated so you can be confident that the project is finished. For this, keep a handful of CarbaCaps around. That’s a $15 plastic cap that you can attach to most soda bottles. Then you attach a ball-lock connector to your CO2 supply and you can carbonate a cold sample in less than a minute. This also makes it easy to do different blends of barrels and try them next to each other in essentially “finished” form.
After all of that, keep it simple — you know when to take it out when it tastes great to you. One of the common mistakes is to taste a barrel, think it’s great, and then decide to wait another few months to see if it might get even better. Don’t wait for that beer to maybe get five percent better. In my experience there’s a better chance of something going wrong than improving. Even your 12% ABV, non-sour, barrel-aged beer is susceptible to infection, to oxidation, or to some random customer deciding they want to look in the barrel. Get excited, get it out of that barrel, get it on tap, and get it into your customers’ flavor holes. Unless, of course, something tastes . . . off.
7. Don’t be afraid to dump barrels
We’re into the chaos now. You put beer in barrels. You’re having fun, but you’re also the most critical person tasting your beer. But it can be easy to start making excuses. It’s not that bad, you spent time on it, you spent money on it, you’re emotionally invested in this project . . . we all know how it goes. So remember — just like every good all-steel brewer dumps beer sometimes, same thing with every good barrel-aging brewer. So what is the best way to put those emotions aside and evaluate your beer as honestly as possible? Sensory training.
Even if you’ve done some sensory training for all-steel beers and you’re acquainted with basics like diacetyl, acetaldehyde, trans-2 nonenal, and hydrogen sulfide, there’s more to learn. The barrel aging world has its own compounds that deserve attention. Oxidation can appear as a delightful Port aroma or an astringent ashtray. Non-sour barrels can become infected, leading to an array of diacetyl (butter), acetic acid (vinegar), ethyl acetate (paint thinner), and so forth. With these descriptive terms it seems like we’d all recognize them immediately, but that’s not always the case. I’ve bought more than a few barrel-aged beers, labeled as either sour or non-sour, that are basically undrinkable ethyl acetate.
A little training goes a long way towards making great beer. Everyone’s palate is different, we can all taste different things, and it can take some work to analyze your own strengths and weaknesses. Through training, I know that I’m almost completely blind to a compound called butyric acid. It tastes like baby vomit and even at six times the normal human threshold I can’t detect it. I’ve been in a training room where my fellow tasters were gagging from the aroma and it tasted like the control sample to me. That’s great knowledge. I know that I should never release a sour beer with myself as the only taster and that has helped me be confident in releasing every project I’ve been a part of.
The timing of this piece was great since this week we were set to empty four barrels of a doppelbock in rye barrels. As of a month ago all four barrels tasted great. In trying them all again right before debarreling one had developed some medium level ethyl acetate (paint thinner). We did some quick blends, and while blending that fourth barrel in only made a minor difference in flavor and aroma, I made the call to dump it.
Why? Because I almost never see ethyl acetate problems in non-sour barrels. It’s almost always sour beer. Ethyl acetate is created when acetic acid and ethanol mix. And the presence of acetic acid means that Acetobacter, which is everywhere, was given a chance to flourish. Acetobacter just needs oxygen and ethanol to start making acetic acid.
So why did this happen? Most likely because we ran out of doppelbock during the filling of this barrel and ended up adding 15-ish gallons (57 L) of a Baltic porter we had around. The extra time and shenanigans involved likely means that extra oxygen went into this barrel. That oxygen triggered the Acetobacter, which progressed to ethyl acetate.
While I can only make a logical guess to all of that, the conclusion is that the barrel was infected and blending it with the other three barrels might have meant infecting the whole batch. Maybe keeping the blended beer chilled and carbonated would have mitigated the acetic/ethyl acetate production, but I don’t want to take that risk. So this hits on several of the tips in the article: Keep oxygen out, monitor flavors, sensory training, and don’t be afraid to dump barrels.
8. Equipment for emptying barrels
For extracting beer from the barrels you’re looking for a piece of equipment that works just like a portable keg spear. It goes into the bunghole of the barrel, seals it with a rubber or silicone stopper, then pushes CO2 in through the top and extracts the beer from the bottom. I’ve used two main versions of this equipment and each can work well for different operations.
The most common no-frills option is best known as the Bulldog, though there are similar options on the market. A Bulldog racking cane has a steel tube, sealing mechanism, CO2 port, sight glass, and a valve. If the goal is just to empty a handful of barrels occasionally, this will do everything you need. The one caveat is a potential safety issue. You’re putting CO2 into a vessel that does not have a pressure gauge or a pressure relief valve, so you don’t truly know what’s happening in there. It is possible to overpressurize a barrel and the head can shoot off. This is a very rare situation and at a small operation you’ll be monitoring the operation at all times. But if something goes wrong it would be catastrophic.
If you’re planning on expanding your program, the Rack-it-Teer is worth the extra funds. It has a more flexible sealing mechanism, a small cup at the bottom to help prevent charred oak from getting into the tank, a pressure gauge, and a pressure relief valve. Your beer yield might go up slightly, but the safety aspect is critical if you’re running a larger operation and need to multitask at all times.
And one small addition that can save a lot of trouble . . . many years ago I was debarreling around 50 Bourbon barrels into a conical tank and after around 20 barrels things just stopped moving. I took the debarreling rig apart and checked every valve. Then I checked the tank. Turns out that I had vastly underestimated the amount of charred oak in that barrel, and the conical tank was plugged with chunks of oak. Not just little floating bits, chunks of oak. Enough that liquid wouldn’t go through.
So it’s common practice to put something inline to filter out that charred oak. A large operation can repurpose a hopback, but for smaller operations all you need is an inexpensive “sock screen gasket.” It’s a tube of stainless steel mesh attached to a rubber gasket, and will fit perfectly into the sight glass on a Bulldog or Rack-it-Teer. If you’re worried about overloading it, put valves on both sides for easy removal and cleaning.
9. How many times can you use a barrel?
As a general rule, for a vast majority of spirits/wine barrels, you have one shot to get the delicious impact of that previous beverage. Whenever I’ve tried to age something a second time I might get a hint of that spirit, but I’m hesitant to call that second round a “Bourbon Barrel-Aged Beer.” If I can only taste a hint of those flavors that would seem like false advertising to me. If you’re intent on reusing those barrels, just make sure you’re accurately describing the eventual beer when you put it up for sale. As an example of this, years ago Goose Island Brewery made a beer called King Henry. They said right on the label that it was a barleywine aged in barrels that previously held Bourbon County Stout.
Great beer and they advertised it truthfully. I knew going in that it would have hints of vanilla and coconut and charred oak without being major players in the flavor party. The one exception I’ve found to this rule is smoky Scotch barrels . . . that polarizing flavor can be used two or three times. They’re the gift that keeps on giving. And yes, you can repurpose these barrels to house sour beer, but that’s a tale for another day.
Solera aging requires multiple barrels, with the ones on the bottom being drawn off occasionally and then topped up with beer from the barre
This website uses cookies to improve your experience. You can opt-out if you wish.AcceptRejectRead More
Privacy & Cookies Policy
Privacy Overview
This website uses cookies to improve your experience while you navigate through the website. Out of these, the cookies that are categorized as necessary are stored on your browser as they are essential for the working of basic functionalities of the website. We also use third-party cookies that help us analyze and understand how you use this website. These cookies will be stored in your browser only with your consent. You also have the option to opt-out of these cookies. But opting out of some of these cookies may affect your browsing experience.
Necessary cookies are absolutely essential for the website to function properly. This category only includes cookies that ensures basic functionalities and security features of the website. These cookies do not store any personal information.
Any cookies that may not be particularly necessary for the website to function and is used specifically to collect user personal data via analytics, ads, other embedded contents are termed as non-necessary cookies. It is mandatory to procure user consent prior to running these cookies on your website.